
A basic adjustment of the ignition timing is only necessary if the ignition distributor has been removed or the toothed belt has been replaced. A tachometer and a stroboscope are required for verification.
Examination
1. Warm up the engine to the operating temperature of the coolant and drive the car for another 5 km to reach an engine oil temperature of at least 80 degrees.
2. With the appropriate configuration, turn off the A/C.
3. Turn off the ignition.
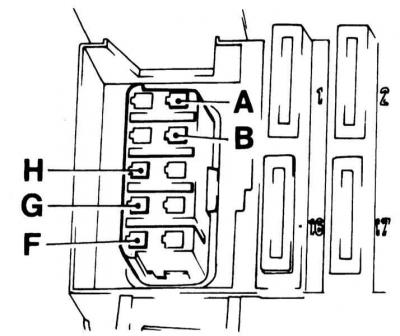
4. In the MULTEC diagnostic socket, short-circuit terminals A and B.
Diagnostic socket terminals
5. Install the tachometer and strobe according to their operating instructions. The tachometer is usually connected to terminals 1 and 15 of the ignition coil. The connector must remain connected.
Strobe connection diagram
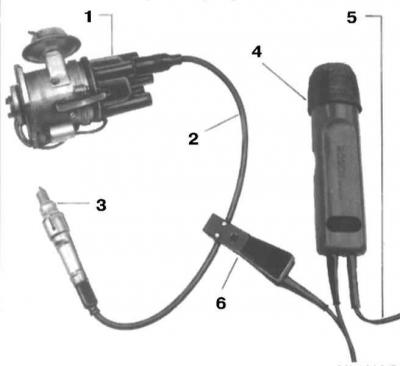
1 — Cover of the distributor of ignition
2 - BB wire of cylinder 1
3 - Cylinder 1 spark plug
4 - Stroboscope
5 - To the battery
6 - Capacitive strobe terminal
6. Start the engine and let it idle.
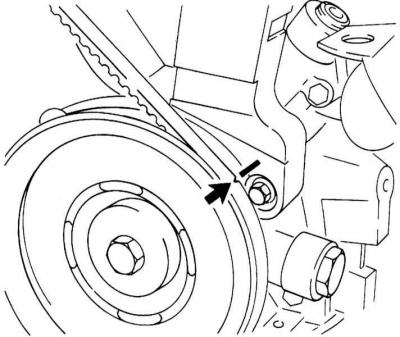
7. Light up the crankshaft pulley with a strobe light.
Stay away from moving parts of the power unit to avoid personal injury.
The ignition timing is set correctly if the mark on the pulley in relation to the mark on the bottom cover of the toothed belt seems to be stationary. In this case, the ignition timing corresponds to 10 deg. to TDC The number of revolutions of the crankshaft when checking should be 700 ÷ 1000 rpm.
Tags for checking the ignition timing
If the marks for setting the ignition timing do not match, it is necessary to adjust it.
Adjustment
1. Loosen the fastener of the clamping bar and turn the ignition distributor slightly with the engine running so that the specified value is reached. There is no vacuum box on the Corsa model.
Turning the ignition distributor
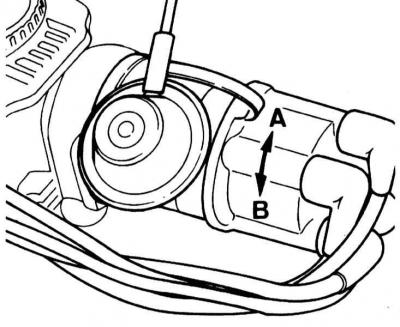
A - Early ignition
B - Late ignition
2. Tighten the clamping bar fasteners.
3. Temporarily increase the number of revolutions of the crankshaft to 2000 rpm, if necessary, repeat the adjustment.
4. Stop the engine.
5. Remove the jumper from the diagnostic socket.
Visitor comments