
OpelBook.ru
Cars AvtoVAZ Cars Mitsubishi Cars BMW Cars Mercedes Cars Nissan Cars Toyota Cars Chevrolet
English Русский
Български
Беларускі
Український
Српски
Hrvatski
Română
Polski
Slovenský
Magyar
 |  Sitemap  |  Contacts  |    


Main Astra Corsa Insignia Kadett Omega Vectra Zafira Others Articles
Astra F (1991-1998, petrol) Astra G (1998-2004, petrol) Astra G (1998-2004) Astra H (2004-2009) Astra J (2009-2015, petrol)
  • Main
  • Astra
  • Astra G
  • Electrical equipment
  • Equipment and devices
  • Adjusting the direction of the optical axes of the headlights

Adjusting the direction of the optical axes of the headlights (Opel Astra G)

            0

Headlights


Failure to adjust the direction of the optical axes of the headlights may result in blinding drivers of vehicles moving in parallel and may cause an emergency situation on the road. Checking the correct adjustment of the headlights should be done regularly once every 2 years, as well as every time after replacing the headlights and repairing the supporting elements of the front of the vehicle.


Readers should pay attention to the fact that the procedure described below can be considered only a preventive adjustment. The final adjustment of the optical axes should be performed in a specialized car service workshop!


Location of screws for adjusting the direction of the optical axes of the headlights
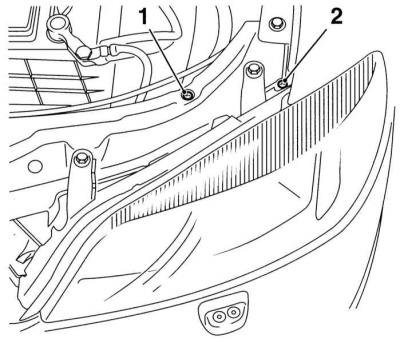
1 — Screw for adjusting the headlight position in the horizontal plane

1 — Screw for adjusting the headlight position in the horizontal plane

2 — Screw for adjusting the headlight position in the vertical plane


Scheme of adjustment of direction of optical axis of headlights
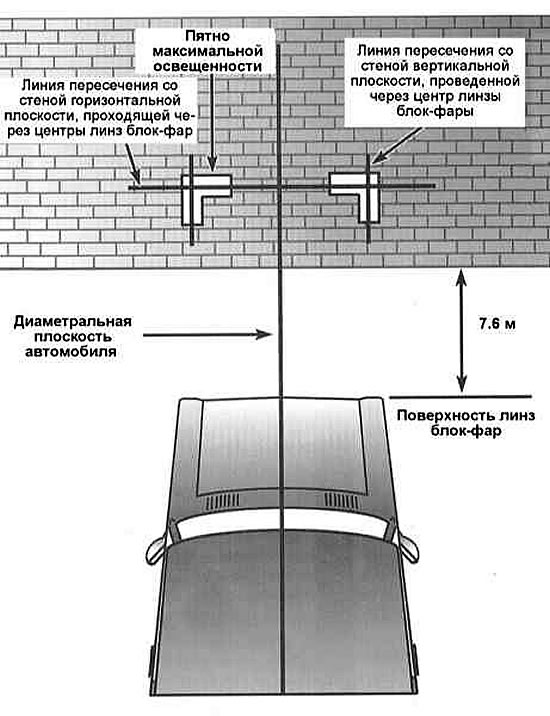
Scheme of adjustment of direction of optical axis of headlights


Each of the headlight units is equipped with two spring-loaded adjustment screws: an internal and an external one. Access to both screws is opened from the rear side of the lamp assembly after preliminary removal of the rubber plugs (see illustration Location of screws for adjusting the direction of the optical axes of the headlights). In addition, the standard equipment of all models includes an electric headlight range control with a control switch located on the instrument panel (see Chapter User manual and Specifications).


In addition to the adjusting screws, the models in question are equipped with headlamp level gauges, which greatly facilitate the procedure for adjusting the direction of the optical axes. If a satisfactory result cannot be achieved by turning the adjusting screws (see below), then there is mechanical deformation of the front body panels of the car.

1. Roll the front of the car to the wall. Stick a strip of tape on the wall along a vertical line running in the diametrical plane of the car. Also stick vertical strips of tape along the lines running through the centers of the projections of the headlight lenses on the wall (see illustration Scheme of adjustment of direction of optical axis of headlights).

2. Stick a horizontal strip of tape onto the wall along a line drawn through the centers of the headlight lens projections onto the wall surface.

This procedure is easier to perform by driving the car close to the wall.


4. To adjust the direction of the optical axes of the headlights, roll the car away from the wall to a distance of approximately 7.6 m.

The area on which the car is placed must have a flat horizontal surface, preferably with a hard surface. The car's fuel tank must be half full, all heavy objects that disrupt the car's centering must be removed from the passenger compartment and luggage compartment.


5. Start by adjusting the direction of the low beam optical axis. Try to achieve such a position of the light spots by turning the adjustment screws of the headlights that the zones with maximum illumination intensity are approximately 50 mm below the horizontal line and the same amount to the right of the vertical line.
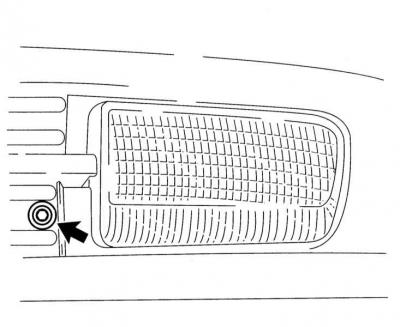


5. Start by adjusting the direction of the low beam optical axis. Try to achieve such a position of…


6. After completing the first adjustment, turn on the high beam: the zones of maximum illumination intensity should shift in the direction of the intersection of the vertical lines with the horizontal, ending up slightly below the latter.

It is not possible in practice to obtain the same complete centering of both low and high beams. It is necessary to try to achieve some compromise solution taking into account the specifics of vehicle operation, keeping the desire to ensure maximum traffic safety at the forefront.


Material copied from the portal OPELBOOK

At the earliest opportunity, take the vehicle to a service station to have the headlights' optical axis adjusted using special equipment.


This article is available at russian, bulgarian, belarusian, ukrainian, serbian, croatian, romanian, polish, slovak, hungarian
Checking the article: Pavlovsky Nikolay

Share information:

Previous articles
Opel Astra G: Equipment and devices
Next articles

Removal and installation of external lighting/signaling devices
Replacement of interior lighting fixtures
Replacement of lamps for external lighting and signaling devices
Removal and installation switches
Relay — general information and checking the correct functioning
Fuses — General Information
Removal and installation the instrument cluster
Removal and installation instrument panel components
Removal and installation the cigarette lighter
Removal and installation horn horns
Removal and installation the wiper arms (leashes)
Removal and installation windshield wiper drive components


See similar ones from other Opel car manuals:
▶ Checking and adjusting headlights, exterior lighting,… Opel Corsa C (2000-2006, petrol)
▶ Front direction indicators Opel Insignia A (2008-2017)
▶ Adjusting clearances in the valve drive mechanism Opel Kadett E (1984-1995)
▶ Adjusting the vehicle's landing level Opel Omega A (1986-1993)
▶ Adjusting the rear view mirrors Opel Vectra A (1988-1995, petrol)
Link to this page in different formats

Visitor comments


No comments yet


How much will 48 + 31 =


Astra J (2009-2015, petrol) 
  • General information
  • Vehicle device
  • User manual
  • Faults en route
  • Maintenance
  • Power unit
  • Engine repair
  • Cooling and lubrication system
  • Engine power system
  • Exhaust system
  • Transmission
  • Clutch
  • Car gearbox
  • Drive shafts
  • Chassis
  • Front suspension
  • Rear suspension
  • Steering
  • Brake system
  • Wheels and tires
  • Body
  • Exterior
  • Interior
  • Doors and windows
  • Body Care
  • Heating and air conditioning
  • Security systems
  • Electrical equipment
  • Equipment and devices
  • Lighting and signaling
  • Power devices
  • Electrical circuits
Astra H (2004-2009) 
  • General information
  • Introduction to the guide
  • Troubleshooting
  • User manual
  • Maintenance
  • Power unit
  • Engine repair
  • Cooling and heating
  • Power and exhaust system
  • Ignition system
  • Launch and charge system
  • Transmission
  • Mechanical gearbox
  • Automatic gearbox
  • Drive shafts
  • Chassis
  • Brake system
  • Car suspension
  • Steering
  • Body
  • Interior
  • Exterior
  • Electrical equipment
  • Equipment and devices
  • Electrical circuits
Astra G (1998-2004) 
  • General information
  • Introduction to manual
  • User manual
  • Maintenance
  • Power unit
  • SOHC gasoline engines
  • DOHC gasoline engines
  • Diesel engines 1.7 and 2.0
  • Engine repair
  • Cooling system
  • Supply system
  • Injection system (gasoline)
  • Injection system (diesel)
  • Exhaust system
  • Charge and launch system
  • Ignition system (gasoline)
  • Preheat system (diesel)
  • Transmission
  • Manual gearbox
  • Automatic gearbox
  • Clutch
  • Drive shafts
  • Chassis
  • Brake system
  • Wheel suspension
  • Steering
  • Body
  • Exterior
  • Interior
  • Doors and windows
  • Ventilation and heating
  • Electrical equipment
  • Equipment and devices
  • Electrical circuits
Astra G (1998-2004, petrol) 
  • General information
  • User manual
  • Car care
  • Maintenance
  • Power unit
  • Single shaft engines
  • Twin shaft engines
  • Engine repair
  • Cooling and heating
  • Fuel and exhaust systems
  • Starting and charging system
  • Ignition system
  • Transmission
  • Clutch
  • Mechanical gearbox
  • Automatic gearbox
  • Drive shafts
  • Chassis
  • Brake system
  • Car suspension
  • Steering
  • Body
  • Interior
  • Exterior
  • Electrical equipment
  • Equipment and devices
  • Wiring diagrams Opel Astra
  • Wiring diagrams Opel Zafira
Astra F (1991-1998, petrol) 
  • General information
  • Maintenance
  • Power unit
  • Engine in car
  • Engine removed
  • Cooling system
  • Heating and ventilation
  • Fuel supply (carburetor)
  • Fuel supply (injector)
  • Emission control
  • Ignition system
  • Transmission
  • Clutch
  • Mechanical gearbox
  • Automatic gearbox
  • Drive shafts
  • Chassis
  • Brake system
  • Car suspension
  • Steering
  • Body
  • Exterior
  • Interior
  • Electrical equipment
  • Equipment and devices
  • Electrical circuits
OpelBook.ru © 2017–2026 · Mobile version · · Sitemap: EN BG BY UA RS HR RO PL SK HU · Feedback · Site search
Astra F, petrol · Astra G, petrol · Astra G · Astra H · Astra J, petrol · Corsa B · Corsa C, petrol · Corsa C · Insignia A · Kadett D · Kadett E · Omega A · Omega B · Omega B2 · Vectra A, petrol · Vectra A · Vectra B, petrol · Vectra B · Vectra C · Zafira A, petrol · Frontera A, petrol · Frontera B · Ascona C · Vivaro A ·
We want your visit to be comfortable 🤝! We use cookies 🍪 to make that happen.