
- Remember that the bulbs of the lamps remain hot for about 20 minutes after switching off the lighting fixtures. Before starting work, make sure that the components have completely cooled down;
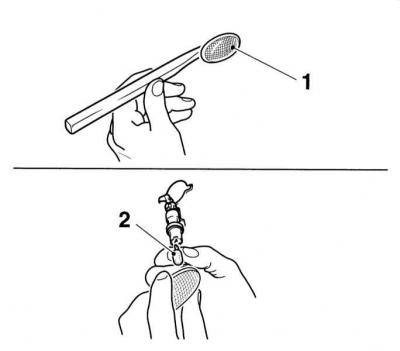
- The bulbs of halogen and xenon type lamps are filled with pressurized gas and may explode if shaken violently. Try to take such lamps only by the base and use safety glasses. Remember that when touching the bulb with bare fingers, grease stains remain on the glass, which leads to premature failure of the lamp as a result of overheating. Before installation, wipe the lamp bulb with alcohol;
- Always check the condition of the lamp bases and cartridge contacts, before installing the lamp, be sure to clean the contact surfaces, completely removing dirt and corrosion from them;
- Make sure that the replacement lamp exactly matches the failed lamp in terms of its electrical characteristics (supply voltage and power).
Dipped headlights
Halogen headlights
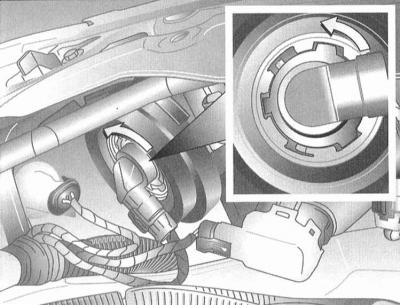
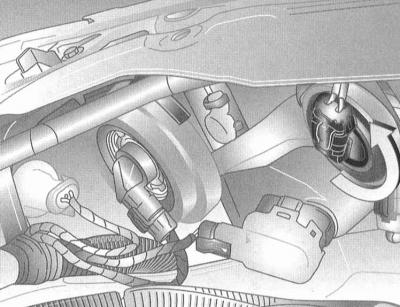
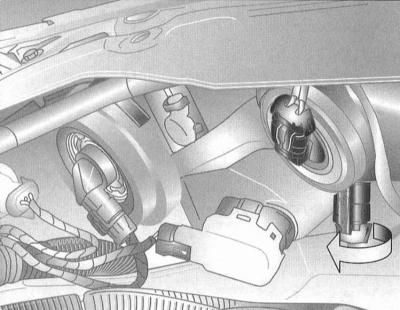
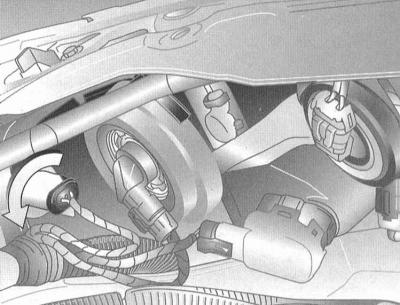
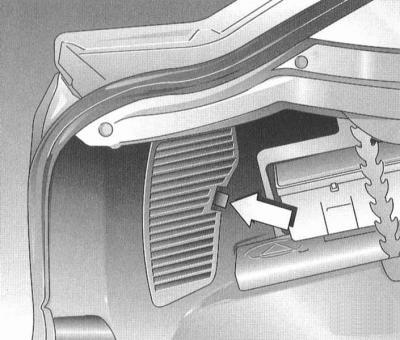
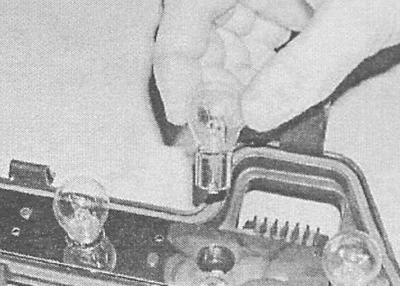
1. Open the hood, loosen the fasteners, and turn the brown socket mounted on the back of the outer headlight assembly of the front lamp assembly counterclockwise.
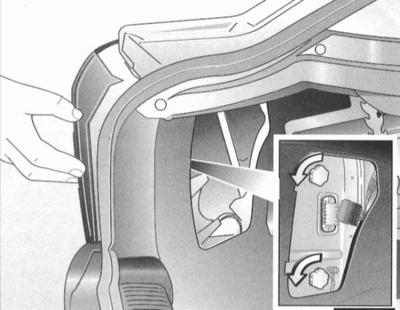
A - To remove the bulb holder from the headlight, turn it counterclockwise
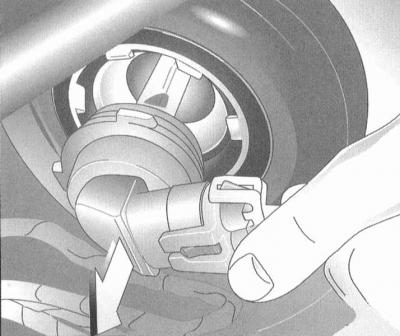
B - Removing the cartridge from the headlight assembly
A.
B.
The dipped beam headlamp is the outer one of the two front lamps installed in the assembly. The interior headlamp is the main beam headlamp.
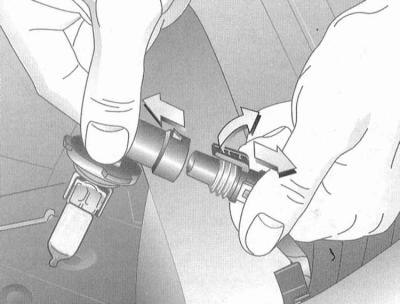
2. Remove it from the cartridge, grasping the metal base with your fingers - try to remember the position of the lamp in the cartridge. Try not to touch the lamp bulb with bare fingers - use a napkin (see above).
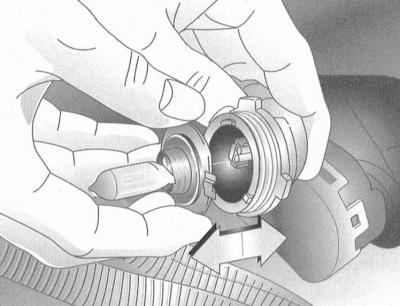
3. Installation is carried out in the reverse order. Make sure that the pins of the base are properly seated in the cutouts of the cartridge.
Xenon type headlights
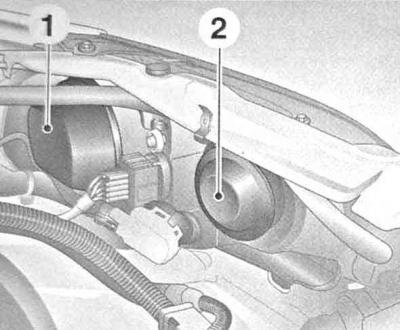
1. The low beam headlamp is external (1) of the two front lights installed in the assembly. Internal block headlight (2) is a high beam headlight.
2. A protective cover is installed on the back of the headlight. Xenon-type dipped beam headlights operate at a very high supply voltage!
3. For safety reasons, the compilers of this Guide recommend entrusting the replacement of dipped beam lamps to car service specialists.
High beam headlights
Halogen headlights
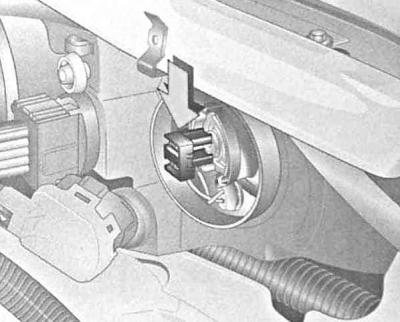
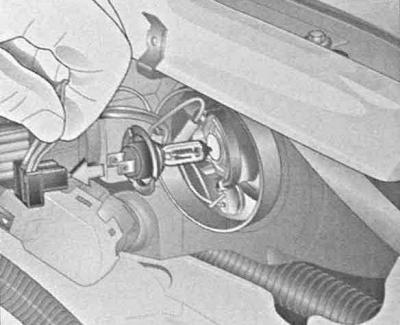
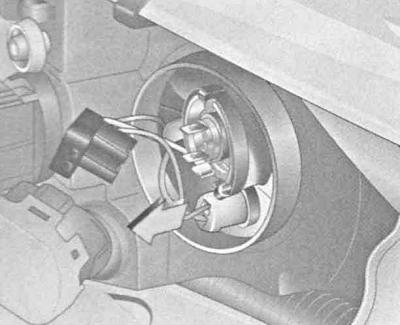
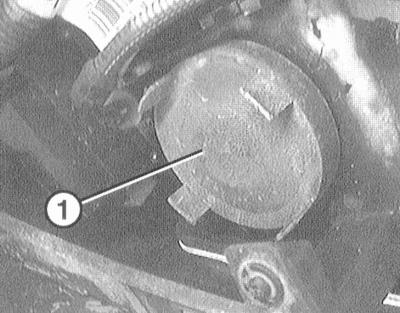
1. Open the hood, loosen the fasteners and turn the black cartridge mounted on the back of the inner headlight assembly of the front lamp assembly counterclockwise.
The high beam headlamp is the inner of the two front lamps installed in the assembly. The outdoor unit headlight is a low beam headlight.
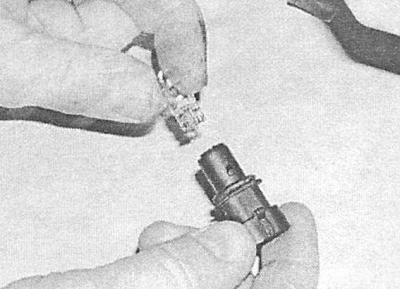
2. Release the latch and disconnect the electrical wiring from the lamp socket. The lamp is built into the cartridge and is replaced as an assembly with it, - try not to touch the lamp bulb with bare fingers, - use a napkin (see above).
3. Installation is carried out in the reverse order. To fix the cartridge in the headlight, turn the cartridge clockwise as far as it will go.
Xenon type headlights
1. Open the hood.
2. Remove the protective cover from the inner headlight assembly.

3. Press the cartridge down and remove it together with the lamp from the headlight reflector.
4. Remove the plug from the bayonet contacts on the lamp base by pulling.
5. Installation is carried out in the reverse order. Try not to touch the lamp bulb with bare fingers - use a napkin (see above).
Front parking lights
Halogen headlights
1. Open the hood. Front parking light bulb at the bottom of the headlamp high beam. To remove the cartridge, turn it counterclockwise.
2. Pull outward to remove the bulb from the socket.
3. Installation is carried out in the reverse order.
Xenon type headlights
1. Open the hood. Front parking light bulb at the bottom of the headlamp high beam. To ensure adequate access, remove the socket from the high beam bulb.
2. Pull the parking light bulb socket outward and remove the parking light assembly from its seat in the reflector.
3. Pull outward to remove the bulb from the socket.

4. Installation is carried out in the reverse order.
Front direction indicators
Halogen headlights
1. Open the hood, turn the white cartridge in the side section of the light assembly counterclockwise.
2. The direction indicators use bayonet-type lamps - sink the lamp into the cartridge and, turning, remove it.
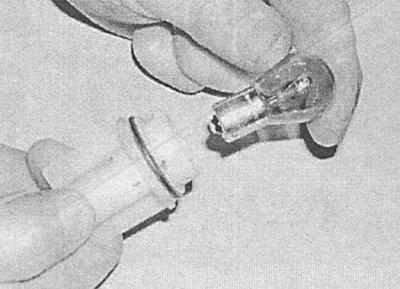
3. Install the new bulb in reverse order.
Xenon type headlights
In xenon-type lamp assemblies, the direction indicator is built into the lamp assembly and is equipped with a maintenance-free incandescent lamp. In the event of a lamp failure, the compilers of this Guide recommend contacting a car service specialist.
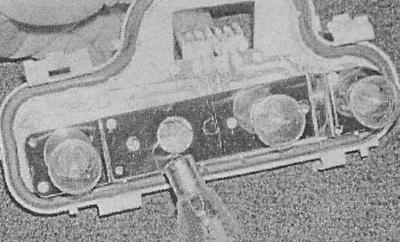
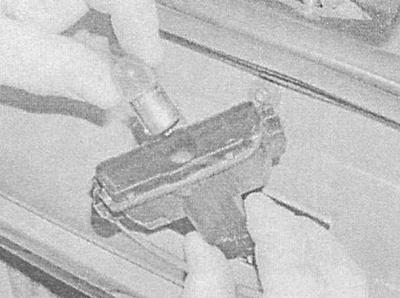
Fog lights
1. Remove the front bumper (see chapter Body).
2. Rotate and remove the crown cap at the rear of the light assembly.
3. Wring out clamps and disconnect a contact socket of an electroconducting of a fog lamp.
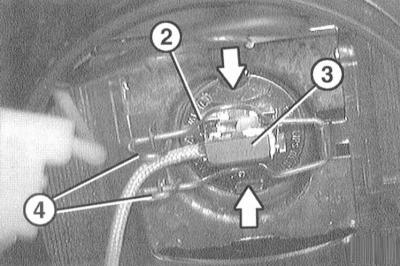
2 — Spring wire clamp
3 - Pin connector (cartridge) lamps
4 — Hooks of a clamp
4. Release the spring clips and remove the lamp from the lamp assembly - try to remember the installation position of the lamp in the reflector.
Replacement lamps are supplied complete with power supply wiring.
5. Installation is carried out in the reverse order.
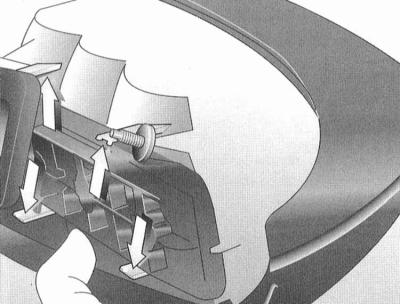
Turn signal repeaters
1. From the outside of the fuse wing, slide the repeater lens (1) back and release its front part from the retainer - if necessary, pry the lens with a suitable tool.
2. Turn to release the lamp socket from the lens, then pull to remove the socketless lamp (2) from the cartridge.
3. Installation is carried out in the reverse order. First, fill the front edge of the lens into the hole in the wing, then, pressing it, snap the rear one into place.
Rear combination lamps
Hatchback Models
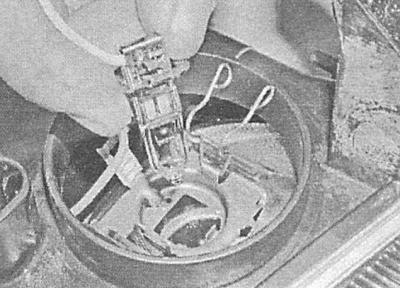
1. In the luggage compartment, release the latches and remove the access cover to the rear combination lamp unit.
2. Disunite a contact socket of an electroconducting.
3. While supporting the rear light from the outside, remove the two thumbscrews from the inside.
4. Remove the lamp assembly from the body opening.
5. Squeeze the latches and remove the lamp holder from the lamp.
6. The rear lights use bayonet type bulbs. Push the bulb to be replaced into the holder, turn it counterclockwise and remove it from the socket.
7. Installation is carried out in the reverse order.
Station wagon and Zafira models
1. In the luggage compartment, release the latches and remove the access cover to the rear combination lamp unit.
2. While holding the flashlight from the outside, loosen the two thumbscrews from the inside (shown by arrows).
3. Remove the lamp.
4. Press the clamps and remove the lamp holder from the lamp.
5. The rear lights use bayonet type bulbs. Push the bulb to be replaced into the holder, turn it counterclockwise and remove it from the socket.
6. Installation is carried out in the reverse order.
License plate light
Models Sedan and Hatchback
1. In order to provide adequate access, open the tailgate/trunk lid, - the license plate light is located at the top of the rear bumper.
2. Inserting a suitable screwdriver into the special slot under the lens of the lamp, release the internal lock of the lamp assembly.
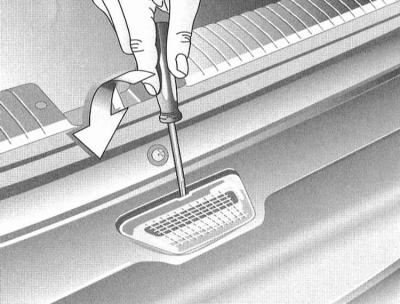
3. Press down the right edge of the lens, lift the left one and release the lamp assembly from the bumper.
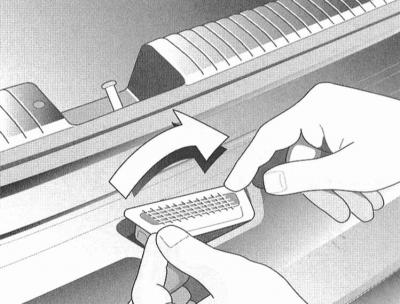
4. Squeeze the tabs and remove the lamp lens.
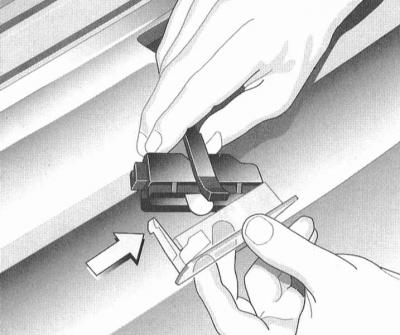
5. Press and twist to remove the bayonet lamp from the lamp holder.
6. Installation is carried out in the reverse order.
Station wagon and Zafira models
1. Open the tailgate and lock it in the up position.
2. Turn out fixing screws and remove corresponding from two lantern assemblies.
3. Remove the scalloped lamp from the spring terminals.
4. Installation is carried out in the reverse order. Follow the reliability of fixing the lamp with spring contacts.
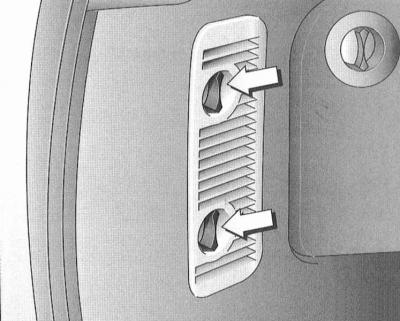
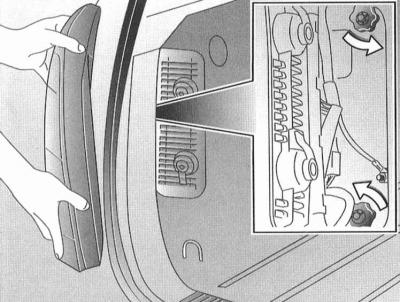
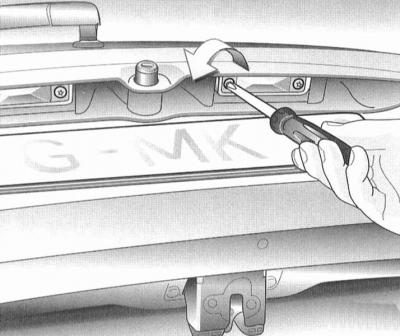
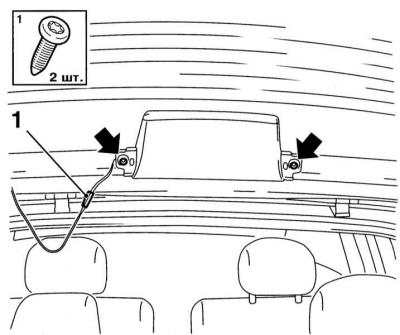
Upper level stop signal
1. Open the tailgate, remove the plugs, unscrew the mounting screws and remove the lower and upper sections of the inner door upholstery - note that the lower upholstery panel is equipped with protrusions that engage with the top panel grooves.
2. Turn out two fixing screws / release clamps, remove assemblage of a stoplight of the top level and disconnect from it electroconducting.
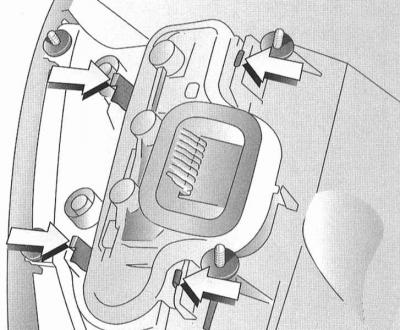
A - Top level brake light mounting screws (Hatchback and Sedan models)
B - Upper level brake light mounting diagram on Wagon and Zafira models
A.
B.
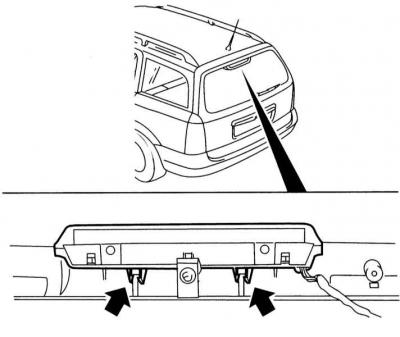
3. The brake light is made non-separable and in case of failure it is completely replaced.
4. Installation is carried out in the reverse order.
Visitor comments