
OpelBook.ru
Cars AvtoVAZ Cars Mitsubishi Cars BMW Cars Mercedes Cars Nissan Cars Toyota Cars Chevrolet
English Русский
Български
Беларускі
Український
Српски
Hrvatski
Română
Polski
Slovenský
Magyar
 |  Sitemap  |  Contacts  |    


Main Astra Corsa Insignia Kadett Omega Vectra Zafira Others Articles
Frontera A (1991-1998, petrol) Frontera B (1998-2004) Ascona C (1981-1988) Vivaro A (2001-2014)
  • Main
  • Opel
  • Ascona C
  • Electrical equipment
  • Power devices
  • Battery — Checking and Maintenance

Battery — Checking and Maintenance (Opel Ascona C)

            0

1. A routine weekly battery check consists of measuring the electrolyte level in each cell and ensuring that the separator plates are covered with a 5 mm layer of electrolyte. If the electrolyte level is low, top up the battery using distilled water only.

Do not pour more than necessary. If the battery is overfilled or if any electrolyte is spilled, wipe up the spill immediately, as the electrolyte, which is dilute sulfuric acid, will immediately react and corrode most metals.

2. It is necessary to keep the battery contacts clean and lightly lubricated with Vaseline, and the entire top of the battery should be dry and clean. This helps prevent corrosion and also ensures that the battery does not become partially discharged due to leakage from moisture and dirt.

3. Every three months, remove the battery and check the condition of its tray, clamps and contacts for corrosion. It appears as a white, rough deposit, and if you find it, wash it off with water with a little ammonia or baking soda added. Treat the battery contacts with Vaseline and cover the metal surfaces with a special paint to prevent corrosion.

4. If you have to top up your battery frequently and there is no sign of a leak, the battery is probably overcharged and needs to be checked by an auto electrician. An older battery may require more frequent topping up than a new one because it accepts more charge. There is no need to worry about this as long as it is working properly.

5. With the battery removed during the three-month check, measure the specific gravity of the electrolyte using a hydrometer to determine the state of charge and electrolyte. There should not be significant deviations in measurements between individual cells, and if deviations exceed 0.025, this may be due to the following reasons:


  • a) Loss of electrolyte from a battery caused by spillage or leakage, resulting in a drop in the specific gravity of the electrolyte when its deficiency was compensated for by distilled water instead of a portion of fresh electrolyte,
  • b) Internal short circuit caused by plates touching or something similar, which may indicate the possibility of complete battery failure in the near future.

6. The specific gravity of the electrolyte for a fully charged and fully discharged battery at different temperature values is given below:
Completely dischargedElectrolyte temperatureFully charged
1.09838 C1.268
1.10232 C1.272
1.10627 C1.276
1.11021 C1.280
1.11416 C1.284
1.11810 C1.288
1.1224 C1.292
1.126-1.5 C1.296

7. Most models are equipped with batteries that do not require constant topping up of electrolyte. With such a battery, there is no need to constantly top up the electrolyte, but you need to monitor the condition of the contacts and the tray and keep them clean, as described above. (see photo 3.7).
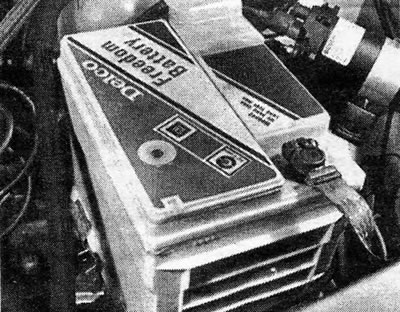
Photo 3.7 Battery that does not require topping up with electrolyte

Photo 3.7 Battery that does not require topping up with electrolyte


Material copied from this resource: OPELBOOK.ru


8. The meaning of the battery status indicator located on the top of the battery can be recognized by referring to Figure 12.1.
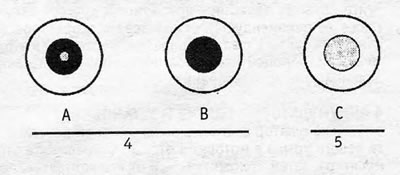
Figure 12.1. Battery status indicator installed on batteries that do not require electrolyte…
Figure 12.1. Battery status indicator installed on batteries that do not require electrolyte topping up: A - 1 darkened indicator WITH GREEN DOT; B - 2 darkened indicator WITHOUT GREEN DOT; B - 3 light or light yellow indicator WITHOUT GREEN DOT; 4 - can be pushed started; 5 - can't be pushed started


9. If the indicator is yellow without a green dot, do not try to start the car using another battery and "crocodiles"; it is also not recommended to use a fast charger. Consult your dealer, as in this case there is almost a 100% chance that your battery is not suitable for further use.


This article is available at russian, bulgarian, belarusian, ukrainian, serbian, croatian, romanian, polish, slovak, hungarian
Checking the article: Kornev Georgy

Share information:

Previous articles
Opel Ascona C: Power devices
Next articles

Battery — Removal and Installation
Battery — charging
Generator — Precautions
Generator — General Description
Generator — removal and installation
Generator — troubleshooting


See similar ones from other Opel car manuals:
▶ Battery — Checking and Charging Opel Astra F (1991-1998, petrol)
▶ Battery — general information, checking the condition,… Opel Corsa B (1993-2000)
▶ Checking the battery Opel Kadett D (1979-1984)
▶ Battery — Checking and Charging Opel Vectra A (1988-1995, petrol)
▶ Battery — Maintenance Opel Zafira A (1999-2005, petrol)
Link to this page in different formats

Visitor comments


No comments yet


How much will 49 + 33 =


Vivaro A (2001-2014) 
  • General information
  • User manual
  • Power unit
  • Petrol engine F4R
  • Diesel engine F9Q
  • Diesel engine G9U
  • Transmission
  • Clutch and drive shafts
  • Manual gearbox
  • Chassis
  • Front suspension
  • Rear suspension
  • Brake system
  • Body
  • Exterior
  • Interior
  • Electrical equipment
  • Heating and ventilation
  • Air conditioner
  • Equipment and devices
  • Electrical diagrams
Ascona C (1981-1988) 
  • General information
  • Maintenance
  • Power unit
  • Gasoline engines
  • Diesel engines
  • Cooling system
  • Fuel and exhaust system
  • Contact ignition system
  • Contactless ignition system
  • Transmission
  • Clutch
  • Mechanical gearbox
  • Automatic gearbox
  • Drive shafts
  • Chassis
  • Steering
  • Brake system
  • Car suspension
  • Body
  • Exterior
  • Interior
  • Doors and windows
  • Electrical equipment
  • Equipment and devices
  • Power devices
  • Electrical circuits
Frontera B (1998-2004) 
  • General information
  • User manual
  • Maintenance
  • Power unit
  • Petrol engines 2.2 l
  • Petrol engines 3.2 l
  • Diesel engines 2.2 l
  • Cooling system
  • Fuel system (petrol)
  • Fuel system (diesel)
  • Ignition system
  • Transmission
  • Clutch
  • Manual gearbox MUA5C
  • Automatic gearbox 4L30E
  • Chassis
  • Suspension and axles
  • Steering
  • Brake system
  • Body
  • Exterior
  • Interior
  • Doors, locks and windows
  • Heating and air conditioning
  • Electrical equipment
  • Power devices
  • Equipment and devices
  • Lighting and signaling
  • Electrical diagrams
Frontera A (1991-1998, petrol) 
  • General information
  • Introduction to guide
  • User manual
  • Maintenance
  • Power unit
  • Engine repair
  • Lubrication system
  • Cooling system
  • Power and exhaust system
  • Engine electrics
  • Transmission
  • Clutch
  • Mechanical gearbox
  • Cardan shafts
  • Chassis
  • Brake system
  • Front suspension
  • Rear suspension
  • Steering
  • Body
  • Repair and care
  • Electrical equipment
  • Equipment and devices
  • Electrical circuits
OpelBook.ru © 2017–2026 · Mobile version · · Sitemap: EN BG BY UA RS HR RO PL SK HU · Feedback · Site search
Astra F, petrol · Astra G, petrol · Astra G · Astra H · Astra J, petrol · Corsa B · Corsa C, petrol · Corsa C · Insignia A · Kadett D · Kadett E · Omega A · Omega B · Omega B2 · Vectra A, petrol · Vectra A · Vectra B, petrol · Vectra B · Vectra C · Zafira A, petrol · Frontera A, petrol · Frontera B · Ascona C · Vivaro A ·
We want your visit to be comfortable 🤝! We use cookies 🍪 to make that happen.