
OpelBook.ru
Cars AvtoVAZ Cars Mitsubishi Cars BMW Cars Mercedes Cars Nissan Cars Toyota Cars Chevrolet
English Русский
Български
Беларускі
Український
Српски
Hrvatski
Română
Polski
Slovenský
Magyar
 |  Sitemap  |  Contacts  |    


Main Astra Corsa Insignia Kadett Omega Vectra Zafira Others Articles
Corsa B (1993-2000) Corsa C (2000-2006, petrol) Corsa C (2000-2006)
  • Main
  • Corsa
  • Corsa C
  • Engines 1.0 and 1.2 l
  • Engine repair
  • Adjustment of valve timing (Z10XE, Z10XEP, without air conditioning)

Adjustment of valve timing (Z10XE, Z10XEP, without air conditioning) (Opel Corsa C)

            0

Open the hood.

Disconnect the battery terminals.

Note: On vehicles from year 04 with ESP - after each battery disconnection the steering wheel angle sensor loses its basic setting. It must be recalibrated.


Disconnect the ground wire.

Disconnect 4 engine management system wiring harness connectors: oil pressure switch 2, coolant temperature sensor 3, camshaft sensor 4, ignition module 1.
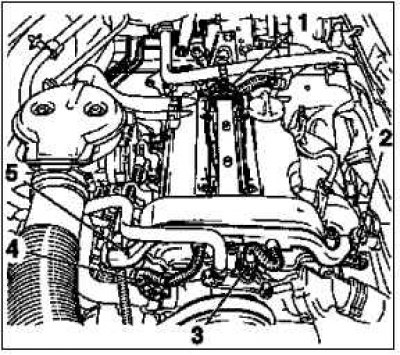
Disconnect 4 engine management system wiring harness connectors: oil pressure switch 2, coolant…


Clear the channel for the wire harness 5.

Set the wiring harness aside.

Remove the ignition module.

Remove the ignition module cover and slide it to the right.

Unscrew the 2 mounting bolts.

Remove the lid using the KM-6009 tool.
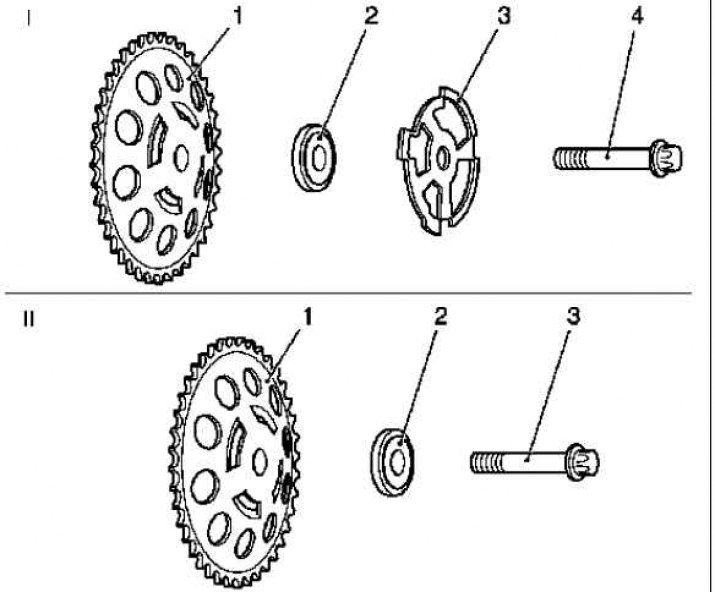
Components of the camshaft drive gear: I - Intake camshaft drive gear; 1 – camshaft drive gear…

Components of the camshaft drive gear: I - Intake camshaft drive gear; 1 – camshaft drive gear (intake and exhaust camshaft); 2 – pressure plate, new part; 3 – phase sensor, borrowed from the old camshaft drive gear assembly; 4 - mounting bolt, borrowed from the old camshaft drive gear assembly; II – exhaust camshaft drive gear; 1 – camshaft drive gear (intake and exhaust camshaft); 2 – pressure plate, new part; 3 - mounting bolt, borrowed from the old camshaft drive gear assembly


Note: Do not tilt the lid.
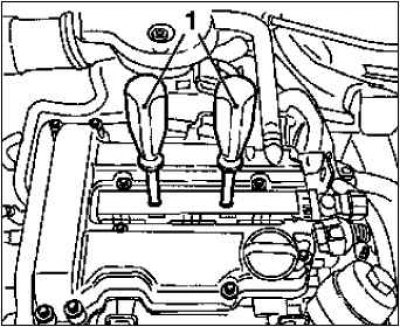

Note: Do not tilt the lid.


Remove the cylinder head cover.

Remove 2 engine crankcase ventilation hoses.

Remove 13 mounting bolts.

Raise the car.

On the "ECO" model, remove the engine cover at the bottom.

Remove the crankshaft support threaded plug 1.

Lower the car.

Set the TDC position of the ignition of cylinder 1.

Article published on the website: www.opelbook.ru

Insert the KM-952 2 tool.

Turn the crankshaft evenly until the KM-952 tool is engaged.

Note: The mark on the crankshaft belt pulley 4 must be in line with the boss 3 on the timing belt housing.
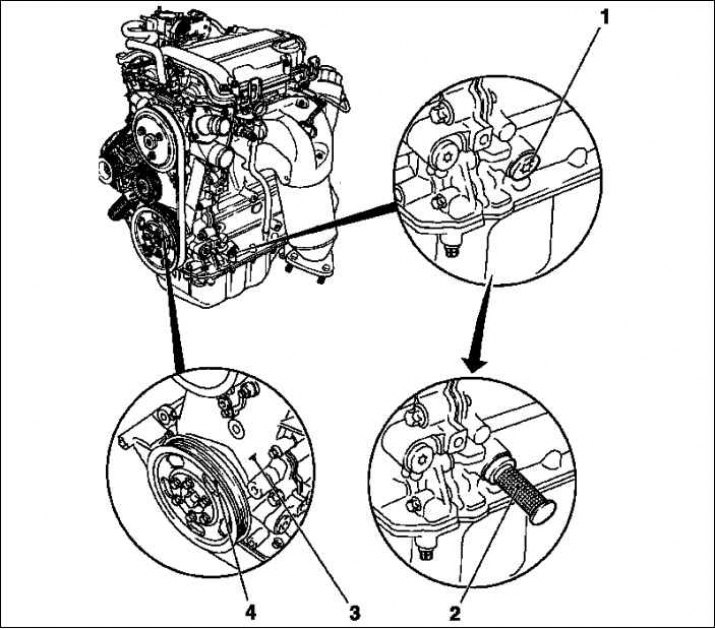

Note: The mark on the crankshaft belt pulley 4 must be in line with the boss 3 on the timing belt…


Insert the KM-9531 tool, it should fit into the groove of the camshafts.

Note: If the KM-953 tool cannot be inserted, a basic valve timing adjustment must be performed.
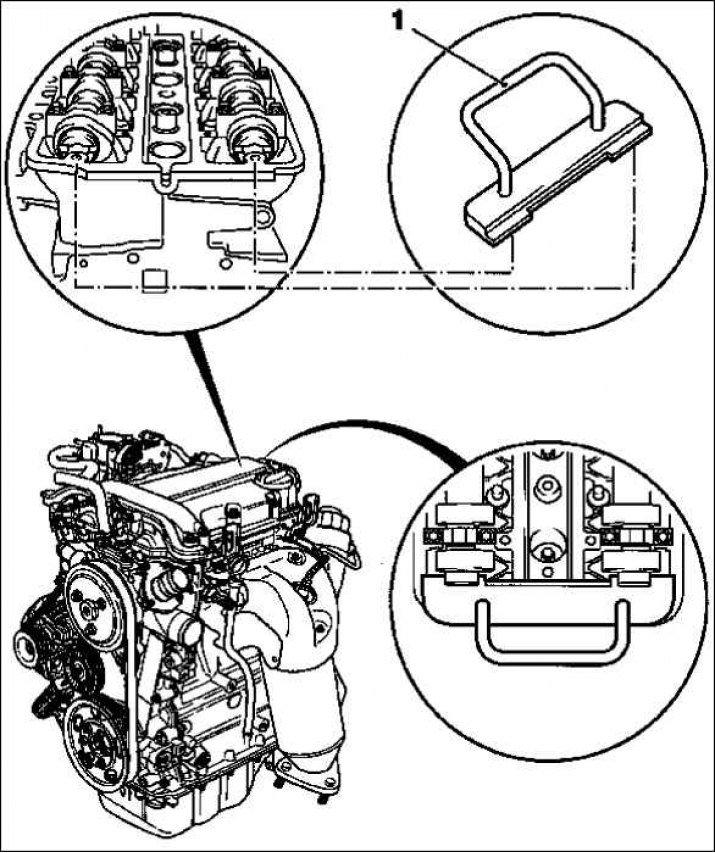


Note: If the KM-953 tool cannot be inserted, a basic valve timing adjustment must be performed.


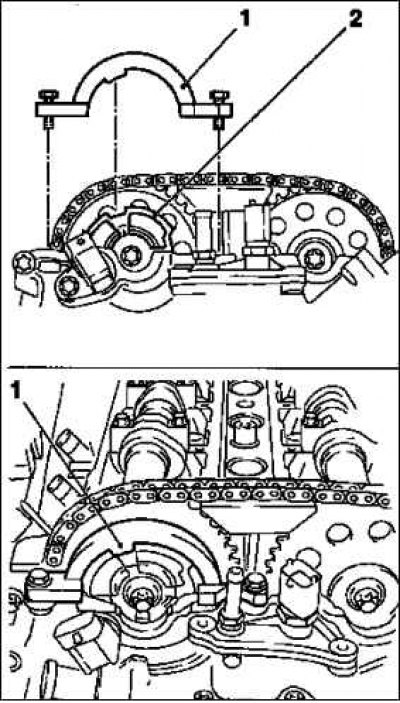
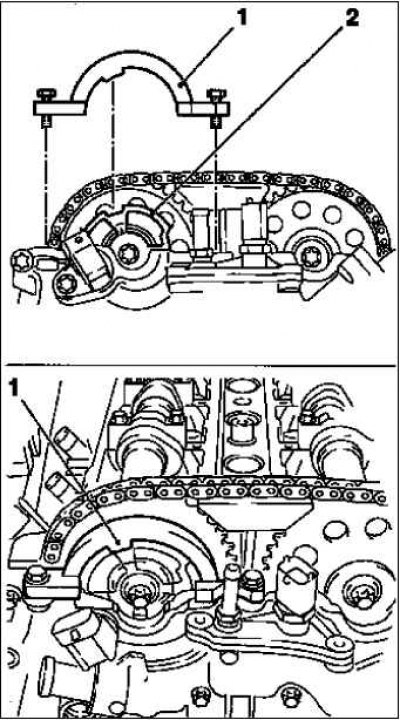
Install fixture KM-9541. Place phase sensor 2 on the disk.

Note: KM-954 must fit into the groove of the phase sensor disk.


Remove the fixing tools.

Note: Fixation tools cannot be used for holding.


Raise the car.

Install the crankshaft support plug.

Replace the sealing ring.

Tighten the bolt to a torque of 50 Nm.

Lock the chain tensioner.

Remove the screw plug 1.
Remove the screw plug 1.


Apply tension load to the intake camshaft by the hexagon using an open-end wrench in the direction of the arrow.

Insert the KM-955-1 tool (2).
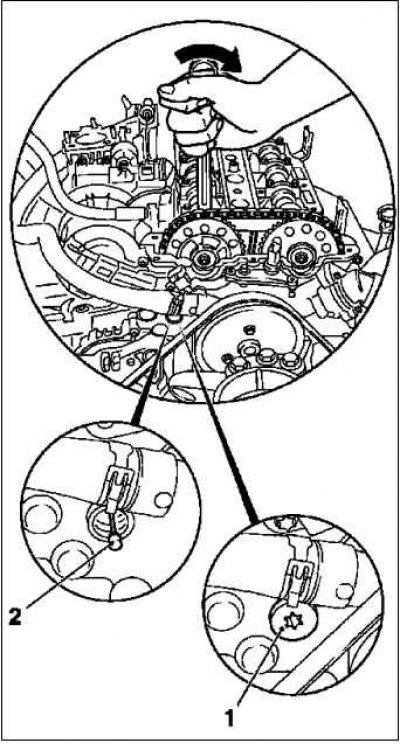
Insert the KM-955-1 tool (2).


Release the camshaft drive gears.
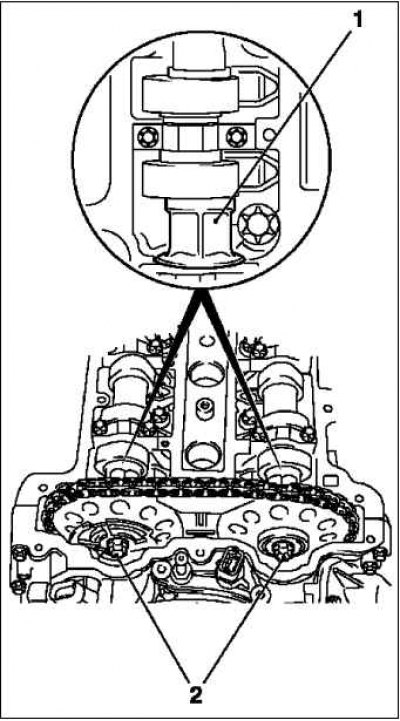


Release the camshaft drive gears.


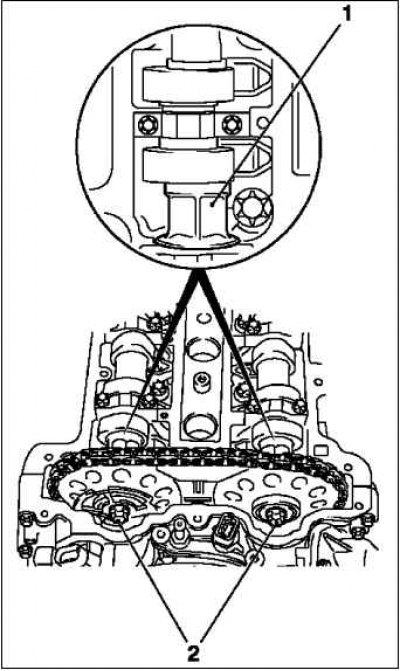
Loosen the 2 mounting bolts 2.

Support the camshafts using hexagon 1.
Support the camshafts using hexagon 1.


Replace the camshaft drive gear bolts.

Insert the KM-952 tool.

Adjust the camshafts.

Insert the KM-9531 tool.

Turn the camshafts by the hexagon.
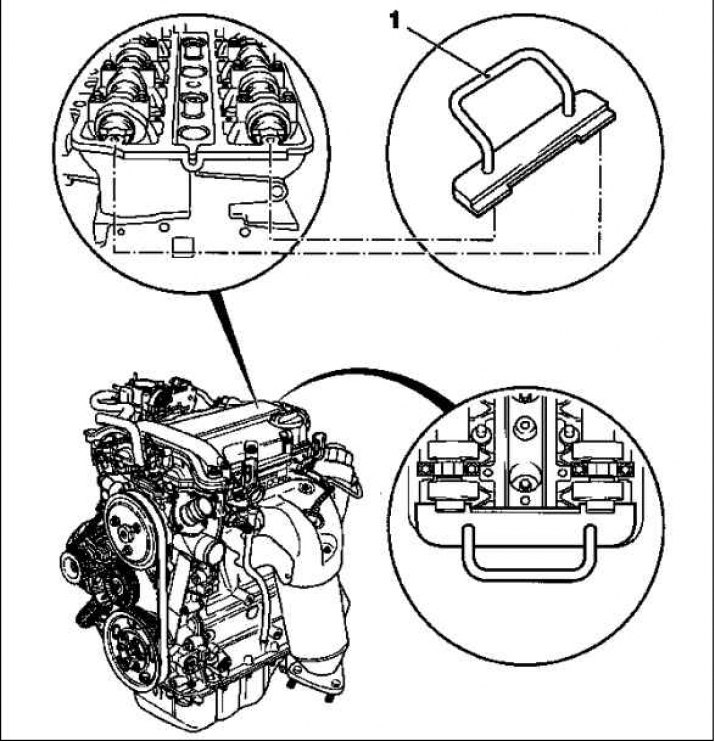
Turn the camshafts by the hexagon.


Install fixture KM-954 (1).

Place it on the phase sensor disk 2.

Note: The KM-954 tool must fit into the groove of the phase sensor disk.


Remove the KM-955-1 tool.

Replace the sealing ring.

Tighten the chain tensioner screw plug to a torque of 50 Nm.

Secure the camshaft drive gears.

Note: Tighten the camshaft drive gears and the phase sensor disc to 10 Nm.

Note: Tighten the camshaft drive gears and the phase sensor disc to 10 Nm.


Tighten the 2 mounting bolts 2 to 10 Nm.

Note: Tighten the intake camshaft timing gear bolt first. Support the camshafts using hexagon 1.


Remove the fixing tools.

Note: Fixation tools cannot be used for holding.


Tighten the camshaft drive gears.

Note: This procedure requires two people.


Tighten the 2 mounting bolts to a torque of 50 Nm + 60°.

Note: Tighten the intake camshaft timing gear bolt first. Hold the camshafts by the hexagon.


Rotate the crankshaft (720°).

Install devices KM-952, KM-953, KM-954.

Remove the fixing tools KM-952, KM-953, KM-954.

Raise the car.

Install the crankshaft support plug.

Replace the sealing ring.

Tighten the bolt to 50 Nm.

On the "ECO" model, install the engine cover at the bottom.

Lower the car.

Clean the sealing surfaces of the cylinder head and cylinder head cover.

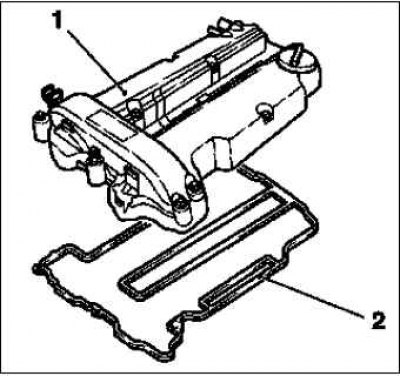
Install cylinder head cover 1.

Replace seal 2 and O-ring.

Apply sealant (distance 1–2 mm).

Note: Installation work must be completed within 10 minutes.


Tighten the 13 mounting bolts to 8 Nm.

Install 2 engine crankcase ventilation hoses.
Install 2 engine crankcase ventilation hoses.


Install the ignition module.

Unscrew 2 pcs. KM-6009.

Tighten the 2 mounting bolts to 8 Nm.

Install the engine management system wiring harness.

Route the wiring harness.

Secure the wiring harness channel.

Connect the 4 wire harness connectors.

Connect the battery terminals.

Program volatile memory.

Close the hood.


This article is available at russian, bulgarian, belarusian, ukrainian, serbian, croatian, romanian, polish, slovak, hungarian
Checking the article: Kornev Georgy

Share information:

Previous articles
Opel Corsa C: Engine repair
Next articles

Adjustment of valve timing by acting on the camshaft Z10XEP, Z12XE, Z14XEP (from the end of 2004 to 2005)
Checking fuel pressure (Z10XE, Z10XEP, with air conditioning)
Compression pressure test (Z10XE, Z10XEP, with air conditioning)
Checking the valve timing (Z10XE, Z10XEP, without air conditioning)
Checking engine compression (Z10XE, Z10XEP)
Checking oil pressure (Z10XE, Z10XEP)
Replacing the poly V-belt (Z10XE, Z10XEP, with air conditioning)
Cylinder head
Removal and installation of the timing case (Z10XE, Z10XEP)
Engine repair (Z10XE, Z10XEP, without air conditioning)
Cylinder block, crank mechanism and piston group


See similar ones from other Opel car manuals:
▶ Rear Suspension Height Adjustment Valve and Air Intake Line… Opel Astra G (1998-2004, petrol)
▶ Technical characteristics of the valve timing mechanism Opel Kadett E (1984-1995)
▶ Valve clearances — checking and adjustment Opel Omega A (1986-1993)
▶ Ignition timing — checking and adjustment Opel Vectra A (1988-1995, petrol)
▶ Checking the valve timing Opel Frontera B (1998-2004)
Link to this page in different formats

Visitor comments


No comments yet


How much will 15 + 46 =


Corsa C (2000-2006) 
  • General information
  • Introduction to guide
  • Troubleshooting
  • Vehicle device
  • User manual
  • Maintenance
  • Power unit
  • Engine repair
  • Cooling system
  • Power and exhaust system
  • Control system
  • Engine electrical equipment
  • Transmission
  • Clutch
  • Mechanical gearbox
  • Automatic gearbox
  • Drive shafts
  • Chassis
  • Brake system
  • Wheel suspension
  • Steering
  • Body
  • Exterior
  • Interior
  • Doors and windows
  • Heating and air conditioning
  • Electrical equipment
  • Equipment and devices
  • Lamps and lighting
  • Electrical circuits
Corsa C (2000-2006, petrol) 
  • User manual
  • Car access
  • Governing bodies
  • Seat control
  • Heating and air conditioning
  • Driving and maintenance
  • Engines 1.0 and 1.2 l
  • Engine repair
  • Cooling and lubrication system
  • Injection system
  • Engines 1.4, 1.6 and 1.8 l
  • Engine repair
  • Cooling and lubrication system
  • Injection system
  • Transmission
  • Clutch
  • Mechanical gearbox
  • Automatic gearbox
  • Drive shafts
  • Chassis
  • Wheels and tires
  • Wheel suspension
  • Steering
  • Brake system
  • Body
  • Exterior
  • Doors and windows
  • Electrical equipment
  • Equipment and devices
  • Lighting system
  • Electrical circuits
Corsa B (1993-2000) 
  • General information
  • Introduction to guide
  • User manual
  • Maintenance
  • Power unit
  • SOHC gasoline engines
  • DOHC gasoline engines
  • Diesel engines
  • Engine repair
  • Cooling system
  • Supply system
  • Injection system (gasoline)
  • Injection system (diesel)
  • Exhaust systems
  • Control system (gasoline)
  • Preheat system (diesel)
  • Charge and launch system
  • Transmission
  • Mechanical gearbox
  • Automatic gearbox
  • Clutch and drive shafts
  • Chassis
  • Brake system
  • Front suspension
  • Rear suspension
  • Steering
  • Body
  • Ventilation and heating
  • Exterior
  • Interior
  • Doors and windows
  • Electrical equipment
  • Equipment and devices
  • Lamps and lighting
  • Electrical circuits
OpelBook.ru © 2017–2026 · Mobile version · · Sitemap: EN BG BY UA RS HR RO PL SK HU · Feedback · Site search
Astra F, petrol · Astra G, petrol · Astra G · Astra H · Astra J, petrol · Corsa B · Corsa C, petrol · Corsa C · Insignia A · Kadett D · Kadett E · Omega A · Omega B · Omega B2 · Vectra A, petrol · Vectra A · Vectra B, petrol · Vectra B · Vectra C · Zafira A, petrol · Frontera A, petrol · Frontera B · Ascona C · Vivaro A ·
We want your visit to be comfortable 🤝! We use cookies 🍪 to make that happen.