
OpelBook.ru
Cars AvtoVAZ Cars Mitsubishi Cars BMW Cars Mercedes Cars Nissan Cars Toyota Cars Chevrolet
English Русский
Български
Беларускі
Український
Српски
Hrvatski
Română
Polski
Slovenský
Magyar
 |  Sitemap  |  Contacts  |    


Main Astra Corsa Insignia Kadett Omega Vectra Zafira Others Articles
Corsa B (1993-2000) Corsa C (2000-2006, petrol) Corsa C (2000-2006)
  • Main
  • Corsa
  • Corsa C
  • Engines 1.0 and 1.2 l
  • Engine repair
  • Checking engine compression (Z10XE, Z10XEP)

Checking engine compression (Z10XE, Z10XEP) (Opel Corsa C)

            0

Verification procedure


Open the hood.

Remove the air filter housing 1.

To do this, disconnect 2 wiring harness connectors, hot-film air flow meter 3, tank ventilation valve 2.

Release the tank vent valve.

Remove the suction pipe 4.

To do this, unscrew 2 nuts.

Remove the engine crankcase ventilation hose 5.

On Z10XEP: Remove the air intake hose, loosen the clamp and remove the bolt (arrow).
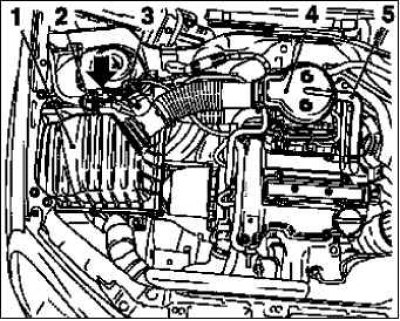
On Z10XEP: Remove the air intake hose, loosen the clamp and remove the bolt (arrow).


Remove the ignition module.

Remove the ignition module cover.

Note: NOTE


Note: Move it to the right.


Disconnect the wiring harness connector.

Unscrew the 2 mounting bolts.

Remove the module using the special tool KM-6009.

Note: Do not tilt the lid.
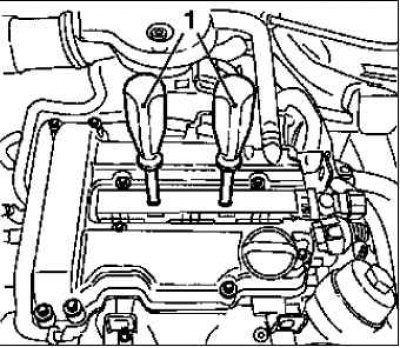

Note: Do not tilt the lid.


Remove 3 spark plugs using the KM-1 94-E tool.

Raise the car.

Remove the poly V-belt cover.


To do this, unscrew the 3 mounting bolts 1.

Remove the clamp (arrow).
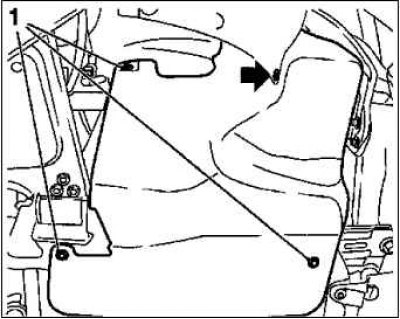
Remove the clamp (arrow).


Lower the car.
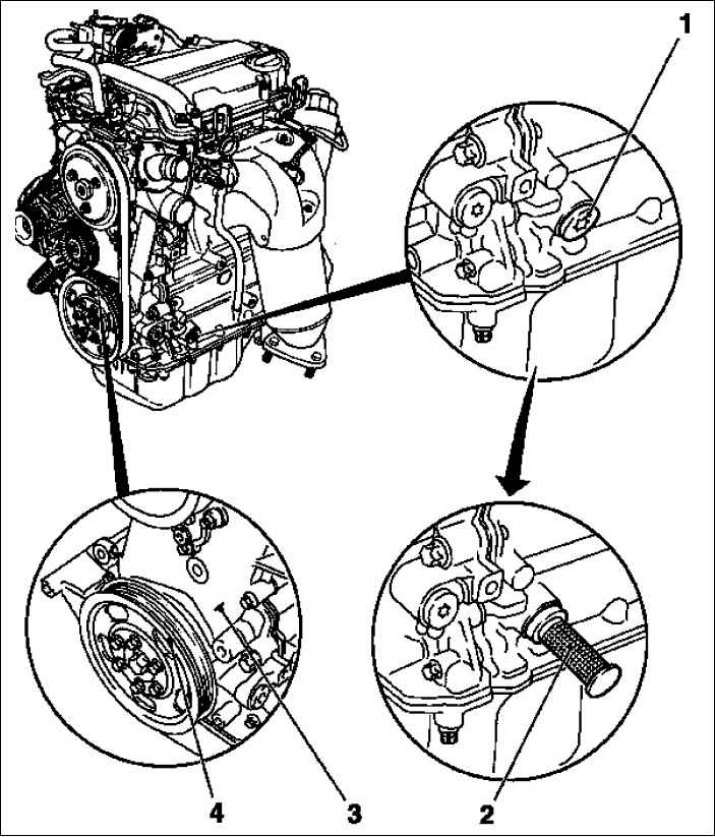
Lower the car.


Set the TDC position of the ignition of cylinder 1.

Note: NOTE


Note: The crankshaft pulley marking must be in line with the boss on the timing belt housing.


Apply auxiliary marks on the belt pulley with an offset of 120° to the TDC mark of the ignition of cylinder 1.
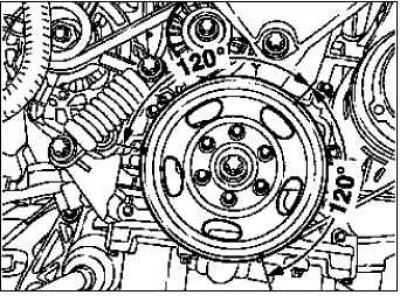
Apply auxiliary marks on the belt pulley with an offset of 120° to the TDC mark of the ignition of…


Unscrew the oil filler cap.


Note: The crankshaft pulley marking must be in line with the boss on the timing belt housing.


Caution! Open the coolant expansion tank cap carefully and slowly as there is a risk of burns.
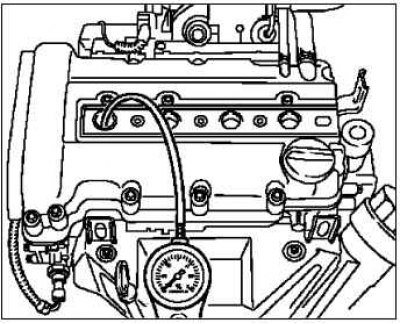

Caution! Open the coolant expansion tank cap carefully and slowly as there is a risk of burns.


Unscrew the cap of the coolant expansion tank

Remove the oil dipstick.

Note: Make sure the adapter is long enough. The adapter connection must be easily accessible. Do not damage the spark plug thread.


Install the adapter and pressure drop gauge on cylinder 1.

Put the transmission in gear and apply the parking brake

Note: All wheels must touch the supporting surface.


Check the pressure drop on cylinder 1.

Note: Follow manufacturer's instructions.


Check the engine pressure drop in the remaining cylinders.

Set the TDC position of cylinder 2.

Move the adapter and pressure drop gauge to cylinder 2.

Check the pressure drop on cylinder 2.

Set the TDC position of cylinder 3.

Move the adapter and pressure drop gauge to cylinder 3.

Check the pressure drop on cylinder 3.

Remove the pressure drop gauge.

Set the idle position.

Remove the adapter from cylinder 3.

Install the spark plugs.

Using special tool KM-194-E, tighten 3 pcs. to 25 N·m.


Install the ignition module.

Tighten the 2 mounting bolts to 8 Nm.

Connect the wire harness connector.

Install the ignition module cover.

Insert the oil dipstick.

Tighten the cap of the coolant expansion tank.

Tighten the oil filler cap.

Install the air filter housing. Tighten the bolt.

For Z10XEP engines: install the suction air hose and tighten the clamp to a torque of 3.5 Nm.

Secure the suction pipe.

Replace the sealing ring.

Tighten the 2 nuts to 8 Nm.

Install the engine crankcase ventilation hose. Connect the tank ventilation valve, connect the 2 wiring harness connectors

Raise the car.

Install the poly V-belt cover.

Tighten the 3 mounting bolts.

Install the clamp.

Lower the car.

Close the hood.


This article is available at russian, bulgarian, belarusian, ukrainian, serbian, croatian, romanian, polish, slovak, hungarian
Checking the article: Kornev Georgy

Share information:

Previous articles
Opel Corsa C: Engine repair
Next articles

Checking oil pressure (Z10XE, Z10XEP)
Engine number
Checking the valve timing (Z10XE, Z10XEP, without air conditioning)
Compression pressure test (Z10XE, Z10XEP, with air conditioning)
Checking fuel pressure (Z10XE, Z10XEP, with air conditioning)
Adjustment of valve timing by acting on the camshaft Z10XEP, Z12XE, Z14XEP (from the end of 2004 to 2005)
Adjustment of valve timing (Z10XE, Z10XEP, without air conditioning)
Replacing the poly V-belt (Z10XE, Z10XEP, with air conditioning)


See similar ones from other Opel car manuals:
▶ Checking engine compression Opel Insignia A (2008-2017)
▶ Checking the compression in the engine cylinders Opel Omega B (1993-1999)
▶ Checking the compression in the engine cylinders Opel Zafira A (1999-2005, petrol)
▶ Checking the engine oil level Opel Astra G (1998-2004, petrol)
▶ Checking the installation of the timing mechanism drive of… Opel Kadett E (1984-1995)
Link to this page in different formats

Visitor comments


No comments yet


How much will 46 + 22 =


Corsa C (2000-2006) 
  • General information
  • Introduction to guide
  • Troubleshooting
  • Vehicle device
  • User manual
  • Maintenance
  • Power unit
  • Engine repair
  • Cooling system
  • Power and exhaust system
  • Control system
  • Engine electrical equipment
  • Transmission
  • Clutch
  • Mechanical gearbox
  • Automatic gearbox
  • Drive shafts
  • Chassis
  • Brake system
  • Wheel suspension
  • Steering
  • Body
  • Exterior
  • Interior
  • Doors and windows
  • Heating and air conditioning
  • Electrical equipment
  • Equipment and devices
  • Lamps and lighting
  • Electrical circuits
Corsa C (2000-2006, petrol) 
  • User manual
  • Car access
  • Governing bodies
  • Seat control
  • Heating and air conditioning
  • Driving and maintenance
  • Engines 1.0 and 1.2 l
  • Engine repair
  • Cooling and lubrication system
  • Injection system
  • Engines 1.4, 1.6 and 1.8 l
  • Engine repair
  • Cooling and lubrication system
  • Injection system
  • Transmission
  • Clutch
  • Mechanical gearbox
  • Automatic gearbox
  • Drive shafts
  • Chassis
  • Wheels and tires
  • Wheel suspension
  • Steering
  • Brake system
  • Body
  • Exterior
  • Doors and windows
  • Electrical equipment
  • Equipment and devices
  • Lighting system
  • Electrical circuits
Corsa B (1993-2000) 
  • General information
  • Introduction to guide
  • User manual
  • Maintenance
  • Power unit
  • SOHC gasoline engines
  • DOHC gasoline engines
  • Diesel engines
  • Engine repair
  • Cooling system
  • Supply system
  • Injection system (gasoline)
  • Injection system (diesel)
  • Exhaust systems
  • Control system (gasoline)
  • Preheat system (diesel)
  • Charge and launch system
  • Transmission
  • Mechanical gearbox
  • Automatic gearbox
  • Clutch and drive shafts
  • Chassis
  • Brake system
  • Front suspension
  • Rear suspension
  • Steering
  • Body
  • Ventilation and heating
  • Exterior
  • Interior
  • Doors and windows
  • Electrical equipment
  • Equipment and devices
  • Lamps and lighting
  • Electrical circuits
OpelBook.ru © 2017–2026 · Mobile version · · Sitemap: EN BG BY UA RS HR RO PL SK HU · Feedback · Site search
Astra F, petrol · Astra G, petrol · Astra G · Astra H · Astra J, petrol · Corsa B · Corsa C, petrol · Corsa C · Insignia A · Kadett D · Kadett E · Omega A · Omega B · Omega B2 · Vectra A, petrol · Vectra A · Vectra B, petrol · Vectra B · Vectra C · Zafira A, petrol · Frontera A, petrol · Frontera B · Ascona C · Vivaro A ·
We want your visit to be comfortable 🤝! We use cookies 🍪 to make that happen.