
OpelBook.ru
Cars AvtoVAZ Cars Mitsubishi Cars BMW Cars Mercedes Cars Nissan Cars Toyota Cars Chevrolet
English Русский
Български
Беларускі
Український
Српски
Hrvatski
Română
Polski
Slovenský
Magyar
 |  Sitemap  |  Contacts  |    


Main Astra Corsa Insignia Kadett Omega Vectra Zafira Others Articles
Corsa B (1993-2000) Corsa C (2000-2006, petrol) Corsa C (2000-2006)
  • Main
  • Corsa
  • Corsa C
  • Transmission
  • Mechanical gearbox
  • Adjusting the gear shift drive

Adjusting the gear shift drive (Opel Corsa C)

            0

Contents: Manual transmission F13, F17 and F17+ ⬇ Manual transmission F23 ⬇
1. The gear shift drive on models with the F13, F17 and F17+ manual transmission is designed as a rod, while the F23 gearbox has a cable drive. On the Easytronic robotic gearbox, gear shifting is performed by transmitting control electrical signals from the lever assembly in the car's interior to the control module in the engine compartment, and there is no drive as such.

2. The general principle of adjustment is to set the gear shift lever in the car interior and the gear shift mechanism on the gearbox in a certain fixed position with the drive removed/disconnected, after which the drive is installed - while the positions of the lever and the mechanism are synchronized.

3. The need to adjust the shift drive usually arises only after dismantling/replacing the gearbox or components of the shift drive itself. If the gear shifting is not clear, the correct operation of the drive can be checked and, if necessary, appropriate adjustments are made.

Manual transmission F13, F17 and F17+


4. On these models, adjustment is made using the bolt of the clamp securing the gear selector rod to the shift rod (see accompanying illustration). The bolt is located under the power unit, just in front of the rear bulkhead of the engine compartment.

[Material taken from an internet portal: opelbook]
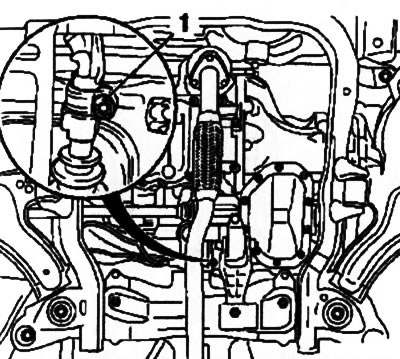
9.4. Bolt (1) for fastening the gear selector rod clamp to the shift rod

9.4. Bolt (1) for fastening the gear selector rod clamp to the shift rod


5. Loosen up (but don't give it all away) bolt of the clamp for fastening the gear selector rod.

6. In the car interior, release the gearshift lever boot from the clamps and screw it up. Press the lever to the left until the holes on the lever base and the support bracket align, fix the lever using a special device KM-527-A or another suitable tool with a diameter of 5 mm (see accompanying illustration).
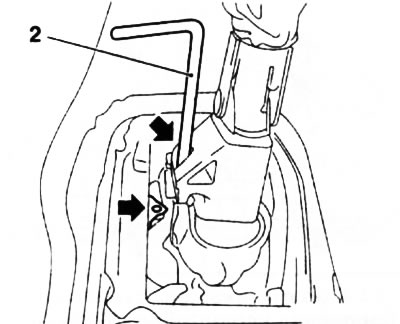
9.6. Fixing the gear shift lever using the KM-527-A tool (2) (Manual transmission F13/F17) - the…

9.6. Fixing the gear shift lever using the KM-527-A tool (2) (Manual transmission F13/F17) - the holes are indicated by arrows


7. Turn the selector shaft of the gear shift mechanism on the manual transmission housing to the left (into third gear) and lock the mechanism in this position by pressing the spring-loaded locking pin into the cover located on top of the transmission housing (see accompanying illustration).
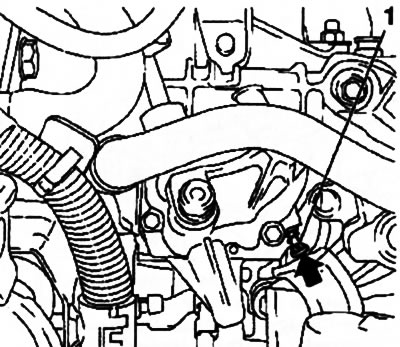
9.7. Gear shift mechanism stopper (1) (Manual transmission F13/F17)

9.7. Gear shift mechanism stopper (1) (Manual transmission F13/F17)


8. Make sure that the lever and the shift mechanism are locked securely, tighten the gear selector rod clamp bolt (see illustration 9.4) with a force of 12 Nm, and then pull it to an angle of 180-225°.

9. Remove the locking device from the gearshift lever and check the operation of the shift mechanism - the spring-loaded locking pin will automatically release when the lever is moved to the reverse gear position. Make sure that the locking pin pops out of the cover.

Manual transmission F23


10. Remove the center console cover and gearshift lever boot (see Chapter 11).

11. Using a small screwdriver, gently pry up and release both drive cable latches (see accompanying illustration).
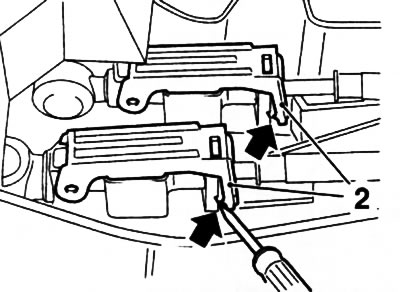
9.11. Releasing the gear shift cable clamps (on the example of F23)

9.11. Releasing the gear shift cable clamps (on the example of F23)


Caution: Be careful when pressing the clamps, excessive force may cause them to break!


12. In the engine compartment Set the gear shift mechanism on the manual transmission to the "neutral" position, make sure that no gear is engaged by shaking the mechanism lever (see accompanying illustration). Then move the gearshift lever inside the car to the neutral position and lock it with the lock.
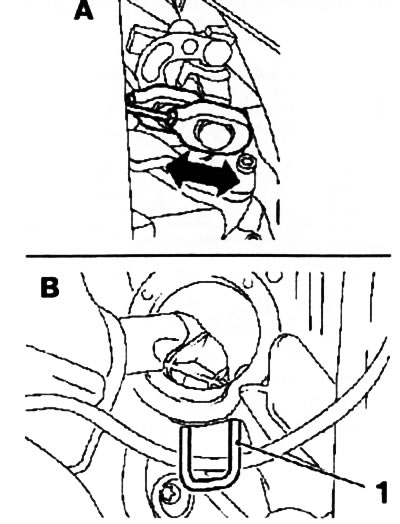


9.12. Setting the gearshift mechanism (A) and lever (B) (F23 manual transmission) to neutral: 1.…

9.12. Setting the gearshift mechanism (A) and lever (B) (F23 manual transmission) to neutral: 1. Lever lock


13. Connect the drive cables, remove the retainer and reinstall all removed components, then check the proper functioning of the shift mechanism.


This article is available at russian, bulgarian, belarusian, ukrainian, serbian, croatian, romanian, polish, slovak, hungarian
Checking the article: Kornev Georgy

Share information:

Previous articles
Opel Corsa C: Mechanical gearbox
Next articles

Manual transmission — general information
Removal and installation gear shift drive components
Transmission oil change
Removal and installation the gearshift control module (Easytronic)
Removal and installation of manual transmission


See similar ones from other Opel car manuals:
▶ Adjusting the gear shift drive Opel Astra H (2004-2009)
▶ Adjusting the gear shift drive Opel Kadett E (1984-1995)
▶ Adjusting the gear shift drive (manual transmission) Opel Vectra C (2002-2008)
▶ Adjusting the gear shift cables Opel Insignia A (2008-2017)
▶ Gear Shift Lever Mounting Hanger — Removal and Installation Opel Omega A (1986-1993)
Link to this page in different formats

Visitor comments


Питер написал(а) 29.05.2025 в 07:50:
Отличное объяснение, большое спасибо. Приветствую вас, Пётр, из Польши.
ответить цитировать


How much will 27 + 35 =


Corsa C (2000-2006) 
  • General information
  • Introduction to guide
  • Troubleshooting
  • Vehicle device
  • User manual
  • Maintenance
  • Power unit
  • Engine repair
  • Cooling system
  • Power and exhaust system
  • Control system
  • Engine electrical equipment
  • Transmission
  • Clutch
  • Mechanical gearbox
  • Automatic gearbox
  • Drive shafts
  • Chassis
  • Brake system
  • Wheel suspension
  • Steering
  • Body
  • Exterior
  • Interior
  • Doors and windows
  • Heating and air conditioning
  • Electrical equipment
  • Equipment and devices
  • Lamps and lighting
  • Electrical circuits
Corsa C (2000-2006, petrol) 
  • User manual
  • Car access
  • Governing bodies
  • Seat control
  • Heating and air conditioning
  • Driving and maintenance
  • Engines 1.0 and 1.2 l
  • Engine repair
  • Cooling and lubrication system
  • Injection system
  • Engines 1.4, 1.6 and 1.8 l
  • Engine repair
  • Cooling and lubrication system
  • Injection system
  • Transmission
  • Clutch
  • Mechanical gearbox
  • Automatic gearbox
  • Drive shafts
  • Chassis
  • Wheels and tires
  • Wheel suspension
  • Steering
  • Brake system
  • Body
  • Exterior
  • Doors and windows
  • Electrical equipment
  • Equipment and devices
  • Lighting system
  • Electrical circuits
Corsa B (1993-2000) 
  • General information
  • Introduction to guide
  • User manual
  • Maintenance
  • Power unit
  • SOHC gasoline engines
  • DOHC gasoline engines
  • Diesel engines
  • Engine repair
  • Cooling system
  • Supply system
  • Injection system (gasoline)
  • Injection system (diesel)
  • Exhaust systems
  • Control system (gasoline)
  • Preheat system (diesel)
  • Charge and launch system
  • Transmission
  • Mechanical gearbox
  • Automatic gearbox
  • Clutch and drive shafts
  • Chassis
  • Brake system
  • Front suspension
  • Rear suspension
  • Steering
  • Body
  • Ventilation and heating
  • Exterior
  • Interior
  • Doors and windows
  • Electrical equipment
  • Equipment and devices
  • Lamps and lighting
  • Electrical circuits
OpelBook.ru © 2017–2026 · Mobile version · · Sitemap: EN BG BY UA RS HR RO PL SK HU · Feedback · Site search
Astra F, petrol · Astra G, petrol · Astra G · Astra H · Astra J, petrol · Corsa B · Corsa C, petrol · Corsa C · Insignia A · Kadett D · Kadett E · Omega A · Omega B · Omega B2 · Vectra A, petrol · Vectra A · Vectra B, petrol · Vectra B · Vectra C · Zafira A, petrol · Frontera A, petrol · Frontera B · Ascona C · Vivaro A ·
We want your visit to be comfortable 🤝! We use cookies 🍪 to make that happen.