
OpelBook.ru
Cars AvtoVAZ Cars Mitsubishi Cars BMW Cars Mercedes Cars Nissan Cars Toyota Cars Chevrolet
English Русский
Български
Беларускі
Український
Српски
Hrvatski
Română
Polski
Slovenský
Magyar
 |  Sitemap  |  Contacts  |    


Main Astra Corsa Insignia Kadett Omega Vectra Zafira Others Articles
Corsa B (1993-2000) Corsa C (2000-2006, petrol) Corsa C (2000-2006)
  • Main
  • Corsa
  • Corsa B
  • Power unit
  • Diesel engines
  • Removal and installation the timing belt

Removal and installation the timing belt (Opel Corsa B)

            0

Contents: Removal ⬇ Removal and installation engine…⬇ Installation ⬇
The timing belt must be removed on a cold engine!


Do not turn the engine with the timing belt removed!


A new camshaft timing gear bolt will be required


Removal


1. Disconnect the negative cable from the battery.

2. Remove the air filter with the supply hose.

3. On 1.7 l engine remove the engine mounts as a set.

4. Remove the accessory drive belt (see Chapter Vehicle settings and routine maintenance).

5. Unscrew the mounting bolts and remove the upper timing belt cover.

6. Set the piston of the first cylinder to the TDC position (see section Procedures for repairing diesel engines without removing them from the vehicle).

7. If the removed belt is to be reinstalled later, mark the direction of rotation of the engine on it with a felt-tip pen (clockwise).

8. Loosen the tension roller fastening (arrows) and disconnect its spring

Tension roller mounting
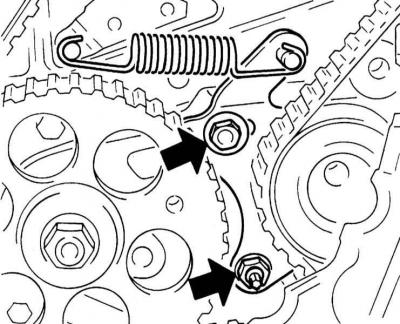
Tension roller mounting


9. Remove the toothed belt from the fuel injection pump pulley.

10. Remove the crankshaft pulley. To do this, hold the crankshaft by the central mounting bolt with a spanner and unscrew the mounting bolts.


Crankshaft pulley mounting bolts
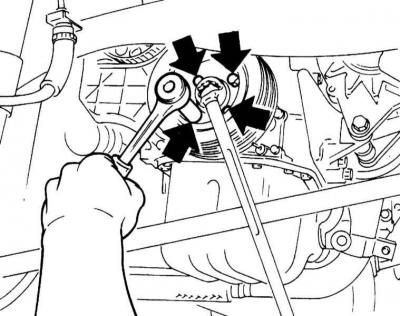
Crankshaft pulley mounting bolts


11. Unscrew the mounting bolts and remove the lower timing belt cover.

12. Remove the timing belt.

Removal and installation engine mounts (1.7L engine)


1. Raise the engine using the KM-263-V device and a chain. Instead of the specified device, you can use a suitable pipe, installing it on wooden blocks on the wing protrusions.

Using a special device to lift the engine

Original posted on the website OpelBook.ru
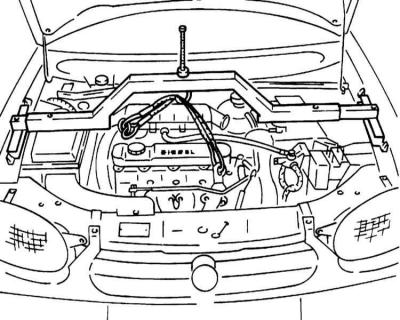
Using a special device to lift the engine


2. Unscrew the bolts securing the engine damping support to the holder.

Engine damper mount to bracket mounting bolts
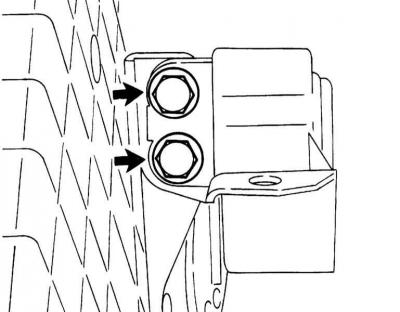
Engine damper mount to bracket mounting bolts


3. Unscrew the bolts securing the engine damper support to the front frame longitudinal beam. After this, clean the threads with a wire brush from any remaining sealant.


4. Remove the bolts securing the engine mount bracket from the engine block.

5. Installation is performed in the reverse order of component dismantling. Tighten the fasteners with the required force. Pre-lubricate the threads with a sealant, for example, OPEL-15 10 177.

Installation


Before installing the timing belt, check whether the mark on the crankshaft pulley matches the pointer on the cylinder block. The fixing bolts in the camshaft and fuel injection pump gears should be screwed in at the same time. The crankshaft pulley can be temporarily installed for checking.


1. Put on the timing belt in accordance with its routing diagram.

Drive Belt Routing Diagram
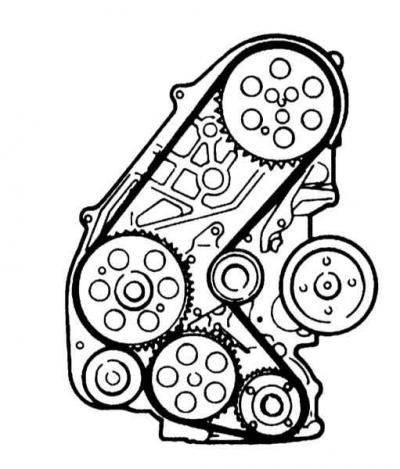
Drive Belt Routing Diagram


If the old belt is installed, observe the direction of its movement.


2. Tighten the lower timing belt cover mounting bolts with force 10 Nm.

3. Install the crankshaft pulley and tighten its mounting bolts with force 20 Nm.

4. Remove the TDC position lock bolts.

5. Hook the tension roller spring, thereby tensioning the timing belt.

The crankshaft must be in a position corresponding to the TDC position of the piston of the first cylinder.


6. Install the tension roller and tighten its fasteners with force 20 Nm. In this case, first tighten the bolt (A) and then the nut (B).


Tension roller fastener
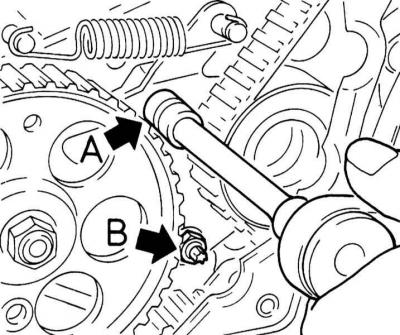
Tension roller fastener


7. Turn the crankshaft two full turns in the direction of engine rotation so that the piston of the first cylinder stops at the TDC position.

Rotate the crankshaft smoothly to prevent the belt teeth from jumping. Temporarily insert the bolts for fixing and check the TDC position.


8. Check the fuel injection timing (see Chapter Fuel, exhaust and emission control systems).

9. Further installation is carried out in the reverse order of dismantling the components.


This article is available at russian, bulgarian, belarusian, ukrainian, serbian, croatian, romanian, polish, slovak, hungarian
Checking the article: Trifonova Emilia

Share information:

Previous articles
Opel Corsa B: Diesel engines
Next articles

Bringing the piston of the first cylinder to the position of the top dead center of the end of the compression stroke (TDC)
Removal and installation the crankshaft pulley
Removal and installation the timing belt cover
Replacing the camshaft seal
Removal and installation the camshaft
Removal and installation the cylinder head
Removal and installation the oil pan


See similar ones from other Opel car manuals:
▶ Timing Belt Covers — Removal and Installation Opel Astra F (1991-1998, petrol)
▶ Checking the timing belt of the gas distribution mechanism Opel Insignia A (2008-2017)
▶ Removal and installation the timing belt Opel Kadett D (1979-1984)
▶ Timing belt of the gas distribution mechanism-check Opel Omega B2 (1999-2003)
▶ Timing Belt Cover Opening, 1.4L and 1.6L Models — General… Opel Vectra A (1988-1995, petrol)
Link to this page in different formats

Visitor comments


No comments yet


How much will 31 + 15 =


Corsa C (2000-2006) 
  • General information
  • Introduction to guide
  • Troubleshooting
  • Vehicle device
  • User manual
  • Maintenance
  • Power unit
  • Engine repair
  • Cooling system
  • Power and exhaust system
  • Control system
  • Engine electrical equipment
  • Transmission
  • Clutch
  • Mechanical gearbox
  • Automatic gearbox
  • Drive shafts
  • Chassis
  • Brake system
  • Wheel suspension
  • Steering
  • Body
  • Exterior
  • Interior
  • Doors and windows
  • Heating and air conditioning
  • Electrical equipment
  • Equipment and devices
  • Lamps and lighting
  • Electrical circuits
Corsa C (2000-2006, petrol) 
  • User manual
  • Car access
  • Governing bodies
  • Seat control
  • Heating and air conditioning
  • Driving and maintenance
  • Engines 1.0 and 1.2 l
  • Engine repair
  • Cooling and lubrication system
  • Injection system
  • Engines 1.4, 1.6 and 1.8 l
  • Engine repair
  • Cooling and lubrication system
  • Injection system
  • Transmission
  • Clutch
  • Mechanical gearbox
  • Automatic gearbox
  • Drive shafts
  • Chassis
  • Wheels and tires
  • Wheel suspension
  • Steering
  • Brake system
  • Body
  • Exterior
  • Doors and windows
  • Electrical equipment
  • Equipment and devices
  • Lighting system
  • Electrical circuits
Corsa B (1993-2000) 
  • General information
  • Introduction to guide
  • User manual
  • Maintenance
  • Power unit
  • SOHC gasoline engines
  • DOHC gasoline engines
  • Diesel engines
  • Engine repair
  • Cooling system
  • Supply system
  • Injection system (gasoline)
  • Injection system (diesel)
  • Exhaust systems
  • Control system (gasoline)
  • Preheat system (diesel)
  • Charge and launch system
  • Transmission
  • Mechanical gearbox
  • Automatic gearbox
  • Clutch and drive shafts
  • Chassis
  • Brake system
  • Front suspension
  • Rear suspension
  • Steering
  • Body
  • Ventilation and heating
  • Exterior
  • Interior
  • Doors and windows
  • Electrical equipment
  • Equipment and devices
  • Lamps and lighting
  • Electrical circuits
OpelBook.ru © 2017–2026 · Mobile version · · Sitemap: EN BG BY UA RS HR RO PL SK HU · Feedback · Site search
Astra F, petrol · Astra G, petrol · Astra G · Astra H · Astra J, petrol · Corsa B · Corsa C, petrol · Corsa C · Insignia A · Kadett D · Kadett E · Omega A · Omega B · Omega B2 · Vectra A, petrol · Vectra A · Vectra B, petrol · Vectra B · Vectra C · Zafira A, petrol · Frontera A, petrol · Frontera B · Ascona C · Vivaro A ·
We want your visit to be comfortable 🤝! We use cookies 🍪 to make that happen.