


Removal
The cylinder head is removed only from a cooled engine. The intake manifold and exhaust manifold do not need to be disconnected.
Cylinder Head Assembly Components
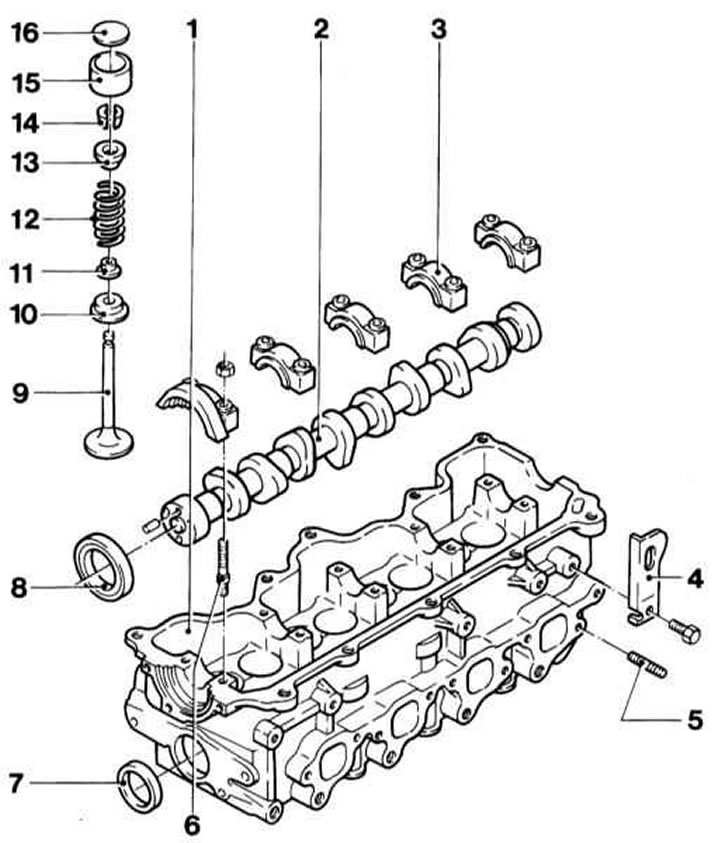
1 - Cylinder head
2 — Camshaft
3 — Camshaft bearing cap
4 — Eye
5 - Hairpin
6 - Hairpin
7 — Lid
8 — Camshaft oil seal
9 — Valve
10 — Lower valve spring plate
11 — Oil deflector cap
12 — Valve spring
13 — Upper valve spring plate
14 - Rusks
15 — Valve tappet
16 — Adjusting washer
1. Disconnect the negative cable from the battery.
2. Remove the cap from the expansion tank of the cooling system, thereby releasing the pressure in the system.
3. Remove the air filter and air supply hose.
4. Drain the coolant (see Chapter Vehicle settings and routine maintenance).
5. On turbodiesel unscrew the mounting bolts and remove the intake pipe and discharge air pipe holder on the cylinder head and block. Remove the engine oil dipstick guide tube from the cylinder block.
Close the open connection flanges on the turbocharger
6. Remove the toothed belt from the injection pump and camshaft gears (see section Removal and installation the timing belt).
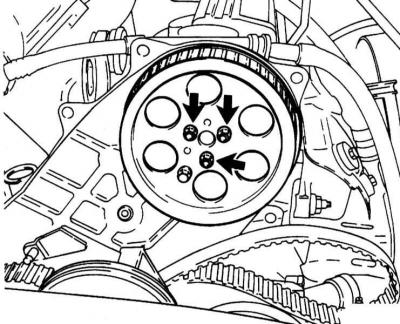
7. Remove the camshaft gear retaining bolts. Remove the TDC position lock bolt from the camshaft gear and remove the gear
Camshaft timing gear mounting bolts
8. Remove the upper bolts securing the rear timing belt cover.
9. Unscrew the mounting bolts and remove the exhaust system inlet pipe from the manifold and from the holder on the intermediate flange, turbodiesel - from the turbocharger connecting pipe.
10. Loosen the mounting bolts and remove the heat shield from the exhaust manifold.
11. On turbodiesel remove the hollow bolt of the pressure oil line on the turbocharger.
12. Remove the fuel lines from the injectors and the high-pressure fuel pump without changing their shape.
13. Remove the hose from the fuel return line.
14. Disconnect the wiring harness from the intake manifold.
15. On turbodiesel remove the pressure hose from the inlet manifold.
16. Disconnect the glow plug contact bus wiring.
17. Disconnect the coolant temperature D/B connector and the temperature sensor.
18. Disconnect the cooling system hoses from the thermostat housing.
19. On naturally aspirated engine disconnect the coolant pipe from the outlet pipe turbodiesel press the connecting pipe of the lower hose of the cooling system away from the pipe.
20. Loosen the cylinder head mounting bolts from the outside inward first by a quarter and then by half a turn. Then completely unscrew the bolts.
The order of loosening the cylinder head mounting bolts
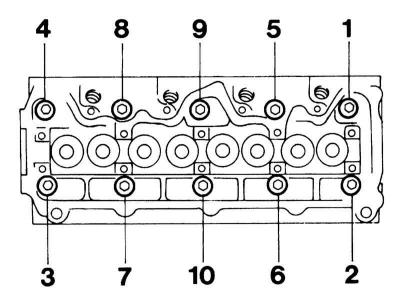
The bolts should only be removed when the engine has cooled down.
21. Push the rear timing belt cover slightly to the side and lift the cylinder head with the intake manifold and exhaust manifold.
A description of the procedure for disassembling the cylinder head in case of the need for its restoration is given in Part General and major engine repairs of this Chapter.
Preparing for installation
1. Thoroughly clean and wipe dry the mating surfaces of the cylinder head and block. Use a hard plastic or wooden scraper to remove all traces of old gasket material and carbon deposits. Also clean the piston crowns. Be extremely careful - the surfaces are easy to damage. Remember that dirt should not get into the oil ducts, water galleries, channels and threaded holes - plug them with plugs or seal them with tape. To prevent carbon deposits from getting into the gaps between the pistons and cylinders, pack the latter with thick grease, which can be easily removed with a stiff brush after the cleaning procedure is complete. After cleaning, wipe all surfaces with a clean, dry rag.
2. Inspect the mating surfaces of the head and block for deep scratches, cracks and other damage. Minor defects can be removed with a fine scraper; in more serious cases, the head should be ground or replaced.
3. Make sure the threaded holes are clean and dry - blow them out with compressed air just in case (you can use a bicycle pump). The presence of traces of grease in blind holes can lead to the destruction of the block when tightening the bolts as a result of the increase in hydraulic pressure.
4. The head mounting bolts must be replaced without fail, regardless of their current condition.
5. Using a steel ruler and a blade-type feeler gauge, check the flatness of the mating surface of the head (see section General and major engine repairs of this Chapter).
6. On these engines, the clearance between the head and pistons is adjusted by the thickness of the gasket. As a marking, there are two or one hole on the narrow side of the gasket, or there may be no hole.
7. If the cylinder head or block has been machined or new pistons have been installed, the thickness of the sealing gasket must be determined again. To do this, measure the excess at three points on the piston using an indicator. First remove any combustion residues from the piston bottom and cylinder block.
Measuring piston protrusion on 1.7L SOHC engines
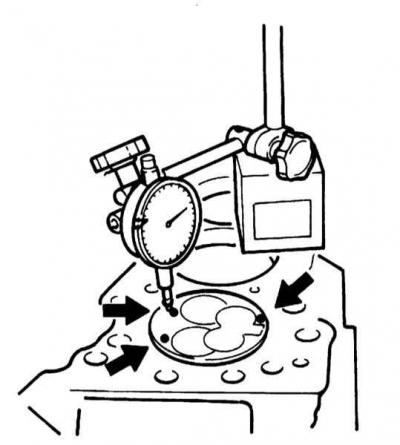
If, when measuring the piston protrusion, one of the 12 values exceeds the upper limit of the corresponding range by 0.05 mm, the next thickness class must be selected.
Cylinder head gasket
|
Designation |
Thickness, mm |
When the piston protrudes, mm |
| No hole
|
1,35
|
0.58÷0.64
|
| 1 hole
|
1,40
|
0.65÷0.70
|
| 2 holes
|
1,45
|
0.71÷0.78
|
Installation
Replacement of cylinder head mounting bolts is mandatory, regardless of their current condition!
1. Place a new sealing gasket without sealant on the degreased mating surface so as not to block the holes. The "OBEN/TOP" inscription on the gasket should face up and toward the engine timing belt.
2. Install the cylinder head.
In this case, none of the pistons should be in the TDC position. To do this, first turn the crankshaft forward or backward by a quarter of a turn.
3. Screw in the new cylinder head mounting bolts evenly in the reverse order indicated in the illustration.
Be sure to use new bolts. The bolts must be tightened in three stages: first with a force of 40 Nm, then twice at an angle of 60÷75 degrees.
4. Install the cylinder head cover with a new gasket and tighten its fasteners crosswise with force 8 Nm.
5. Installation is carried out in the reverse order of disassembly of the components. Tighten the fasteners to the required torque. Use new seals when installing the engine oil dipstick guide tube, turbocharger hoses, exhaust inlet pipe.
6. To complete the installation, fill the cooling system and check and, if necessary, correct the engine oil level. If the engine was removed due to damage to the cylinder head gasket, change the oil and oil filter, as the engine oil may contain coolant.
7. Check and, if necessary, adjust the idle speed and maximum speed.
Visitor comments