
OpelBook.ru
Cars AvtoVAZ Cars Mitsubishi Cars BMW Cars Mercedes Cars Nissan Cars Toyota Cars Chevrolet
English Русский
Български
Беларускі
Український
Српски
Hrvatski
Română
Polski
Slovenský
Magyar
 |  Sitemap  |  Contacts  |    


Main Astra Corsa Insignia Kadett Omega Vectra Zafira Others Articles
Corsa B (1993-2000) Corsa C (2000-2006, petrol) Corsa C (2000-2006)
  • Main
  • Corsa
  • Corsa B
  • Electrical equipment
  • Equipment and devices
  • Relay — general information and checking the correct functioning

Relay — general information and checking the correct functioning (Opel Corsa B)

            0

Contents: General information ⬇ Examination ⬇

General information


To supply power or control signal to some of the electrical consumers in the vehicle (such as fuel injection system components, horn, starter, cooling fan, fog lights, etc.) relays are used. In fact, a relay is an electric key that ensures the closure of the high-voltage circuit by a low-voltage signal. If a relay fails, the corresponding consumer will fail. Most relays are placed in mounting blocks located under the instrument panel and in the engine compartment of the car. A description of how to check the proper functioning of the relay is given below. Failed relays are subject to replacement.

Examination


If it is not possible to find out how to connect the relay to the corresponding electrical circuit using the electrical connection diagrams (see section Electrical connection diagrams), it should be remembered that the approach to testing any relay is, in principle, the same in all cases.

In most relays, the control circuit is always connected to two of the contact terminals. When low-voltage voltage is applied to these terminals, current begins to circulate through the relay control winding, resulting in the closure of the large contacts of the working circuit of the consumer of electrical energy. The remaining terminals are the terminals of the working (HV) circuit.

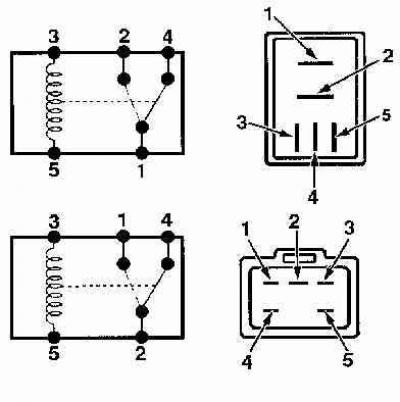
To facilitate identification of the relay terminals, explanatory markings with an image of the key connection diagram are usually applied to its body.
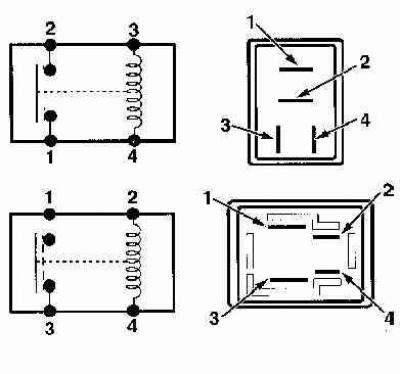


Structural diagram of a typical 4-pin relay with terminal numbers and circuit connections
Structural diagram of a typical 4-pin relay with terminal numbers and circuit connections


Structural diagram of a typical 5-pin relay with terminal numbering and circuit connections

Structural diagram of a typical 5-pin relay with terminal numbering and circuit connections


1. Before removing the relay, make sure that the corresponding circuit is de-energized.

2. Connect a fused jumper wire between one of the relay control terminals and the positive battery terminal. Use a second jumper wire to ground the other control terminal - the relay should click. Some relays require that the polarity of the connection be observed - if there is no click, try reversing the polarity of the control terminals.

3. With the jumper wires connected, check for conductivity between the terminals of the high-voltage circuit by connecting an ohmmeter in accordance with the key diagram on the relay body.

4. If the test result is negative, replace the relay.


This article is available at russian, bulgarian, belarusian, ukrainian, serbian, croatian, romanian, polish, slovak, hungarian
Checking the article: Trifonova Emilia

Share information:

Previous articles
Opel Corsa B: Equipment and devices
Next articles

Fuses — General Information
Search for causes of electrical equipment failures
General information and precautions
On-board electrical equipment specifications
Removal and installation the electric motor of the single lock
Removal and installation the switch and electric motor for adjusting the range of the light (Corsa and Combo models)
Removal and installation the seat heating switch
Removal and installation the horn
Anti-theft device and alarm
Removal and installation the instrument cluster


See similar ones from other Opel car manuals:
▶ Relay — general information and checking the correct… Opel Astra G (1998-2004)
▶ Checking the control relay Opel Kadett D (1979-1984)
▶ Checking the fuel pump relay Opel Vectra A (1988-1995)
▶ Checking the relay Opel Zafira A (1999-2005, petrol)
▶ Checking the functioning of the cooling system Opel Frontera A (1991-1998, petrol)
Link to this page in different formats

Visitor comments


No comments yet


How much will 11 + 19 =


Corsa C (2000-2006) 
  • General information
  • Introduction to guide
  • Troubleshooting
  • Vehicle device
  • User manual
  • Maintenance
  • Power unit
  • Engine repair
  • Cooling system
  • Power and exhaust system
  • Control system
  • Engine electrical equipment
  • Transmission
  • Clutch
  • Mechanical gearbox
  • Automatic gearbox
  • Drive shafts
  • Chassis
  • Brake system
  • Wheel suspension
  • Steering
  • Body
  • Exterior
  • Interior
  • Doors and windows
  • Heating and air conditioning
  • Electrical equipment
  • Equipment and devices
  • Lamps and lighting
  • Electrical circuits
Corsa C (2000-2006, petrol) 
  • User manual
  • Car access
  • Governing bodies
  • Seat control
  • Heating and air conditioning
  • Driving and maintenance
  • Engines 1.0 and 1.2 l
  • Engine repair
  • Cooling and lubrication system
  • Injection system
  • Engines 1.4, 1.6 and 1.8 l
  • Engine repair
  • Cooling and lubrication system
  • Injection system
  • Transmission
  • Clutch
  • Mechanical gearbox
  • Automatic gearbox
  • Drive shafts
  • Chassis
  • Wheels and tires
  • Wheel suspension
  • Steering
  • Brake system
  • Body
  • Exterior
  • Doors and windows
  • Electrical equipment
  • Equipment and devices
  • Lighting system
  • Electrical circuits
Corsa B (1993-2000) 
  • General information
  • Introduction to guide
  • User manual
  • Maintenance
  • Power unit
  • SOHC gasoline engines
  • DOHC gasoline engines
  • Diesel engines
  • Engine repair
  • Cooling system
  • Supply system
  • Injection system (gasoline)
  • Injection system (diesel)
  • Exhaust systems
  • Control system (gasoline)
  • Preheat system (diesel)
  • Charge and launch system
  • Transmission
  • Mechanical gearbox
  • Automatic gearbox
  • Clutch and drive shafts
  • Chassis
  • Brake system
  • Front suspension
  • Rear suspension
  • Steering
  • Body
  • Ventilation and heating
  • Exterior
  • Interior
  • Doors and windows
  • Electrical equipment
  • Equipment and devices
  • Lamps and lighting
  • Electrical circuits
OpelBook.ru © 2017–2026 · Mobile version · · Sitemap: EN BG BY UA RS HR RO PL SK HU · Feedback · Site search
Astra F, petrol · Astra G, petrol · Astra G · Astra H · Astra J, petrol · Corsa B · Corsa C, petrol · Corsa C · Insignia A · Kadett D · Kadett E · Omega A · Omega B · Omega B2 · Vectra A, petrol · Vectra A · Vectra B, petrol · Vectra B · Vectra C · Zafira A, petrol · Frontera A, petrol · Frontera B · Ascona C · Vivaro A ·
We want your visit to be comfortable 🤝! We use cookies 🍪 to make that happen.