
Lubrication of door hinges and locks
Lubricate the hinges on the hood, doors and trunk or cargo area with light-weight machine oil. Also lubricate the tongues of the locks, latches, and latches with the same oil. Check the operation and security of all hinges, latches and locks. Lightly grease the hood release mechanism and cable portions coming out of the sheaths. Check the condition of the rear cover pillars. If the stand does not hold the cover, or if a fluid leak is detected, replace the stands.
Checking the pads and drums of the rear brakes
The verification procedure is discussed in Chapter 9.
Checking the suspension, steering and CV joints
1. Put the car on the handbrake, raise the front of the car and place it on stands.
2. Inspect the rubber boots of the ball bearings and the steering mechanism, check for cracks, tears and wear on them. Any damage to these parts leads to loss of lubrication, ingress of dirt and water, and accelerated wear of the parts.
3. On cars with hydraulic booster, check the condition of the hydraulic steering hoses, the presence of traces of aging and wear on them, also check the tightness of all tubes and hoses at the junctions with fittings. Also check for leaks of pressurized fluid from under the steering gear rubber boot. Traces of a leak indicate a failure of the steering gear oil seals.
4. Rock the wheel in a vertical plane by holding the top and bottom fay (see photo). Barely perceptible movement of the wheel is allowed, however, if the play is noticeable, then the cause should be found. Ask an assistant to press the brake pedal and again shake the wheel in a vertical plane. If the play disappears or decreases significantly, then the cause of it is the failure of the hub bearings. If the play when the wheel is rocking while pressing the brake changes slightly, then the ball bearings of the suspension are worn out, or the parts for attaching the suspension arms to the body.
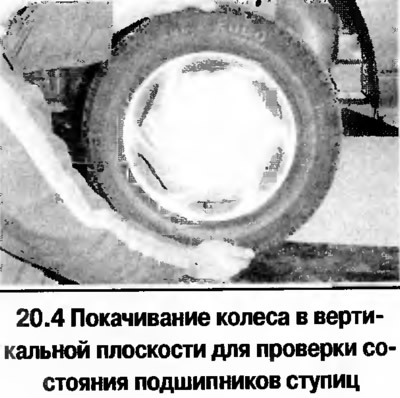
5. Rock the wheel horizontally. Any appreciable play in this plane can be caused by worn hub bearings or tie rod ends. If the inner or outer tips are worn, there will be noticeable wheel play.
6 To check the wear of the front suspension bushings, shake the part into which the bushing is pressed with a large screwdriver or pry bar. A small play is allowed due to the elasticity of the rubber. Significant play in the bushings will be easily noticeable. Also check the condition of any visible rubber bushings for cracks, delamination or swelling of the rubber.
7. Lower the vehicle and have an assistant turn the steering wheel one-eighth of a turn in both directions. There should be no steering play at all, let's also say a barely noticeable play. Otherwise, carefully check all suspension joints, in addition, check the condition of the steering column cardan joint, as well as steering gear parts.
Checking the rear suspension
8. The procedure for checking is no different from that discussed above for the front suspension.
Checking shock absorbers
9. The serviceability of the shock absorbers of the struts can be checked by sharply pressing the front part of the fender of the car. After releasing the body should return to its original position without oscillating. Weak vibrations of the body after pressing indicate a possible malfunction of the strut mounts or shock absorbers.
Checking the covers of the axle shafts
10. Raise the vehicle and place it on stands. Turn the steering wheel all the way and turn the wheel slowly. Check the condition of the rubber boot of the outer CV joint, for which push the folds of the boot. Check for cracks, tears, or signs of aging in the rubber, which can cause lubricant to wash out and dirt and water to enter the joint. Also check the tightness and condition of the clamps of the covers. Repeat the same steps for the inner CV joint (see photo) If any damage or signs of wear are found, the covers should be replaced (see chapter 8).
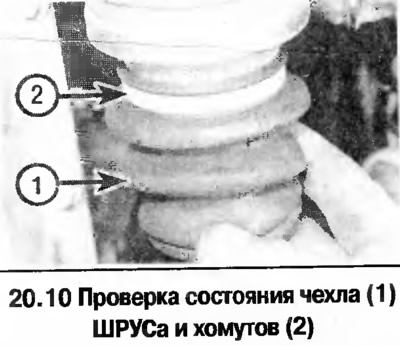
11. Check the condition of the CV joints, for which, while holding the axle shaft, try to turn the wheel. Then try to turn the axle shaft while holding the inner joint. Any appreciable play indicates wear on the pivot splines, axle shaft splines, or a loose axle shaft nut.
Checking the Fluid Level in an Automatic Transmission
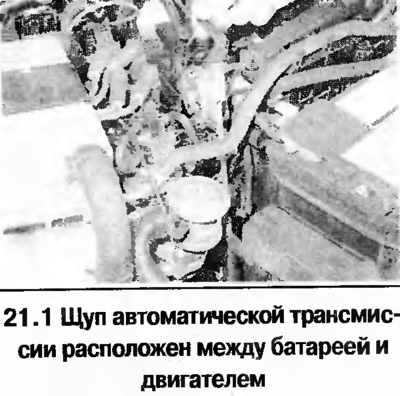
1. Drive a short drive to warm up the transmission fluid, then park the vehicle on a level surface. The transmission fluid level is checked with a dipstick located between the battery and the engine.
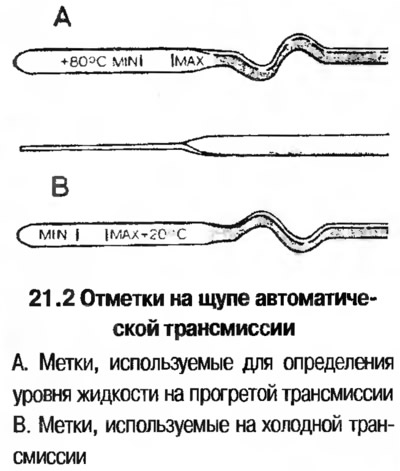
2. Move the engine to idle mode, put the selector lever in position "R". Remove the dipstick from the meter tube and wipe dry. Insert the dipstick into place until it stops in the nozzle, then remove the dipstick. Determine the level by the position of the liquid film boundary, which must be between two marks (see photo). On a warm transmission, labels with the inscription + 80°С are used, on cold ones - labels with the inscription + 20°С (on the opposite side of the probe).
3. Add fluid to the transmission (if necessary) follows through the meter nozzle, inserting a funnel with a thin metal mesh, so as not to spill the liquid and exclude the ingress of impurities. Add fluid until the level is between the top and bottom marks on the dipstick. Attention! The liquid level must always be below the upper mark, it is forbidden to overfill the liquid in order to avoid transmission failure.
4. At the end, make a short trip so that the fluid is evenly distributed throughout the internal volume of the transmission, then check the level again and add fluid if necessary.
5. Always keep the fluid level between the upper and lower marks. If the level falls below the lower mark, the transmission may be damaged.
Visitor comments