
OpelBook.ru
Cars AvtoVAZ Cars Mitsubishi Cars BMW Cars Mercedes Cars Nissan Cars Toyota Cars Chevrolet
English Русский
Български
Беларускі
Український
Српски
Hrvatski
Română
Polski
Slovenský
Magyar
 |  Sitemap  |  Contacts  |    


Main Astra Corsa Insignia Kadett Omega Vectra Zafira Others Articles
Astra F (1991-1998, petrol) Astra G (1998-2004, petrol) Astra G (1998-2004) Astra H (2004-2009) Astra J (2009-2015, petrol)
  • Main
  • Astra
  • Astra G
  • Power unit
  • Diesel engines 1.7 and 2.0
  • Bringing the piston of the first cylinder to the position of the top dead center of the end of the compression stroke (TDC)

Bringing the piston of the first cylinder to the position of the top dead center of the end of the compression stroke (TDC) (Opel Astra G)

            0

Contents: General information ⬇ Procedure execution order ⬇

General information


Cm. Bringing the piston of the first cylinder to the position of the top dead center of the compression stroke (TDC).

Procedure execution order


Bringing any of the pistons to the TDC position is done by turning the engine crankshaft. If you look at the engine from the timing drive side, the normal direction of rotation of the crankshaft is clockwise. Remember that trying to turn the shaft counterclockwise can lead to a violation of the valve timing adjustments. The first is the cylinder, the outermost on the timing drive side.

1. Disconnect the negative battery cable. Immobilize the ignition system (see Chapter Engine electrical equipment).

2. Make sure the transmission is in neutral, then firmly set the parking brake/chock the rear wheels of the vehicle. Jack up the front of the vehicle, support it, and remove the right front wheel. If so equipped, remove the crankcase guard.

3. To check the position of the working projections of the cams, remove the timing cover 2.0L models alternatively, the brake booster servo vacuum pump can be removed (see Chapter Brake system). In order to provide access to the inspection hole on the camshaft journal).

4. On sOHC models unscrew the mounting bolts and remove the crankshaft pulley.

2. Using a wrench placed on the crankshaft sprocket/pulley mounting bolt, turn the latter in the direction of normal rotation until the timing mark on the sprocket/pulley aligns with the matching mark on the base of the oil pump cover (1.7 l models)/ timing chain (2.0L models - refer to accompanying illustration). Alignment of timing marks ensures that pistons No.1 and No.4 are at TDC.
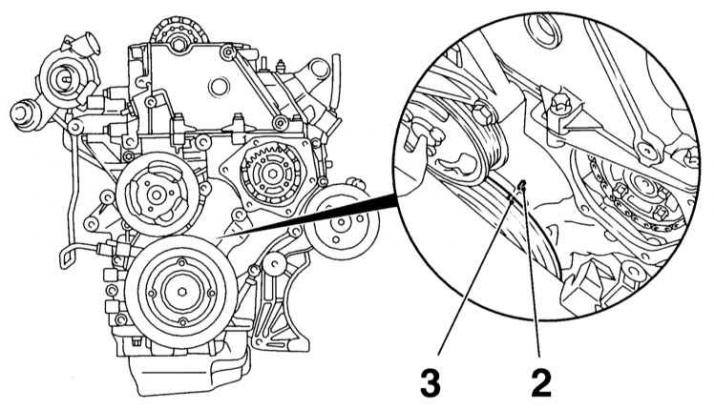


2 — Timing chain cover alignment mark (2.0L models)

2 — Timing chain cover alignment mark (2.0L models)

3 - Risk on the crankshaft pulley (2.0L models)


3. Now you should check which of the pistons is at TDC at the end of the compression stroke.

4. On 1.7 SOHC engines you should check the position of the cam of the exhaust valve drive of the first cylinder (2 - the outermost on the side of the timing drive) - in the TDC position of the end of the compression stroke of the first cylinder, this cam is turned with the working projection upward. If the cam is turned with the working projection downward, the piston of the 4th cylinder is at TDC of the end of the compression stroke and the crankshaft must be turned 360° in the normal direction.
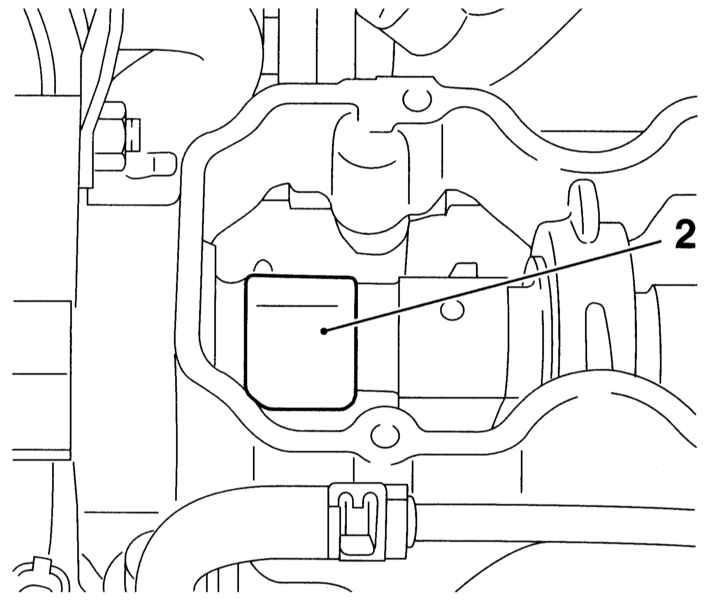
4. On 1.7 SOHC engines you should check the position of the cam of the exhaust valve drive of the…


5. On 1.7L DOHC models the output of the piston of the 1st cylinder to the required point is accompanied by the alignment of the installation marks of the gear wheels of the camshaft and the high-pressure fuel pump with the threaded mounting holes in the head/cylinder block, in addition, the drive cams of both exhaust valves of the first cylinder should turn with the working projections upwards - make sure by looking into the oil filler neck. If the marks of the gear wheels are turned relative to the marks by 180°, then the piston of the 4th cylinder is in the TDC position of the end of the compression stroke and to correct the situation it is necessary to turn the crankshaft in the normal direction by another 360°.


1. On 2.0L engines the positions of the cams or the inspection hole in the end of the camshaft journal should be checked. In the TDC position of the end of the compression stroke of the piston of the first cylinder, the cams (1) of the valve drive of the first cylinder should turn with their working projections symmetrically upwards at approximately 45° to the vertical.
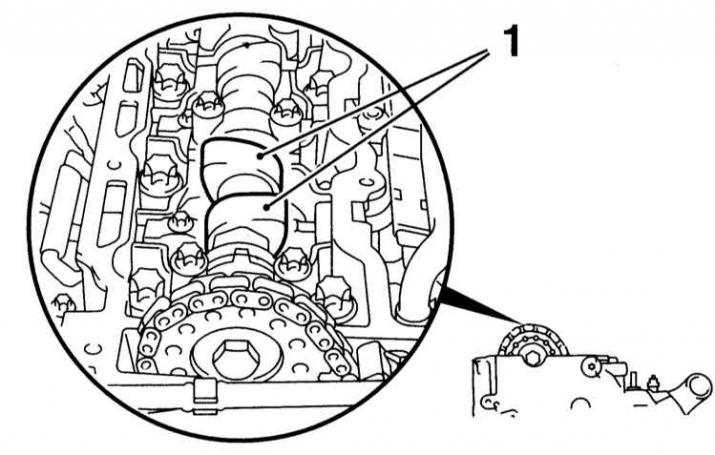
1. On 2.0L engines the positions of the cams or the inspection hole in the end of the camshaft…


The control hole in the shaft journal is in the "12 o'clock" position. If the shaft cams are turned with their working projections down, and the control hole on the journal is in the "6 o'clock" position, the piston of the 4th cylinder is at TDC of the end of the compression stroke and the crankshaft should be turned in the normal direction by another 360°.
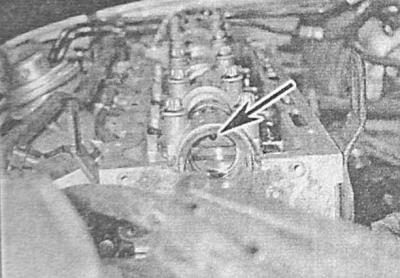
The control hole in the shaft journal is in the «12 o'clock» position. If the shaft cams are turned…


3. Fixing the pistons in the selected position 1.7L SOHC models is performed by blocking the crankshaft using a special device KM-951, which is a rod inserted into a recess in the flywheel ring gear through a hole in the transmission dome. If you don't have a special device at hand, you can use a long bolt with a diameter of 8 mm (the best bolt for this purpose is the lower steering column bolt, the end of which is sharpened into a cone).
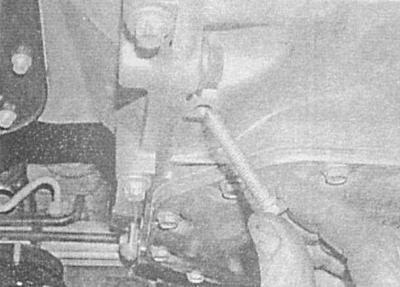
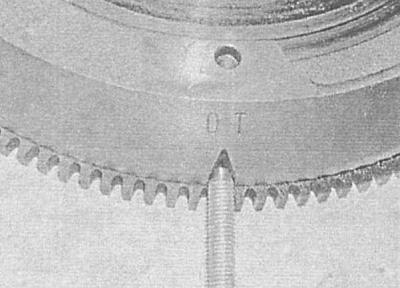

3. Fixing the pistons in the selected position 1.7L SOHC models is performed by blocking the…


3. Fixing the pistons in the selected position 1.7L SOHC models is performed by blocking the…


4. On 1.7 DOHC models the pistons can be fixed by locking the camshaft gears and the high-pressure fuel pump. The camshaft gear is locked using an M6 bolt inserted into a round opening in the wheel spoke and screwed into a threaded hole in the cylinder head.
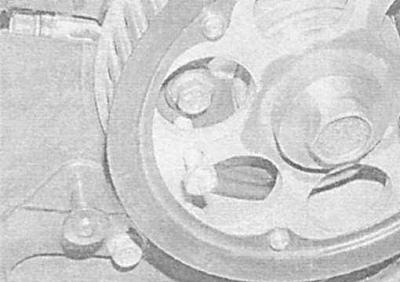
4. On 1.7 DOHC models the pistons can be fixed by locking the camshaft gears and the high-pressure…


The fuel injection pump gear is locked in a similar manner, with the only difference being that an M8 bolt should be used.
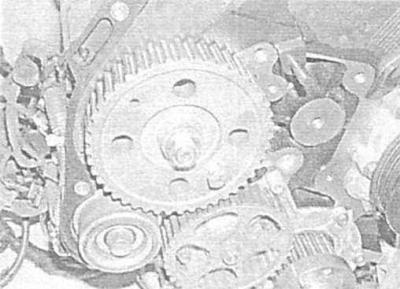


The fuel injection pump gear is locked in a similar manner, with the only difference being that an…


6. On 2.0L models the crankshaft can be locked by inserting the KM-929 device into the hole of the shaft position sensor (CKP) in the front part of the cylinder. If necessary, a suitable device can be made by yourself in accordance with the illustration Dimensional characteristics of the crankshaft locking device (mm) parameters. Remove the CKP sensor and ensure that the rod of the device enters the corresponding cutout in the shaft body.
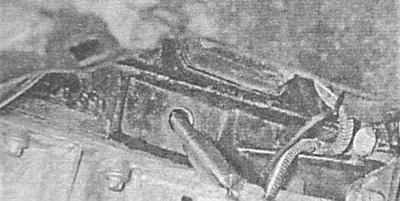
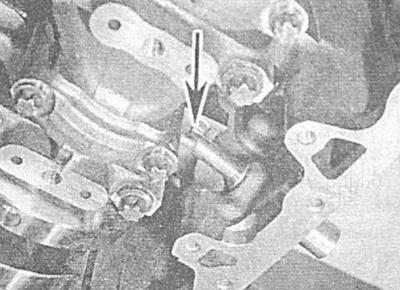
6. On 2.0L models the crankshaft can be locked by inserting the KM-929 device into the hole of the…


6. On 2.0L models the crankshaft can be locked by inserting the KM-929 device into the hole of the…


This article is available at russian, bulgarian, belarusian, ukrainian, serbian, croatian, romanian, polish, slovak, hungarian
Checking the article: Pavlovsky Nikolay

Share information:

Previous articles
Opel Astra G: Diesel engines 1.7 and 2.0
Next articles

Checking and adjusting valve timing (2.0L engines)
Removal and installation the timing cover
Removal and installation the crankshaft pulley
Removal and installation the timing belt cover
Removal and installation timing chain tensioners (2.0L engines)
Removal and installation the timing belt


See similar ones from other Opel car manuals:
▶ Bringing the piston of the first cylinder to the position… Opel Corsa B (1993-2000)
▶ Bringing the piston of the first cylinder to the top dead… Opel Vectra C (2002-2008)
▶ Setting the piston of cylinder No. 1 to top dead center… Opel Omega B2 (1999-2003)
▶ Adjusting the position of the steering wheel Opel Insignia A (2008-2017)
▶ Cylinder head specifications Opel Kadett E (1984-1995)
Link to this page in different formats

Visitor comments


No comments yet


How much will 16 + 34 =


Astra J (2009-2015, petrol) 
  • General information
  • Vehicle device
  • User manual
  • Faults en route
  • Maintenance
  • Power unit
  • Engine repair
  • Cooling and lubrication system
  • Engine power system
  • Exhaust system
  • Transmission
  • Clutch
  • Car gearbox
  • Drive shafts
  • Chassis
  • Front suspension
  • Rear suspension
  • Steering
  • Brake system
  • Wheels and tires
  • Body
  • Exterior
  • Interior
  • Doors and windows
  • Body Care
  • Heating and air conditioning
  • Security systems
  • Electrical equipment
  • Equipment and devices
  • Lighting and signaling
  • Power devices
  • Electrical circuits
Astra H (2004-2009) 
  • General information
  • Introduction to the guide
  • Troubleshooting
  • User manual
  • Maintenance
  • Power unit
  • Engine repair
  • Cooling and heating
  • Power and exhaust system
  • Ignition system
  • Launch and charge system
  • Transmission
  • Mechanical gearbox
  • Automatic gearbox
  • Drive shafts
  • Chassis
  • Brake system
  • Car suspension
  • Steering
  • Body
  • Interior
  • Exterior
  • Electrical equipment
  • Equipment and devices
  • Electrical circuits
Astra G (1998-2004) 
  • General information
  • Introduction to manual
  • User manual
  • Maintenance
  • Power unit
  • SOHC gasoline engines
  • DOHC gasoline engines
  • Diesel engines 1.7 and 2.0
  • Engine repair
  • Cooling system
  • Supply system
  • Injection system (gasoline)
  • Injection system (diesel)
  • Exhaust system
  • Charge and launch system
  • Ignition system (gasoline)
  • Preheat system (diesel)
  • Transmission
  • Manual gearbox
  • Automatic gearbox
  • Clutch
  • Drive shafts
  • Chassis
  • Brake system
  • Wheel suspension
  • Steering
  • Body
  • Exterior
  • Interior
  • Doors and windows
  • Ventilation and heating
  • Electrical equipment
  • Equipment and devices
  • Electrical circuits
Astra G (1998-2004, petrol) 
  • General information
  • User manual
  • Car care
  • Maintenance
  • Power unit
  • Single shaft engines
  • Twin shaft engines
  • Engine repair
  • Cooling and heating
  • Fuel and exhaust systems
  • Starting and charging system
  • Ignition system
  • Transmission
  • Clutch
  • Mechanical gearbox
  • Automatic gearbox
  • Drive shafts
  • Chassis
  • Brake system
  • Car suspension
  • Steering
  • Body
  • Interior
  • Exterior
  • Electrical equipment
  • Equipment and devices
  • Wiring diagrams Opel Astra
  • Wiring diagrams Opel Zafira
Astra F (1991-1998, petrol) 
  • General information
  • Maintenance
  • Power unit
  • Engine in car
  • Engine removed
  • Cooling system
  • Heating and ventilation
  • Fuel supply (carburetor)
  • Fuel supply (injector)
  • Emission control
  • Ignition system
  • Transmission
  • Clutch
  • Mechanical gearbox
  • Automatic gearbox
  • Drive shafts
  • Chassis
  • Brake system
  • Car suspension
  • Steering
  • Body
  • Exterior
  • Interior
  • Electrical equipment
  • Equipment and devices
  • Electrical circuits
OpelBook.ru © 2017–2026 · Mobile version · · Sitemap: EN BG BY UA RS HR RO PL SK HU · Feedback · Site search
Astra F, petrol · Astra G, petrol · Astra G · Astra H · Astra J, petrol · Corsa B · Corsa C, petrol · Corsa C · Insignia A · Kadett D · Kadett E · Omega A · Omega B · Omega B2 · Vectra A, petrol · Vectra A · Vectra B, petrol · Vectra B · Vectra C · Zafira A, petrol · Frontera A, petrol · Frontera B · Ascona C · Vivaro A ·
We want your visit to be comfortable 🤝! We use cookies 🍪 to make that happen.