
OpelBook.ru
Cars AvtoVAZ Cars Mitsubishi Cars BMW Cars Mercedes Cars Nissan Cars Toyota Cars Chevrolet
English Русский
Български
Беларускі
Український
Српски
Hrvatski
Română
Polski
Slovenský
Magyar
 |  Sitemap  |  Contacts  |    


Main Astra Corsa Insignia Kadett Omega Vectra Zafira Others Articles
Vectra A (1988-1995, petrol) Vectra A (1988-1995) Vectra B (1995-2002, petrol) Vectra B (1995-2002) Vectra C (2002-2008)
  • Main
  • Vectra
  • Vectra C
  • Transmission
  • Drive shafts
  • Checking and replacing constant velocity joints (CV joints)

Checking and replacing constant velocity joints (CV joints) (Opel Vectra C)

            0

Contents: Examination ⬇ Replacing the CV joint ⬇

Examination


1. A clearly failed CV joint can be identified by characteristic impacts when the load changes, and also by ear by the characteristic clicking sound it makes when turning - the sharper the turn, the greater the load on the joint, and the more clearly the clicks are heard.

2. For a more detailed inspection, lift the vehicle and place it on stands. Remove the crankcase guard if necessary.

3. Press the control arm up forcefully and then pull it down (see accompanying illustration), then press hard on the bottom of the wheel and push it outward first, then pull it inward. While checking, watch the joint - if any noticeable play is detected, the joint must be replaced.

Note: When checking, it is necessary to exclude the influence of play in other suspension elements and the code part.


4. Check the integrity of the boot; replace if damaged.
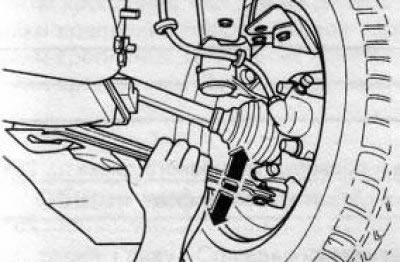
4.3 Checking the condition of the CV joint

4.3 Checking the condition of the CV joint


Replacing the CV joint


Note: Damaged hinges are replaced only as a set.


5. To replace the joint, it is necessary to disassemble the drive shaft.


6. Remove the drive shaft (see Section 2) and clamp it in a vice - use soft jaws or aluminum pads!

7. Release or cut the bandage tapes (be careful not to damage the shaft) and slide the protective boot off the damaged joint.

8. Using a screwdriver or snap ring pliers, loosen the hinge retaining ring (see accompanying illustrations), if necessary, first remove excess grease from the joint.
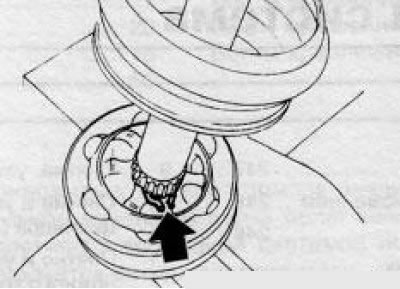
4.8a CV joint retaining ring
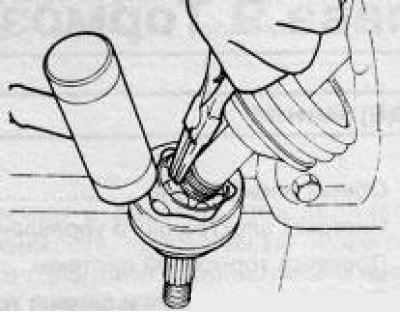
4.8a CV joint retaining ring


4.8b Removing the retaining ring using special pliers

4.8b Removing the retaining ring using special pliers


Note: Depending on the engine installed, the outer joints of the drive shafts of some models may be installed without retaining rings. In this case, the retaining ring is installed on the drive shaft.


9. With a soft-faced hammer (for example, plastic) knock the joint off the shaft.


10. Install a new snap ring into the groove of the new joint/drive shaft, making sure it is installed correctly.

11. If dirt is found in the lubricant, for example as a result of damage to the protective cover, completely remove the old lubricant and wash the joint in gasoline.
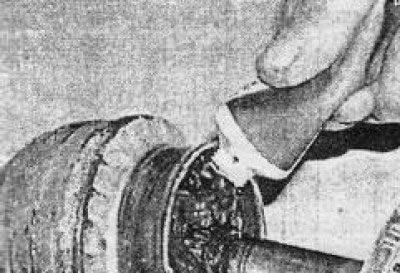
4.11 Filling the CV joint with grease

4.11 Filling the CV joint with grease


Caution: Even a small amount of dirt can cause the joint to break!


Lubricate the joint with the required type of grease (for example, special lubricant Opel-1941522) as shown in the accompanying illustration or with a wooden spatula. Press the joint onto the shaft until the locking ring snaps into place using a soft-faced hammer.

12. Fill the boot with the remaining grease, pull it over the hinge and secure with bandage straps (see Section 5).

13. Install the drive shaft on the vehicle (see Section 2).


This article is available at russian, bulgarian, belarusian, ukrainian, serbian, croatian, romanian, polish, slovak, hungarian
Checking the article: Meshcheryakov Damir

Share information:

Previous articles
Opel Vectra C: Drive shafts
Next articles

Removal and installation the intermediate shaft
Removal and installation drive shafts
General information about drive shafts
Drive shaft specifications
Replacing CV joint boots


See similar ones from other Opel car manuals:
▶ Checking the condition and replacing constant velocity… Opel Astra H (2004-2009)
▶ Checking the condition and replacing constant velocity… Opel Corsa B (1993-2000)
▶ Replacing the ball joints of the suspension arms Opel Kadett E (1984-1995)
▶ Cardan shaft elastic joints — replacement Opel Omega B2 (1999-2003)
▶ Accessory Drive Belt — Checking Condition and Replacing Opel Zafira A (1999-2005, petrol)
Link to this page in different formats

Visitor comments


No comments yet


How much will 13 + 23 =


Vectra C (2002-2008) 
  • General information
  • User manual
  • Vehicle device
  • Maintenance
  • Troubleshooting
  • Power unit
  • Engine repair
  • Cooling system
  • Power and control system
  • Engine electrics
  • Transmission
  • Clutch
  • Car gearbox
  • Drive shafts
  • Chassis
  • Car suspension
  • Steering
  • Brake system
  • Body
  • Exterior
  • Interior
  • Doors, locks and windows
  • Heating and ventilation
  • Electrical equipment
  • Equipment and devices
  • Headlights and lighting
  • Electrical circuits
Vectra B (1995-2002) 
  • General information
  • User manual
  • Weekly checks
  • Maintenance (gasoline)
  • Maintenance (diesel)
  • Troubleshooting
  • Power unit
  • SOHC gasoline engine
  • DOHC petrol engine
  • Diesel engine 1.7 liter
  • Diesel engine 2.0 liters
  • Engine repair
  • Cooling system
  • Fuel system (gasoline)
  • Fuel system (diesel)
  • Charging system
  • Launch system
  • Ignition and preheat
  • Transmission
  • Clutch
  • Mechanical gearbox
  • Automatic gearbox
  • Drive shafts
  • Chassis
  • Brake system
  • Wheel suspension
  • Steering
  • Body
  • Exterior
  • Interior
  • Doors and windows
  • Heating and ventilation
  • Electrical equipment
  • Equipment and devices
  • Electrical circuits
Vectra B (1995-2002, petrol) 
  • General information
  • Maintenance
  • Help with malfunctions
  • Power unit
  • Engine repair
  • Exhaust system
  • Cooling system
  • Fuel system
  • Multec injection system
  • Four point injection
  • Transmission
  • Clutch
  • Gearbox and drive
  • Chassis
  • Wheel suspension
  • Steering
  • Brake system
  • Wheels and tires
  • Body
  • Exterior
  • Interior
  • Electrical equipment
  • Fuses and electronics
  • Power devices
  • Ignition system
  • Lighting and signaling
  • Equipment and devices
  • Heating and ventilation
  • Electrical circuits
Vectra A (1988-1995) 
  • Power unit
  • Engine repair
  • Ignition system
  • Lubrication system
  • Cooling system
  • Injection system
  • Fuel system (carburetor)
  • Fuel system (diesel)
  • Exhaust system
  • Transmission
  • Clutch
  • Car gearbox
  • Chassis
  • Front suspension
  • Rear suspension
  • Steering
  • Brake system
  • Wheels and tires
  • Body
  • Exterior
  • Interior
  • Electrical equipment
  • Electrical circuits
Vectra A (1988-1995, petrol) 
  • General information
  • User manual
  • Maintenance
  • Power unit
  • SOHC engine
  • DOHC engine
  • Cooling and ventilation
  • Fuel system (carburetor)
  • Fuel system (injector)
  • Exhaust converter
  • Transmission
  • Clutch
  • Mechanical gearbox
  • Automatic gearbox
  • Drive shafts
  • Chassis
  • Brake system
  • Car suspension
  • Steering
  • Body
  • Body elements
  • Electrical equipment
  • Power devices
  • Equipment and devices
  • Electrical circuits
OpelBook.ru © 2017–2026 · Mobile version · · Sitemap: EN BG BY UA RS HR RO PL SK HU · Feedback · Site search
Astra F, petrol · Astra G, petrol · Astra G · Astra H · Astra J, petrol · Corsa B · Corsa C, petrol · Corsa C · Insignia A · Kadett D · Kadett E · Omega A · Omega B · Omega B2 · Vectra A, petrol · Vectra A · Vectra B, petrol · Vectra B · Vectra C · Zafira A, petrol · Frontera A, petrol · Frontera B · Ascona C · Vivaro A ·
We want your visit to be comfortable 🤝! We use cookies 🍪 to make that happen.