
OpelBook.ru
Cars AvtoVAZ Cars Mitsubishi Cars BMW Cars Mercedes Cars Nissan Cars Toyota Cars Chevrolet
English Русский
Български
Беларускі
Український
Српски
Hrvatski
Română
Polski
Slovenský
Magyar
 |  Sitemap  |  Contacts  |    


Main Astra Corsa Insignia Kadett Omega Vectra Zafira Others Articles
Vectra A (1988-1995, petrol) Vectra A (1988-1995) Vectra B (1995-2002, petrol) Vectra B (1995-2002) Vectra C (2002-2008)
  • Main
  • Vectra
  • Vectra A
  • Power unit
  • Lubrication system
  • Maintenance of the lubrication system

Maintenance of the lubrication system (Opel Vectra A)

            0

Contents: Engine oil change ⬇ Oil drain ⬇ Filling with oil ⬇ Volume of oil to be filled ⬇

Engine oil change


The engine oil must be changed every 15,000 km, but not less than once a year. At the same time, the oil filter is also changed. Under severe operating conditions of the vehicle (frequent short-distance trips, frequent cold engine starts, operation on heavily polluted roads) oil and filter changes should be made more frequently.

Attention! Used oil and filters must be handed over to special collection points. Never dump oil into the ground, as this is harmful to the environment.


Oil drain


Start the engine and warm it up to operating temperature (oil temperature 80°C).

Note: Oil can be pumped out through the dipstick hole.


Raise the vehicle and place it on supports.

Install a container to collect used oil.

Remove the drain plug from the oil pan and drain the oil completely.

Caution! If the oil contains a large amount of metal filings or other wear products, this indicates the presence of scoring, for example, in the crankshaft or connecting rod bearings. To avoid further damage, it is necessary to thoroughly clean the oil passages and pipes. It is also advisable to replace the oil cooler, if there is one.


Tighten the oil drain plug (installing a new gasket):
  • for petrol and diesel naturally aspirated engines - 45 Nm torque,
  • for a 1.7-liter turbocharged diesel engine - 80 Nm.

Lower the car.
Lower the car.


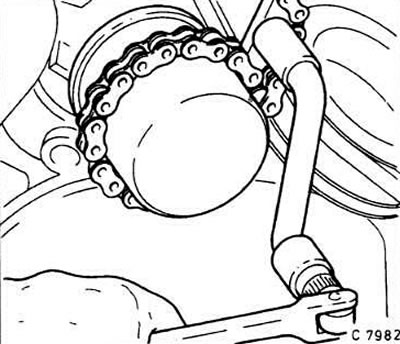
Unscrew the oil filter. In workshops, a special tool is used for this purpose. If you do not have one, you can use a regular leather belt. To make removal easier, you can use a sharp screwdriver, piercing the filter with it and using it as a lever. When removing the filter, oil flows out, so you need to put a suitable container underneath.


Filling with oil


When installing the filter, follow the instructions provided on its body.

(Information taken from the website www.opelbook.ru)

Rinse the filter flange with fuel.

Lightly lubricate the rubber filter seal with oil.

Tighten the filter by hand.

Pour clean oil into the oil filler hole.

Attention! CD type motor oils intended for diesel engines should not be used for petrol engines!


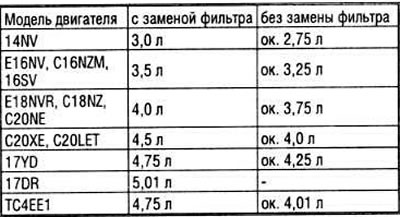
Volume of oil to be filled


Volume of oil to be filled

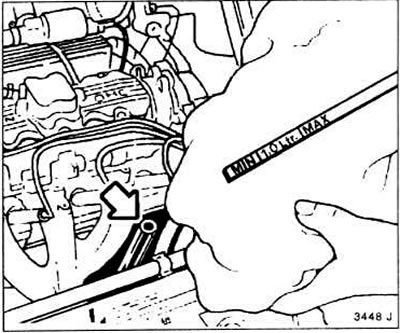
The volume of oil between the "max" and "min" marks on the dipstick for all engines is approximately 1 liter.

Attention! In engines with a catalytic converter, do not allow the oil level to exceed the "max" mark under any circumstances. Excess oil may get into the catalytic converter and cause it to fail!


After a test drive, check the tightness of the oil drain plug and oil filter. If necessary, tighten the plug and filter.

For better control of the engine, it is necessary to replace the used oil with oil of the same type and, if possible, the same brand. It is recommended to stick a sheet of thick paper in the engine compartment indicating the brand and viscosity of the oil used.
For better control of the engine, it is necessary to replace the used oil with oil of the same type…


It is not recommended to change the type of oil used during the operation of the vehicle. In addition, motor oils of the same type but different brands should not be mixed. Oils of the same type and brand but different viscosity can be mixed.


This article is available at russian, bulgarian, belarusian, ukrainian, serbian, croatian, romanian, polish, slovak, hungarian
Checking the article: Zinoviev Kirill

Share information:

Previous articles
Opel Vectra A: Lubrication system
Next articles

Removal and installation the safety valve
Removal and installation the oil pump
Removal and installation the oil pan
Measuring oil pressure
Measuring oil temperature
Operation of the lubrication system


See similar ones from other Opel car manuals:
▶ Lubrication system malfunctions Opel Astra H (2004-2009)
▶ Maintenance of the cooling system (emptying, flushing and… Opel Corsa B (1993-2000)
▶ Lubrication system of gasoline engines Opel Insignia A (2008-2017)
▶ Lubrication system of a carburetor engine Opel Kadett E (1984-1995)
▶ Identifying and troubleshooting engine lubrication system… Opel Omega B2 (1999-2003)
Link to this page in different formats

Visitor comments


No comments yet


How much will 36 + 32 =


Vectra C (2002-2008) 
  • General information
  • User manual
  • Vehicle device
  • Maintenance
  • Troubleshooting
  • Power unit
  • Engine repair
  • Cooling system
  • Power and control system
  • Engine electrics
  • Transmission
  • Clutch
  • Car gearbox
  • Drive shafts
  • Chassis
  • Car suspension
  • Steering
  • Brake system
  • Body
  • Exterior
  • Interior
  • Doors, locks and windows
  • Heating and ventilation
  • Electrical equipment
  • Equipment and devices
  • Headlights and lighting
  • Electrical circuits
Vectra B (1995-2002) 
  • General information
  • User manual
  • Weekly checks
  • Maintenance (gasoline)
  • Maintenance (diesel)
  • Troubleshooting
  • Power unit
  • SOHC gasoline engine
  • DOHC petrol engine
  • Diesel engine 1.7 liter
  • Diesel engine 2.0 liters
  • Engine repair
  • Cooling system
  • Fuel system (gasoline)
  • Fuel system (diesel)
  • Charging system
  • Launch system
  • Ignition and preheat
  • Transmission
  • Clutch
  • Mechanical gearbox
  • Automatic gearbox
  • Drive shafts
  • Chassis
  • Brake system
  • Wheel suspension
  • Steering
  • Body
  • Exterior
  • Interior
  • Doors and windows
  • Heating and ventilation
  • Electrical equipment
  • Equipment and devices
  • Electrical circuits
Vectra B (1995-2002, petrol) 
  • General information
  • Maintenance
  • Help with malfunctions
  • Power unit
  • Engine repair
  • Exhaust system
  • Cooling system
  • Fuel system
  • Multec injection system
  • Four point injection
  • Transmission
  • Clutch
  • Gearbox and drive
  • Chassis
  • Wheel suspension
  • Steering
  • Brake system
  • Wheels and tires
  • Body
  • Exterior
  • Interior
  • Electrical equipment
  • Fuses and electronics
  • Power devices
  • Ignition system
  • Lighting and signaling
  • Equipment and devices
  • Heating and ventilation
  • Electrical circuits
Vectra A (1988-1995) 
  • Power unit
  • Engine repair
  • Ignition system
  • Lubrication system
  • Cooling system
  • Injection system
  • Fuel system (carburetor)
  • Fuel system (diesel)
  • Exhaust system
  • Transmission
  • Clutch
  • Car gearbox
  • Chassis
  • Front suspension
  • Rear suspension
  • Steering
  • Brake system
  • Wheels and tires
  • Body
  • Exterior
  • Interior
  • Electrical equipment
  • Electrical circuits
Vectra A (1988-1995, petrol) 
  • General information
  • User manual
  • Maintenance
  • Power unit
  • SOHC engine
  • DOHC engine
  • Cooling and ventilation
  • Fuel system (carburetor)
  • Fuel system (injector)
  • Exhaust converter
  • Transmission
  • Clutch
  • Mechanical gearbox
  • Automatic gearbox
  • Drive shafts
  • Chassis
  • Brake system
  • Car suspension
  • Steering
  • Body
  • Body elements
  • Electrical equipment
  • Power devices
  • Equipment and devices
  • Electrical circuits
OpelBook.ru © 2017–2026 · Mobile version · · Sitemap: EN BG BY UA RS HR RO PL SK HU · Feedback · Site search
Astra F, petrol · Astra G, petrol · Astra G · Astra H · Astra J, petrol · Corsa B · Corsa C, petrol · Corsa C · Insignia A · Kadett D · Kadett E · Omega A · Omega B · Omega B2 · Vectra A, petrol · Vectra A · Vectra B, petrol · Vectra B · Vectra C · Zafira A, petrol · Frontera A, petrol · Frontera B · Ascona C · Vivaro A ·
We want your visit to be comfortable 🤝! We use cookies 🍪 to make that happen.