
During the check, the engine must be cooled, the temperature must not exceed +20°С.
1. Disconnect the battery ground cable.
Warning! This erases the data from the fault memory and the security code of the radio.
2. Unscrew the bottom guard of the engine.
3. Remove the intake manifold.
4. On vehicles with air conditioning, remove the viscous fan.
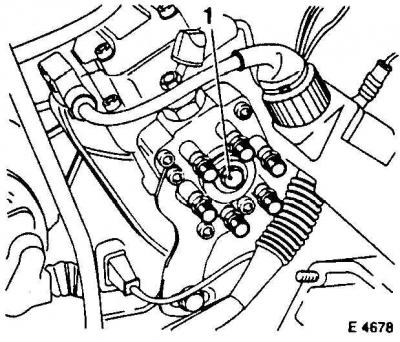
5. unscrew the bolt (1).
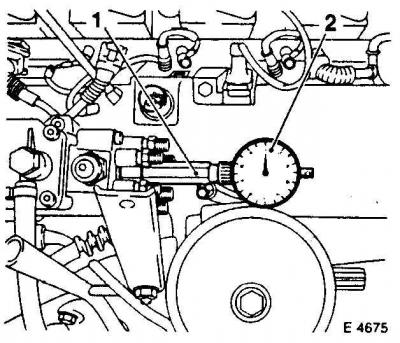
6. Screw the nozzle into place of the unscrewed bolt (1) (OPEL KM-226-A) and indicator (2) (KM-571-B) and push the plunger down a little.
7. Turn the crankshaft clockwise to the TDC position of the 1st cylinder so that the indicator pointer remains at the deepest point for a while. The start of the turn should be between 60°and 90°before TDC.
8. The piston of the 1st cylinder is at TDC if both cams of the 1st cylinder are facing up on the camshaft drive chain. To control, remove the filler cap and watch the cams.
9. As the crankshaft rotates, engage 5th gear, release the handbrake and move the vehicle. Or apply the handbrake, place the transmission in neutral and turn the crankshaft pulley with the socket head on the center bolt.
10. Set the indicator to "0".
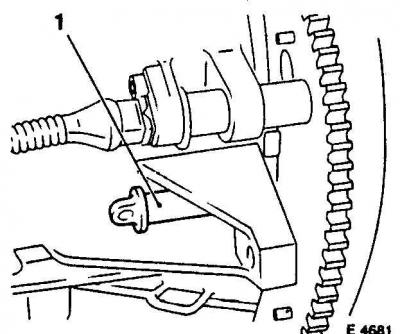
11. Take out the plug (1) engine compartment.
12. Rotate the crankshaft 2 turns so that the OPEL-813 rod or other suitable rod can be inserted (drill) through the hole in the cylinder block into the hole in the flywheel.
Warning! Do not rotate the shaft in the opposite direction, this may lead to an incorrect reading of the indicator.
13. The indicator should now show a height of 0.95±0.02 mm for the new camshaft drive chain.
Warning! For the camshaft drive circuit, after a run of 20,000 km, the indicator should show 0.90±0.02 mm.
14. If the value is not as required, adjust the pump.
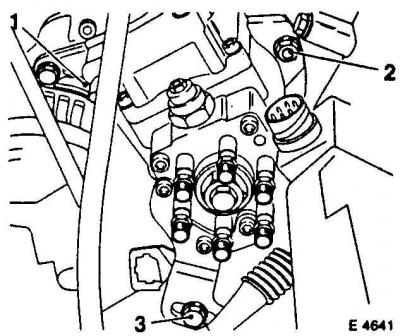
15. Loosen the bolt (3), without unscrewing it. Loosen nuts (1 and 2).
Warning! Unscrew the nuts not much, literally 2 or 3 turns, to avoid jamming the camshaft drive chain.
16. Turn the injection pump until the indicator shows the correct value.
17. Tighten the nuts and bolt from sequence 1 to 3 with a torque of 25 N.m.
18. Remove the test rod and check the adjustment again. At the same time, turn the crankshaft only in the correct direction.
Installation
1. Remove the test rod and indicator.
2. Install the cylinder block cap.
3. Fasten the central bolt with a new sealing ring with a force of 30 N.m.
4. Install the filler cap.
5. Install the intake manifold.
Cars with air conditioning
6. Screw on the viscous fan.
7. Screw on the engine bottom shield.
8. Connect the battery ground cable.
9. Set the time on the clock.
10. Set the radio's security code.
11. Start the engine, bleed the injection system if necessary.
12. After a test drive, check the tightness of the central bolt, tighten if necessary.
Visitor comments