


Contents: General information ⬇ AT Mode Switching Management ⬇ Standard positions of the selector…⬇ Selector lever positions for driving…⬇ AT Emergency Operation Mode ⬇ Emergency release of the selector…⬇ Electronic control of some AT…⬇ Some techniques for driving a car…⬇
General information
Attention: Automatic transmission is a very complex system in its technical design - independent attempts to interfere with its operation and adjustment are unacceptable! If you have any questions about the operation of the AT or if its operation deviates from what is described below, contact only the Opel service station!
AT allows you to control the car without constant driver intervention in the gear shifting process. The cars discussed in this Manual can be equipped with a 4-speed AT. The AT selector lever is floor-mounted and is located on the center console (see illustrations 23.1).
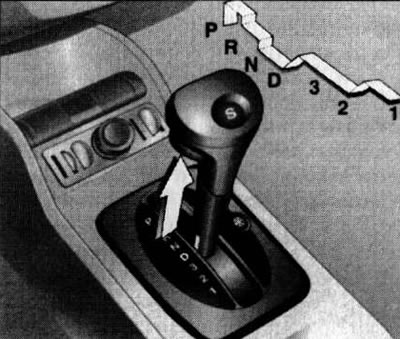
23.1. Selector lever AT
The current AT mode indication is displayed on the instrument cluster in the field of the corresponding instrument cluster display (see Section 16).
Note: When shifting the selector lever while parked/stopped, it is recommended to always prevent the vehicle from moving using the parking or service brake systems.
AT Mode Switching Management
Gear shifting while the vehicle is moving is performed automatically depending on the selected position of the AT selector lever, the degree to which the gas pedal is depressed and the current driving speed.
The transmission range selector lever can be in one of seven fixed positions "P", "R", "N", "D", "3", "2" or "1". The engine can only be started in the "P" or "N" positions of the lever. To switch AT, move the lever along the guide groove.
To the left of the selector lever, a panel is mounted on the center console (see illustration 23.1) with AT mode designation.
The selector lever is equipped with a lock release button. The lock release button must be pressed when moving the lever to the "P" and "R" positions, when switching to the "3" or "1" positions, and also when moving the lever from the "P" position. The lever can be moved to other positions without pressing the button.
The engine starting procedure is described above (see Section 21). When starting off, to release the AT selector lever lock, depress the foot brake pedal. Press the lock release button and move the lever to the position "D", "3", "2" or "1" for forward movement or "R" for reverse movement.
Release the parking brake, - the brake system indicator lamp on the instrument cluster (see Section 16) should go out.
Release the foot brake pedal and gently press the gas pedal.
Caution: Never press the gas pedal while the brake pedal is depressed!
When changing gears, remove your foot from the accelerator pedal.
Caution: When the gear is engaged and the brake pedal is released, the car starts to move slowly, even if the gas pedal is released! Never press the gas and brake pedals simultaneously - otherwise this may lead to AT failure!
Standard positions of the selector lever
Position "P". In this position, when the key is removed from the ignition switch, the transmission is locked, providing additional protection for the parked car. In this case, it is impossible to move the lever from the "P" position even when the brake pedal is depressed. A description of the emergency release procedure for the lever lock is given below.
Note: The key can only be removed from the ignition switch after the selector lever is moved to the "P" position and the foot brake pedal is released. To avoid damage to the AT, move the lever to the "P" position only after the vehicle has come to a complete stop.
Position "R". Setting the selector lever to this position ensures the vehicle moves in reverse. Only turn the lever to position "R" from position "N" (Neutral) after the vehicle has come to a complete stop. If this attempt fails, press the foot brake pedal and slowly move the lever first back to position "N", then to position "R". Do not forget to press the lock release button.
Position "N". In this position, none of the AT gears will be engaged. Position "N" (Neutral) is used to start a stalled engine while driving or when stopping the car with the engine running. If for any reason you need to leave the car, first move the range selector lever to position "P". When moving the lever from position "N", depress the foot brake pedal.
Caution: Shifting the transmission into position "N" while driving carries the risk of serious internal damage to the gearbox!
Position "D". In this position the range selector lever should be constantly in the car's movement under normal road conditions, this ensures automatic switching of AT between forward gears in accordance with changes in the speed mode and the degree of pressing of the gas pedal from the first gear to the highest. The corresponding display will show the indication "D" and the currently engaged gear.
Selector lever positions for driving in special conditions
AT modes "3", "2" or "1" are designed to limit automatic gear shifting above the specified level and are used when driving in special conditions.
Position "3". In this position, the transmission shifting is limited to third gear. The mode can be used to perform engine braking. Switching on the "3" range is also useful for eliminating unnecessary cyclic shifting of the automatic transmission between third and fourth gears - such cyclic shifting of the gearbox can be observed, for example, when driving in dense traffic with frequent slowdowns and stops.
Position "2". When range "2" is engaged, the automatic transmission will operate permanently in second gear. It is recommended to use this limitation when towing a trailer, when driving on hilly terrain or to perform engine braking on a steep descent. Position "2" can also be used when starting off on slippery road surfaces or when driving in snow, helping to prevent severe slippage of the vehicle's drive wheels.
Note: If mode "2" is engaged at too high a speed, the transmission will continue to operate in the previous gear until the shift point to 2nd gear is reached.
Position "1". When range "1" is engaged, the automatic transmission will constantly operate in first (lowest) gear. The mode can be used when driving with a trailer on particularly steep descents and long passes, when driving in deep snow, sand and mud.
Note: If mode "1" is engaged at too high a speed, the gearbox will continue to operate in 2nd gear until the shift point to 1st gear is reached - for example by braking.
AT Emergency Operation Mode
A malfunction of the AT is indicated by a corresponding indicator lamp on the instrument cluster (see Section 16). If the lamp does not go out after starting the engine or lights up while driving, the automatic transmission mode is switched off. To continue driving, you can change gears manually using the selector lever. The ability to engage 2nd gear is completely blocked and switching is performed according to the "1-3-4" scheme. In this case, the following scheme of the relationship of the lever positions takes place:
- 1 - 1st gear
- 2 - 3rd gear
- 3 - 4th gear
- D — 4th gear
- N — Neutral gear
- R — Reverse
- P - Parking position
To eliminate the causes of AT failures, contact service station specialists.
Emergency release of the selector lever lock in position "P"
The need for emergency disabling of the AT selector lever lock in the "P" position arises in the event of a breakdown of the locking mechanism, as well as when it is necessary to tow a faulty vehicle. In addition, the selector lever may not leave the locked position if the battery has an insufficient charge level.
If the cause of the malfunction is a discharged battery, perform a jump start (see Chapter "Introduction"),
If the lock cannot be disabled for other reasons, perform the following operations:
- Set the parking brake;
- Release the rear part of the panel from the clips (see illustration 23.2) selector lever on the center console;
- Move the panel up and to the side, using a screwdriver, push the yellow stopper forward (see illustration 23.3) and move the lever out of position P;
- Return the selector cover to its original position and make sure it is securely locked.
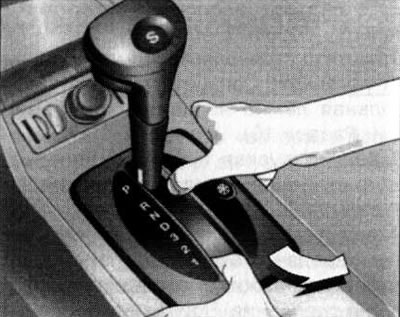
23.2. Disconnecting the AT selector lever panel |
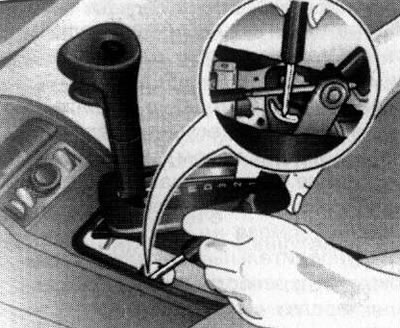
23.3. Emergency disabling of the selector lever lock in position "P" |
The next time the selector lever is shifted to position "P", the locking occurs again.
At the first opportunity, contact a service station to eliminate the cause of the malfunction, and/or recharge the battery.
Electronic control of some AT functions
The AT electronics system provides automatic control of some functions.
Adaptive gearshift program. This function automatically adjusts the gearshift mode depending on driving conditions, making appropriate adjustments, for example, when driving uphill and downhill, when driving with a trailer or with a heavy load.
Automatic switching to neutral gear during short-term stop. To reduce fuel consumption during stops (for example, at a traffic light) AT automatically shifts to neutral when the following conditions are met:
The selector lever is set to positions D, 3, 2 or 1;
- The brake pedal is depressed;
- The car is stationary;
- The gas pedal is released;
- Transmission oil temperature (ATF) is above 0°C.
When you release the brake pedal and press the gas pedal, the car starts moving as usual.
The cold start temperature control program allows the catalytic converter to (see section 28) quickly reach the operating temperature required for its optimal functioning by delaying upshifts (high engine speeds are maintained).
Material published on the website: OpelBook.ru
Some techniques for driving a car with AT
To accelerate the car sharply when the transmission is operating in the "D" range, press the gas pedal all the way down. The gearbox will automatically switch to the adjacent lower gear (kickdown mode), which will provide more power when picking up speed. When the pedal is released, the transmission returns to the original, higher gear, corresponding to the characteristics of the current speed mode.
When stopping with the engine running, the transmission may not be disengaged, but the car must be held from moving by the parking brake or the foot brake pedal. When stopping on an incline, it is necessary to apply the parking brake or press the brake pedal.
Caution: Do not hold the vehicle in gear by increasing the engine speed to avoid overheating the gearbox!
For longer stops, such as in a traffic jam or at a crossing, it is recommended to turn off the engine.
For precise maneuvering, for example, when parking, entering a garage, etc., you can use the "sliding" property. To do this, with the gear engaged, without pressing the gas pedal, control the movement of the car by releasing the brake pedal.
If the car gets stuck in sand, mud, snow or a ditch, it is necessary to move the selector lever back and forth between the "D" and "R" positions while slightly pressing the gas pedal (see illustration 23.4). You should maintain the lowest possible engine speed, avoid pressing the gas pedal sharply.
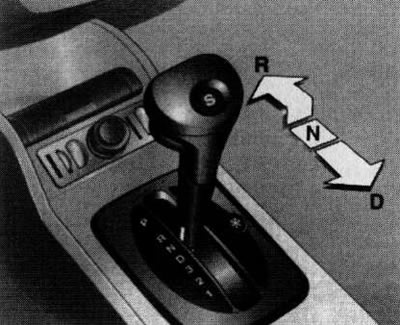
23.4. "Pulling" a car when stuck
Attention: The method described above is permissible to use only in exceptional cases.
Before leaving the car when parking, you must first apply the parking brake, then set the gearshift lever to position P and remove the key from the ignition. Be sure to lock the car, otherwise the battery may be discharged during prolonged parking.
Visitor comments