OpelBook.ru
Cars AvtoVAZ Cars Mitsubishi Cars BMW Cars Mercedes Cars Nissan Cars Toyota Cars Chevrolet
English Русский
Български
Беларускі
Український
Српски
Hrvatski
Română
Polski
Slovenský
Magyar
 |  Sitemap  |  Contacts  |    


Main Astra Corsa Insignia Kadett Omega Vectra Zafira Others Articles
Astra F (1991-1998, petrol) Astra G (1998-2004, petrol) Astra G (1998-2004) Astra H (2004-2009) Astra J (2009-2015, petrol)
  • Main
  • Astra
  • Astra J
  • Transmission
  • Car gearbox
  • Checking the level, topping up and replacing oil in the gearbox

Checking the level, topping up and replacing oil in the gearbox (Opel Astra J)

            0

Periodically (but not less than once every 15,000 km) check the oil level in a manual gearbox or the working fluid level in an automatic. The design of the gearbox does not provide for oil changes throughout the entire service life of the car. However, sometimes the need to change the oil may arise (for example, when switching to oil of a different viscosity, when the quality of the working fluid in an automatic transmission deteriorates after it overheats, when repairing the transmission, etc.). Techniques for checking the level, topping up and replacing oil (fluid) in a mechanical (automatic) the boxes are different, so they are shown separately for each of the boxes.

Note: It is recommended to drain the oil (liquid) within 15 minutes after driving, while it is still warm and has good fluidity.


Notes:
  • Fill the manual transmission with API GL4 SAE 80W-90 or SAE 75W-90 oil. The manufacturer recommends replacing the factory-filled oil with SAE 75W transmission oil if the vehicle is operated for a long time at ambient temperatures below –30°C.
  • For an automatic transmission, the manufacturer recommends a working fluid.


To check the oil level, top it up or replace it in a manual transmission perform the following operations.

You will need: socket heads "13", "17", syringe.

You will need: socket heads «13», «17», syringe.


1. Loosen the oil level plug located on the side of the gearbox housing and remove the plug.


2. The oil level should be at the edge of the hole or slightly below it (you can reach the surface of the oil with a screwdriver or your finger).
2. The oil level should be at the edge of the hole or slightly below it (you can reach the surface…


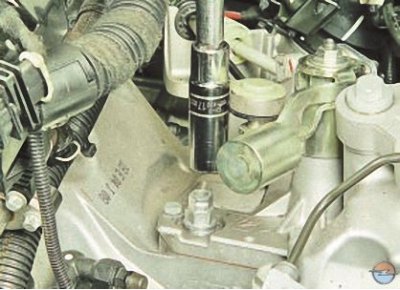
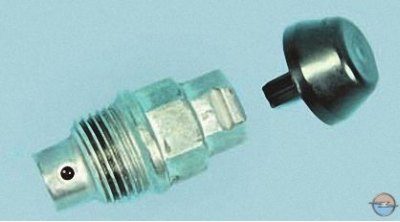
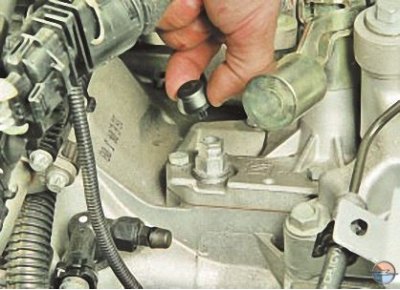
3. If the oil level is very low (can't be controlled with a screwdriver or finger), remove the cap from the oil filler plug located on top of the gearshift housing…

3. If the oil level is very low (can't be controlled with a screwdriver or finger), remove the cap…


4. …loose the plug…

4. …loose the plug…


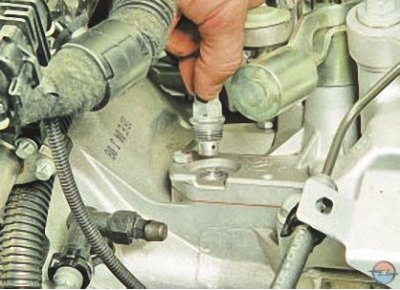
5. …and turn it inside out.


5. …and turn it inside out.


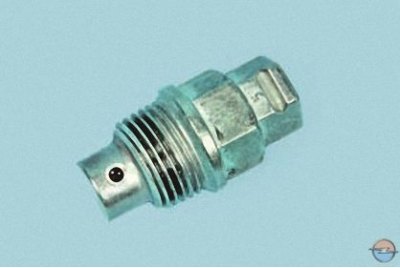
Note: The oil filler plug also functions as a breather, so check that the holes in it are clean.


Note: The oil filler plug also functions as a breather, so check that the holes in it are clean.


Attention! It is prohibited to operate the vehicle without the protective cap of the plug! If it is missing, road dirt will get into the gearbox.


Attention! It is prohibited to operate the vehicle without the protective cap of the plug! If it is…


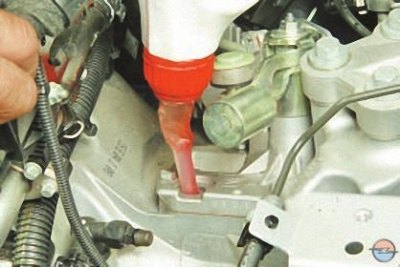
6. Using a syringe, pour oil into the hole in the gearshift housing until it appears from the inspection hole. Screw in the inspection hole plug.


Note: The plug has a magnet to collect metal wear debris, please clean it before installing the plug.


7. Screw in the oil filler plug.

7. Screw in the oil filler plug.


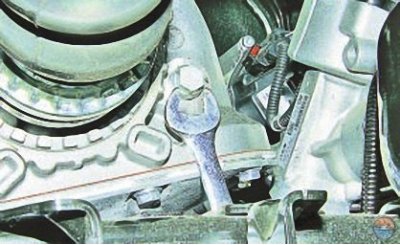
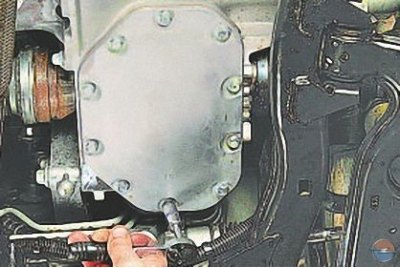
8. The design does not include a plug for draining the oil, so if you need to change the oil, place a container under the gearbox to drain the oil, unscrew the bolts securing the lower cover of the gearbox...

8. The design does not include a plug for draining the oil, so if you need to change the oil, place…


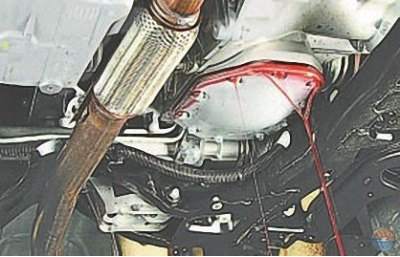
9. …and drain the oil.

10. Remove the cover and gasket.

11. Wipe the cover and gasket with a clean cloth to remove any remaining oil.

Note: Replace the gasket with a new one each time the bottom cover is removed.


12. Install the lower gearbox cover and fill with oil in the same way as you did when checking its level and topping up (see points 1–6).

To check the fluid level, top it up or replace it in an automatic transmission perform the following operations.


You will need: a square wrench "8", a syringe.

1. Warm up the working fluid in the gearbox to an operating temperature of 70–80°C by taking a short drive.

2. Place the vehicle on a level, horizontal surface and apply the parking brake.

3. While pressing the brake pedal and holding it down, alternately move the selector lever to all positions from "P" (parking) to "D" (forward movement), briefly holding each position to fill the torque converter and hydraulic system with fluid. Then set the selector lever to the "N" (neutral) position. Release the brake pedal.

4. Place a wide container under the gearbox to collect the fluid.

5. Unscrew the plug of the hole for filling the working fluid. When the level is normal, it begins to flow out of the hole or you can reach its surface with your finger.

6. If the level is low, add fluid with a syringe in the same way as you did for a manual transmission (see above in this subsection), until it starts to flow out through the hole. Tighten the plug to a torque of 45 N·m.

7. To replace the fluid, unscrew the plug of the hole for draining the working fluid and drain the fluid. Tighten the plug with a torque of 45 N·m.

8. Fill in the working fluid in the same way as you did when checking the level (see points 5 and 6 above).

Note: When the liquid is completely drained, the calculated volume of newly added liquid will be 4 liters.


This article is available at russian, bulgarian, belarusian, ukrainian, serbian, croatian, romanian, polish, slovak, hungarian
Checking the article: Trifonova Emilia

Share information:

Previous articles
Opel Astra J: Car gearbox
Next articles

Features of the design of an automatic transmission
Possible malfunctions of a manual transmission
Design features of a manual gearbox
Replacing gearbox seals
Removal and installation the gearbox
Disassembly and assembly of a manual gearbox
Repair of secondary shaft of manual transmission
Repair of synchronizer of manual transmission
Repair of differential of manual transmission


See similar ones from other Opel car manuals:
▶ Checking the transmission oil level (F13 gearbox) Opel Corsa C (2000-2006, petrol)
▶ Checking the level and topping up the power steering fluid Opel Insignia A (2008-2017)
▶ Checking the gearbox oil level Opel Vectra A (1988-1995)
▶ Gearbox — Checking the level and changing the oil Opel Zafira A (1999-2005, petrol)
▶ Checking the level and replacing the transmission oil Opel Frontera B (1998-2004)
Link to this page in different formats

Visitor comments


No comments yet


How much will 18 + 29 =


Astra J (2009-2015, petrol) 
  • General information
  • Vehicle device
  • User manual
  • Faults en route
  • Maintenance
  • Power unit
  • Engine repair
  • Cooling and lubrication system
  • Engine power system
  • Exhaust system
  • Transmission
  • Clutch
  • Car gearbox
  • Drive shafts
  • Chassis
  • Front suspension
  • Rear suspension
  • Steering
  • Brake system
  • Wheels and tires
  • Body
  • Exterior
  • Interior
  • Doors and windows
  • Body Care
  • Heating and air conditioning
  • Security systems
  • Electrical equipment
  • Equipment and devices
  • Lighting and signaling
  • Power devices
  • Electrical circuits
Astra H (2004-2009) 
  • General information
  • Introduction to the guide
  • Troubleshooting
  • User manual
  • Maintenance
  • Power unit
  • Engine repair
  • Cooling and heating
  • Power and exhaust system
  • Ignition system
  • Launch and charge system
  • Transmission
  • Mechanical gearbox
  • Automatic gearbox
  • Drive shafts
  • Chassis
  • Brake system
  • Car suspension
  • Steering
  • Body
  • Interior
  • Exterior
  • Electrical equipment
  • Equipment and devices
  • Electrical circuits
Astra G (1998-2004) 
  • General information
  • Introduction to manual
  • User manual
  • Maintenance
  • Power unit
  • SOHC gasoline engines
  • DOHC gasoline engines
  • Diesel engines 1.7 and 2.0
  • Engine repair
  • Cooling system
  • Supply system
  • Injection system (gasoline)
  • Injection system (diesel)
  • Exhaust system
  • Charge and launch system
  • Ignition system (gasoline)
  • Preheat system (diesel)
  • Transmission
  • Manual gearbox
  • Automatic gearbox
  • Clutch
  • Drive shafts
  • Chassis
  • Brake system
  • Wheel suspension
  • Steering
  • Body
  • Exterior
  • Interior
  • Doors and windows
  • Ventilation and heating
  • Electrical equipment
  • Equipment and devices
  • Electrical circuits
Astra G (1998-2004, petrol) 
  • General information
  • User manual
  • Car care
  • Maintenance
  • Power unit
  • Single shaft engines
  • Twin shaft engines
  • Engine repair
  • Cooling and heating
  • Fuel and exhaust systems
  • Starting and charging system
  • Ignition system
  • Transmission
  • Clutch
  • Mechanical gearbox
  • Automatic gearbox
  • Drive shafts
  • Chassis
  • Brake system
  • Car suspension
  • Steering
  • Body
  • Interior
  • Exterior
  • Electrical equipment
  • Equipment and devices
  • Wiring diagrams Opel Astra
  • Wiring diagrams Opel Zafira
Astra F (1991-1998, petrol) 
  • General information
  • Maintenance
  • Power unit
  • Engine in car
  • Engine removed
  • Cooling system
  • Heating and ventilation
  • Fuel supply (carburetor)
  • Fuel supply (injector)
  • Emission control
  • Ignition system
  • Transmission
  • Clutch
  • Mechanical gearbox
  • Automatic gearbox
  • Drive shafts
  • Chassis
  • Brake system
  • Car suspension
  • Steering
  • Body
  • Exterior
  • Interior
  • Electrical equipment
  • Equipment and devices
  • Electrical circuits
OpelBook.ru © 2017–2026 · Mobile version · · Sitemap: EN BG BY UA RS HR RO PL SK HU · Feedback · Site search
Astra F, petrol · Astra G, petrol · Astra G · Astra H · Astra J, petrol · Corsa B · Corsa C, petrol · Corsa C · Insignia A · Kadett D · Kadett E · Omega A · Omega B · Omega B2 · Vectra A, petrol · Vectra A · Vectra B, petrol · Vectra B · Vectra C · Zafira A, petrol · Frontera A, petrol · Frontera B · Ascona C · Vivaro A ·
We want your visit to be comfortable 🤝! We use cookies 🍪 to make that happen.