OpelBook.ru
Cars AvtoVAZ Cars Mitsubishi Cars BMW Cars Mercedes Cars Nissan Cars Toyota Cars Chevrolet
English Русский
Български
Беларускі
Український
Српски
Hrvatski
Română
Polski
Slovenský
Magyar
 |  Sitemap  |  Contacts  |    


Main Astra Corsa Insignia Kadett Omega Vectra Zafira Others Articles
Astra F (1991-1998, petrol) Astra G (1998-2004, petrol) Astra G (1998-2004) Astra H (2004-2009) Astra J (2009-2015, petrol)
  • Main
  • Astra
  • Astra J
  • Transmission
  • Car gearbox
  • Repair of differential of manual transmission

Repair of differential of manual transmission (Opel Astra J)

            0

One of the reasons for increased noise in the gearbox may be wear or breakage of differential parts.

You will need: 15 mm socket head, universal puller, bearing press mandrel, flat-blade screwdrivers, punch, hammer.
You will need: 15 mm socket head, universal puller, bearing press mandrel, flat-blade screwdrivers,…


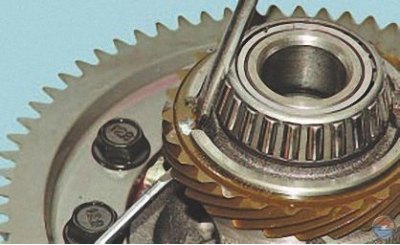
1. If the speedometer drive gear teeth are heavily worn, replace the gear. To do this, spread the ends of the locking ring with a screwdriver and at the same time use a second screwdriver to slide the gear along the differential box journal together with the ring.

1. If the speedometer drive gear teeth are heavily worn, replace the gear. To do this, spread the…


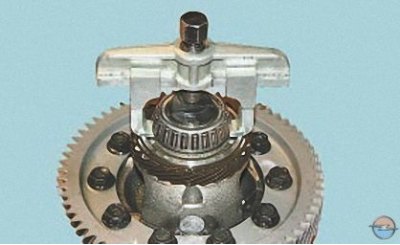
2. To replace a worn or damaged bearing, press it off the differential case journal.

Attention!
  • A bearing pressed in the manner shown is not suitable for reinstallation, as its separator is damaged. Therefore, do not dismantle the differential bearings unless necessary.
  • When replacing differential bearings, be sure to replace their outer rings installed in the adjusting nut and bearing cap (see Disassembly and assembly of the gearbox, inspection of its parts).


When replacing differential bearings, be sure to replace their outer rings installed in the…


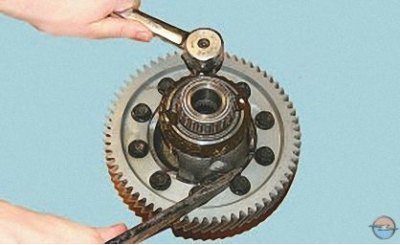
3. Remove the ten bolts securing the driven gear of the final drive to the differential box.


3. Remove the ten bolts securing the driven gear of the final drive to the differential box.


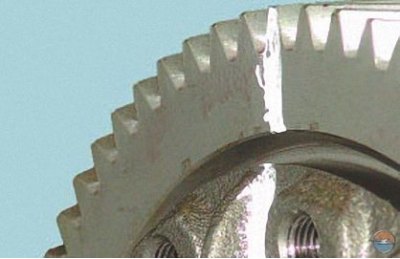
4. Mark the relative positions of the gear and the box…

4. Mark the relative positions of the gear and the box…


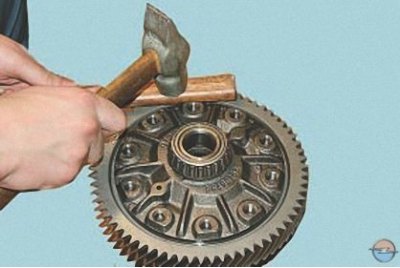
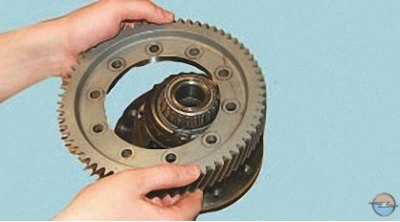
5. …press the gear off the differential box with light hammer blows through a wooden spacer…

5. …press the gear off the differential box with light hammer blows through a wooden spacer…


6. …and remove the gear.

6. …and remove the gear.


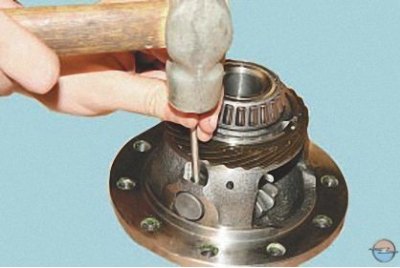
7. Using a 3.2 mm punch, knock out the satellite axle retaining pin…


7. Using a 3.2 mm punch, knock out the satellite axle retaining pin…


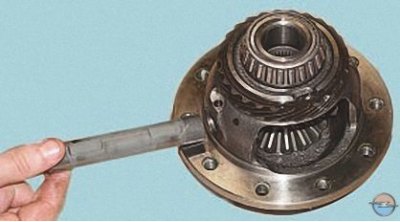
8. …and remove the satellite axle from the differential box.
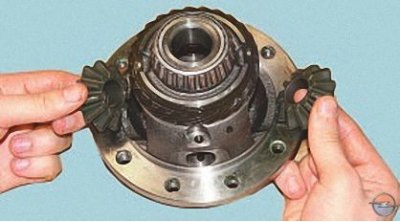
8. …and remove the satellite axle from the differential box.


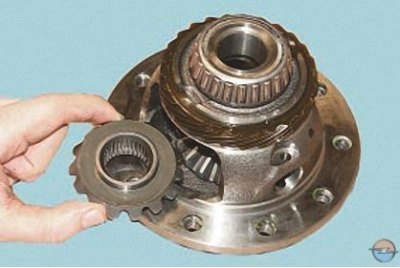
9. While turning the differential gears, remove the satellites from the differential box…

9. While turning the differential gears, remove the satellites from the differential box…


10. …and axle gears.

Please note…

Please note…


...on satellites..


...on satellites..


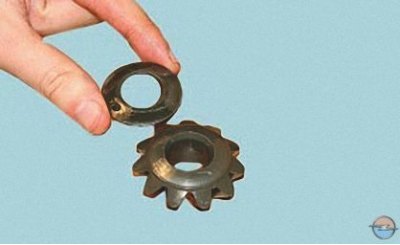
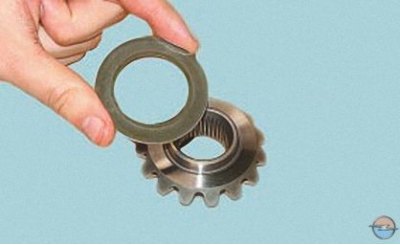
...and the axle gears have thrust washers installed. When reassembling, do not forget to install them in their original places.

11. Inspect the working surfaces and teeth of the satellites, splines and teeth of the axle gears. If the working surfaces, splines and teeth are heavily worn, or if the teeth are chipped, replace the differential gears.

12. Inspect the gear support washers. If the washers are visibly worn, replace them

12. Inspect the gear support washers. If the washers are visibly worn, replace them


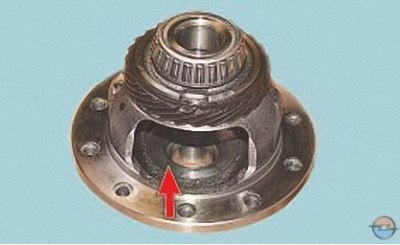
13. Inspect the differential case surfaces in the areas where the gear support washers operate. If the surfaces are heavily worn, replace the differential case.

14. Remove small irregularities on the pinion journals with fine-grained sandpaper. If the metal of the pinion journals is dragged or if they are worn on one side, replace the axle.
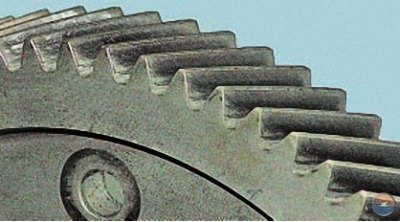


14. Remove small irregularities on the pinion journals with fine-grained sandpaper. If the metal of…


15. If there are chips, pitting or significant wear on the teeth of the driven gear of the main transmission, replace the gear.

Note: When replacing the final drive driven gear, the pinion gear must also be replaced at the same time (secondary shaft), since these gears are selected based on noise and are installed only in pairs.


16. Assemble the differential in the reverse order of disassembly, taking into account the following:
  • press the satellite axle locking pin into the differential box hole on the side where it was knocked out;
  • press the differential bearings onto the differential box journals, applying force to the inner ring;
  • before pressing the speedometer drive gear onto the differential box journal, heat the gear in an oil bath to a temperature of 80°C;
  • press the driven gear of the main transmission onto the differential box, aligning the marks made during disassembly and heating the gear in an oil bath to a temperature of 100°C;
  • lubricate the threaded portion of the driven gear mounting bolts with anaerobic thread locker, tighten the bolts evenly in a crisscross pattern. Finally tighten the bolts to a torque of 70 N·m (7.0 kgf·m).


(The source is on the online website: OPELBOOK)


This article is available at russian, bulgarian, belarusian, ukrainian, serbian, croatian, romanian, polish, slovak, hungarian
Checking the article: Trifonova Emilia

Share information:

Previous articles
Opel Astra J: Car gearbox
Next articles

Repair of synchronizer of manual transmission
Repair of secondary shaft of manual transmission
Disassembly and assembly of a manual gearbox
Removal and installation the gearbox
Replacing gearbox seals
Checking the level, topping up and replacing oil in the gearbox
Replacing gearbox control cables
Removal and installation the gearbox control lever linkage
Adjusting the gearbox control drive


See similar ones from other Opel car manuals:
▶ Manual transmission repair — general information Opel Corsa B (1993-2000)
▶ Introduction to the operation and repair manual Insignia A Opel Insignia A (2008-2017)
▶ Manual transmission Opel Kadett E (1984-1995)
▶ Input shaft of a manual transmission — disassembly and… Opel Omega A (1986-1993)
▶ Manual transmission Opel Vectra A (1988-1995, petrol)
Link to this page in different formats

Visitor comments


No comments yet


How much will 24 + 24 =


Astra J (2009-2015, petrol) 
  • General information
  • Vehicle device
  • User manual
  • Faults en route
  • Maintenance
  • Power unit
  • Engine repair
  • Cooling and lubrication system
  • Engine power system
  • Exhaust system
  • Transmission
  • Clutch
  • Car gearbox
  • Drive shafts
  • Chassis
  • Front suspension
  • Rear suspension
  • Steering
  • Brake system
  • Wheels and tires
  • Body
  • Exterior
  • Interior
  • Doors and windows
  • Body Care
  • Heating and air conditioning
  • Security systems
  • Electrical equipment
  • Equipment and devices
  • Lighting and signaling
  • Power devices
  • Electrical circuits
Astra H (2004-2009) 
  • General information
  • Introduction to the guide
  • Troubleshooting
  • User manual
  • Maintenance
  • Power unit
  • Engine repair
  • Cooling and heating
  • Power and exhaust system
  • Ignition system
  • Launch and charge system
  • Transmission
  • Mechanical gearbox
  • Automatic gearbox
  • Drive shafts
  • Chassis
  • Brake system
  • Car suspension
  • Steering
  • Body
  • Interior
  • Exterior
  • Electrical equipment
  • Equipment and devices
  • Electrical circuits
Astra G (1998-2004) 
  • General information
  • Introduction to manual
  • User manual
  • Maintenance
  • Power unit
  • SOHC gasoline engines
  • DOHC gasoline engines
  • Diesel engines 1.7 and 2.0
  • Engine repair
  • Cooling system
  • Supply system
  • Injection system (gasoline)
  • Injection system (diesel)
  • Exhaust system
  • Charge and launch system
  • Ignition system (gasoline)
  • Preheat system (diesel)
  • Transmission
  • Manual gearbox
  • Automatic gearbox
  • Clutch
  • Drive shafts
  • Chassis
  • Brake system
  • Wheel suspension
  • Steering
  • Body
  • Exterior
  • Interior
  • Doors and windows
  • Ventilation and heating
  • Electrical equipment
  • Equipment and devices
  • Electrical circuits
Astra G (1998-2004, petrol) 
  • General information
  • User manual
  • Car care
  • Maintenance
  • Power unit
  • Single shaft engines
  • Twin shaft engines
  • Engine repair
  • Cooling and heating
  • Fuel and exhaust systems
  • Starting and charging system
  • Ignition system
  • Transmission
  • Clutch
  • Mechanical gearbox
  • Automatic gearbox
  • Drive shafts
  • Chassis
  • Brake system
  • Car suspension
  • Steering
  • Body
  • Interior
  • Exterior
  • Electrical equipment
  • Equipment and devices
  • Wiring diagrams Opel Astra
  • Wiring diagrams Opel Zafira
Astra F (1991-1998, petrol) 
  • General information
  • Maintenance
  • Power unit
  • Engine in car
  • Engine removed
  • Cooling system
  • Heating and ventilation
  • Fuel supply (carburetor)
  • Fuel supply (injector)
  • Emission control
  • Ignition system
  • Transmission
  • Clutch
  • Mechanical gearbox
  • Automatic gearbox
  • Drive shafts
  • Chassis
  • Brake system
  • Car suspension
  • Steering
  • Body
  • Exterior
  • Interior
  • Electrical equipment
  • Equipment and devices
  • Electrical circuits
OpelBook.ru © 2017–2026 · Mobile version · · Sitemap: EN BG BY UA RS HR RO PL SK HU · Feedback · Site search
Astra F, petrol · Astra G, petrol · Astra G · Astra H · Astra J, petrol · Corsa B · Corsa C, petrol · Corsa C · Insignia A · Kadett D · Kadett E · Omega A · Omega B · Omega B2 · Vectra A, petrol · Vectra A · Vectra B, petrol · Vectra B · Vectra C · Zafira A, petrol · Frontera A, petrol · Frontera B · Ascona C · Vivaro A ·
We want your visit to be comfortable 🤝! We use cookies 🍪 to make that happen.