
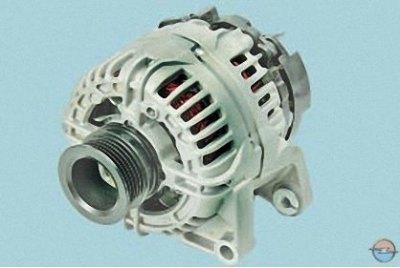
Opel Astra J cars are equipped with a three-phase alternator with a built-in rectifier unit and an electronic voltage regulator, right rotation (when viewed from the drive side).
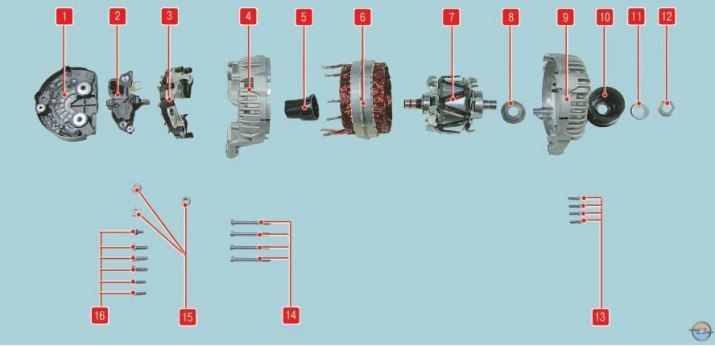
Pic. 1. Generator details: 1 - protective cover; 2 - voltage regulator combined with a brush assembly; 3 - rectifier block; 4 - cover from the side of slip rings; 5 - centering sleeve of the rear bearing of the rotor; 6 - stator; 7 - rotor; 8 - remote washer; 9 - cover from the drive side; 10 - pulley; 11 – a lock washer of a nut of fastening of a pulley; 12 - pulley fastening nut; 13 - screws for fastening the plate of the front bearing of the rotor shaft; 14 - coupling bolts; 15 - nuts for fastening the protective cover; 16 - screws for fastening the voltage regulator and the rectifier unit
Stator 6 (pic. 1) and covers 4 and 9 are tightened with four bolts 14. The rotor shaft 7 rotates in bearings installed in the covers. Power to the rotor winding (excitation winding) is supplied through brushes and slip rings.
The three-phase alternating current induced in the stator winding is converted into a direct current by a rectifier unit 3 attached to the cover 4. An electronic voltage regulator 2, combined with a brush holder, is also attached to the cover 4. The voltage to excite the generator when the ignition is turned on is supplied to the regulator terminal block.
The operation of the generator is monitored by a battery discharge warning light located in the instrument cluster. When the ignition is turned on, the lamp should be on, after starting the engine it should go out if the generator is working. The bright burning of the lamp or its glow half-heartedly indicates malfunctions.
Note. Recently, many companies have appeared that specialize in the repair of imported starters and generators. There you can diagnose a faulty unit, purchase spare parts for any model of the generator (starter), get qualified advice. If you are not sure you can repair the generator (starter) independently, it makes sense to contact such a company, where the repair of these units will be performed quickly, efficiently and at an affordable price. However, on high mileage vehicles, it is often more cost effective to replace the assembly with a new one than to replace failed parts.
Table 1. Possible generator malfunctions, their causes and remedies
Cause of malfunction | Remedy |
When the ignition is switched on, the low battery indicator light does not light up | |
Break in the wire between the generator, the ignition switch and the signal lamp | Repair the break |
Signal lamp burnt out | Replace lamp |
Faulty generator (the generator brushes are worn out or do not fit tightly to the contact rings, the excitation winding of the generator burned out, the diode is faulty bridge or voltage regulator) | Replace or repair generator |
Low battery warning light does not go out after starting the engine | |
Weak alternator drive belt tension | Adjust belt tension |
Faulty generator diode bridge | Repair the generator |
Short circuit of the wire between the generator and the signal lamp to ground | insulate wire |
The signal lamp of the discharge of the storage battery burns at the switched off ignition | |
Faulty generator | Replace or repair generator |
The generator set does not charge the battery | |
Oxidation of battery terminals | Strip, fasten and lubricate the cable lugs and battery terminals with petroleum jelly |
Battery faulty | Replace battery |
Weak alternator drive belt tension | Adjust belt tension |
Faulty generator (rectifier bridge) | Repair the generator |
The battery is being recharged | |
Faulty generator (voltage regulator, rectifier bridge) | Repair the generator |
Increased voltage drop in the generator-battery circuit | Check, clean, tighten or replace the contact connections in the ignition switch, fuses, connectors, check the connection of the generator housing to the "ground" |
Visitor comments