
Attention: When performing work near the elements of the additional security system (SRS) be careful and take appropriate safety precautions (see chapter «Controls and methods of operation», Sections 13 and 16)!
Attention: When connecting the battery, no one should be in the car!
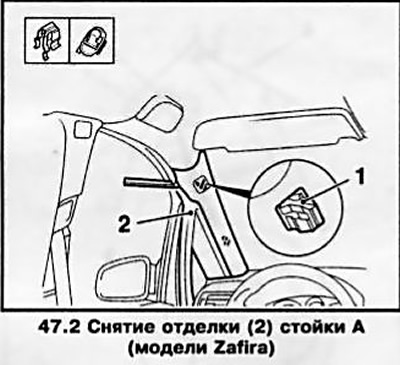
A-pillar trim
1. Disconnect the wires and insulate the battery terminals (see chapter 5).
2. Using a screwdriver, pry off the service cover at the top of the A-pillar trim (see resist. illustration) and carefully separate it by gradually moving the screwdriver along the perimeter of the cover. Insert a plastic wedge under the A-pillar trim, wring out the 2 clips and remove the trim.
3. Install in the reverse order of removal, making sure that the inner edge of the seal is on top of the trim.
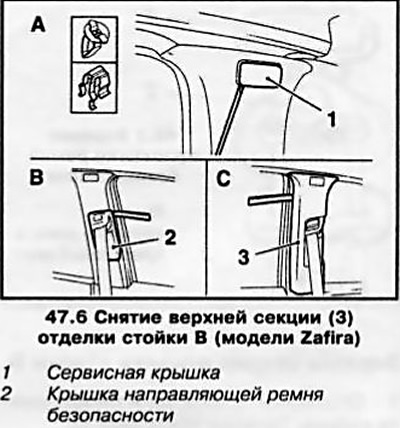
B-pillar upper trim
4. Disconnect the wires and insulate the battery terminals (see chapter 5).
5. Separate the front seat belt anchor from the front seat (see Section 48).
6. Use a screwdriver to pry off the B-pillar top trim service cover (see resist. illustration) and carefully separate it by gradually moving the screwdriver along the perimeter of the cover. Using a plastic wedge, remove the seat belt guide cover.
7. Separate the top of the lower trim section from the B-pillar (see below).
8. Insert a plastic wedge under the top trim section (see illustration 47.6) and separate it from the B-pillar.
9. Pull out the seat belt and remove the top trim from the belt guide.
10. When installing, thread the seat belt through the guide and secure the guide cover to the B-pillar by snapping the rear cover clips.
11. Insert the top trim into the rail, making sure that the rail button is correctly aligned with the top anchor retainer, and secure the top of the lower B-pillar trim section.
12. Further installation is carried out in the reverse order of removal, while making sure that the inner edge of the seal is on top of the finish. Check that the webbing of the belt is not twisted and that it can be wound freely by the drum. Check belt function (see chapter «Controls and methods of operation»).
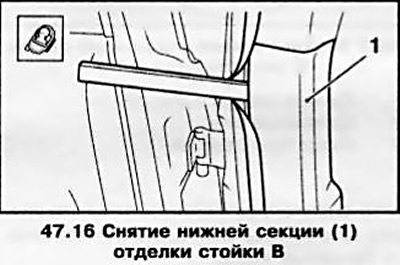
B-pillar lower trim
13. Remove the pocket next to the front seat (see below).
14. Remove the seat adjuster trim (see Section 48).
15. Remove the rear door sill trim (see below).
16. Using a plastic wedge, wring out 2 latches (see resist. illustration) and remove the lower trim section.
17. Install in the reverse order of removal, making sure that the inner edge of the seal is on top of the trim.
C-pillar upper trim
18. Disconnect the wires and insulate the battery terminals (see chapter 5).
19. Remove rear headlining (see below).
20. Remove the D-pillar trim (see below).
21. Remove the seat adjuster trim (see Section 48).
22. Remove the rear door sill trim (see below).
23. Remove the rear seat belt lower anchors from the C-pillar.
24. The further removal procedure is the same as for removing the B-pillar trim (see above).
25. Installation is in the reverse order of removal, while making sure that the inner edge of the seal is on top of the trim. Check. so that the belt strap is not twisted and can be wound freely by the drum. Check belt function (see chapter «Controls and methods of operation»).
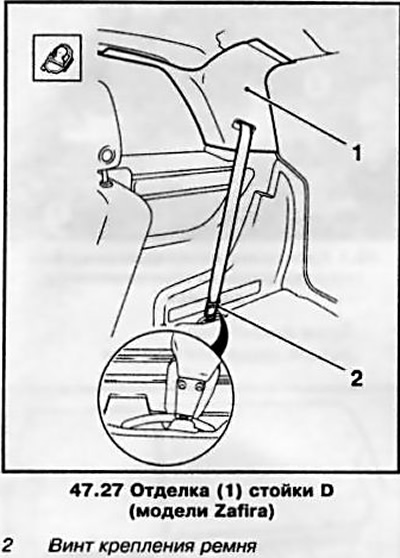
D-pillar trim
26. Remove the rear ceiling trim (see below)
27. Disconnect the lower end of the belt (see resist. illustration), for which, depending on the configuration, unscrew the lower fixing screw, or disconnect the belt from the mounting bracket.
28. Using a plastic wedge, wring out 5 clips and remove the trim from the D-pillar.
29. Installation is in the reverse order of removal, while making sure that the inner edge of the seal is on top of the trim.
Lateral luggage compartment trim
30. Open the tailgate, remove the horizontal blind cover (see chapter «Controls and methods of operation»).
31. Remove the rear ceiling trim (see below).
32. Remove the O-pillar trim (see above).
33. Fold down the rear bench seat (see chapter «Controls and methods of operation», Section 12).
34. Remove tailgate sill trim (see below).
35. Remove 4 screws (see resist. illustration) fastenings of the side trim, unscrew 2 fixing screws and remove the guides from the sides of the luggage compartment.
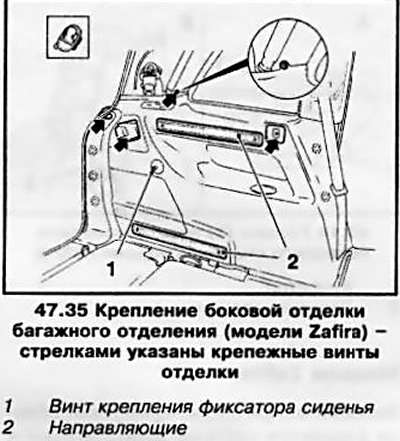
36. Remove the fixing screw (see illustration 47.35) and remove the seat lock.
37. Using a plastic wedge, wring out 5 clips and remove the side trim.
38. Installation is in the reverse order of removal, while making sure that the inner edge of the seal is on top of the finish.
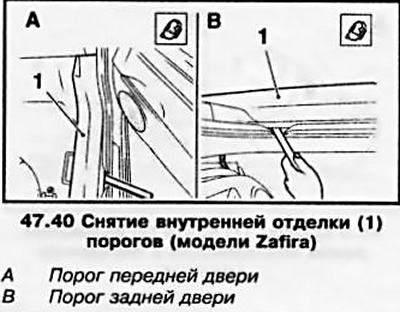
Interior trim thresholds
39. To remove the front door sill, you must first remove the pocket next to the front seat (see below), and to remove the threshold of the rear door - the trim of the seat position adjuster (see Section 49).
40. Using a plastic wedge, wring out 2 latches (see resist. illustration) and separate the threshold from the frame of the doorway. Pull the threshold up.
41. Installation is in the reverse order of removal, while making sure that the inner edge of the seal is on top of the finish. When installing the front door sill, make sure that the wires along the doorway are not pinched.
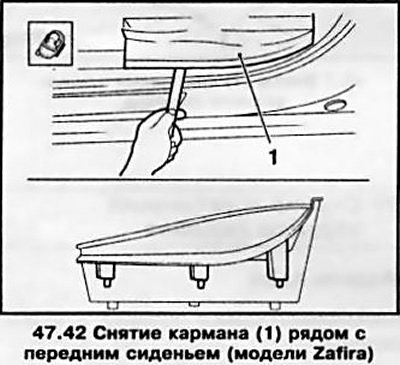
Pocket next to the front seat
42. Open the door. Insert plastic wedge under pocket (1), depress the 3 latches and remove it from the threshold trim (see resist. illustration).
43. Installation is carried out in the reverse order.
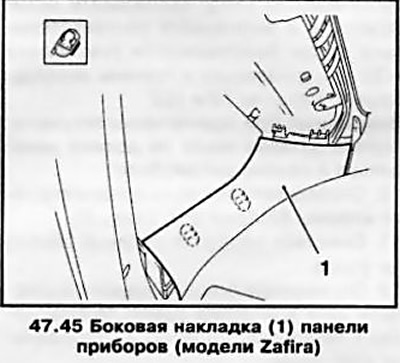
Side overlay of the panel of devices
44. Remove the A-pillar trim (see above).
45. Using a plastic wedge, squeeze out 2 latches and remove the trim (see resist. illustration) up from the instrument panel.
46. Installation is carried out in the reverse order.
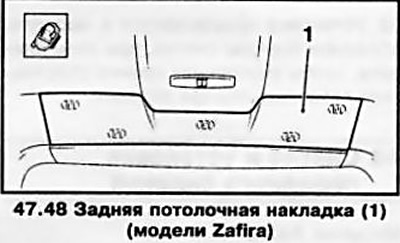
Rear ceiling trim
47. Open the tailgate.
48. Using a plastic wedge, wring out 5 clips and remove the rear ceiling trim (see resist. illustration).
49. Installation is carried out in the reverse order.
Tailgate sill trim
50. Open the tailgate.
51. Raise the floor mat of the luggage compartment, wring out the latch and remove the floor cover (see resist. illustration).

52. Remove 2 fixing screws (see illustration 47.51) from the side of the luggage compartment, wring out 4 latches and remove the trim of the sill of the frame of the doorway of the tailgate.
53. Installation is in the reverse order of removal, while making sure that the inner edge of the seal is on top of the finish.
Visitor comments