
OpelBook.ru
Cars AvtoVAZ Cars Mitsubishi Cars BMW Cars Mercedes Cars Nissan Cars Toyota Cars Chevrolet
English Русский
Български
Беларускі
Український
Српски
Hrvatski
Română
Polski
Slovenský
Magyar
 |  Sitemap  |  Contacts  |    


Main Astra Corsa Insignia Kadett Omega Vectra Zafira Others Articles
Vectra A (1988-1995, petrol) Vectra A (1988-1995) Vectra B (1995-2002, petrol) Vectra B (1995-2002) Vectra C (2002-2008)
  • Main
  • Vectra
  • Vectra B
  • Transmission
  • Gearbox and drive
  • Troubleshooting Drive Shafts

Troubleshooting Drive Shafts (Opel Vectra B)

            0

Contents: Removal drive shafts ⬇ Replacing the cuff and hinge ⬇
Drive shafts are usually not a problem. Of course, their durability depends on driving style. Starting at full throttle with the drive wheels spinning leads to premature failure.

Drive shaft joints often suddenly develop defects that may then disappear completely. The "rest period" may last for several days and kilometers of travel.

Characteristic are rhythmic beating and clicking sounds when applying gas and in forced idle mode. If the sounds change when turning the steering wheel, then the defect is in the hinge on the wheel side.

Vibration and shaking of the steering wheel when the wheels are turned also indicate a defective outer joint.

The simplest, but also the most expensive repair option is to install complete drive shafts as an exchange (perhaps through a parts store).

A cheaper method: replacing a single joint. However, it is quite difficult to localize a defective joint. You can best recognize a defect by listening carefully while driving. On a dismantled shaft, defective joints are easier to recognize: they rotate with difficulty and jerkily. After disassembling and washing the joints, damage to the guide surfaces of the balls in the outer ring becomes visible.

Removal drive shafts


To dismantle the drive shafts, you need a special Opel tool (see text). If there is no special tool and the work is carried out with traditional tools, there is a risk of damaging the structural components.

Engage the gear and apply the handbrake.


Loosen the castle nut. The car must be on the ground, otherwise there is a risk of accident.

Remove the wheel bolts, jack up the car and remove the front wheel.

Remove the cotter pin in the pivot arm joint, unscrew the nut and press the joint with a regular puller.

Press the tie rod joint with a puller, see chapter "Wheel suspension and steering".

Remove the axle shaft from the front wheel hub by hand. If this does not work, press the shaft with a wheel hub puller installed on the outside.

Remove the axle shaft by the joint, not by the shaft.

Knock out the drive shaft from the gearbox. To do this, you need the KM-313 and KM-902 tools for the left drive shaft and the KM-460-2-B tool for the right drive shaft. The fork-shaped side of the tool with a chamfer always faces the gearbox; the tool is hit with a 1500 g hammer.
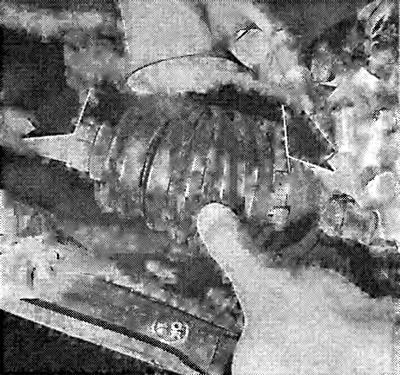
The seals on the ends of the drive shafts protect the joints from moisture and dirt. Regular…

The seals on the ends of the drive shafts protect the joints from moisture and dirt. Regular inspection of the seals and their hose clamps (arrows) is strongly recommended, as penetrating dirt and moisture will quickly cause the joint to fail.


Oil is leaking from the axle shaft hole. It should be sealed immediately and thoroughly.


If you do not have a special tool or the axle jams during dismantling, remove the differential cover. Be careful, oil will leak out.

Knock out the axle shaft with a flat chisel, placing the chisel between the end of the shaft and the axle of the bevel gear.

Place the new shaft on the corrugated boot for a short time.

The mating surface of the outer joint as well as the corresponding surface of the ball joint of the wheel hub must be absolutely clean

Lubricate the axle shaft teeth with transmission oil.

Insert the teeth into the hub, loosely screw a new crown nut with a washer onto the axle shaft.

Lubricate the axle shaft support in the differential housing with transmission oil.

Insert the new thrust ring into the groove of the end of the hinge, being careful not to overtighten the ring.

Press the axle shaft into the gearbox housing by hand. Place a screwdriver on the seam obtained by friction welding (not on tin cladding). Insert the axle shaft with hammer blows until it enters the groove of the thrust ring.

Pull the hinge to check if the thrust ring fits into the groove correctly (do not pull the shaft).

If necessary, install the removed differential cover with a new gasket, first gluing the gasket to the cover with plastic grease for rolling bearings.

Tighten the bolts to 30 Nm.

Fill with transmission oil.

Insert the pivot arm joint. Tighten the nut to 100 Nm.

Transverse steering rod at the steering knuckle by 60 Nm.

Secure the wheel and lower the vehicle.

Tighten the new castle nut to 130 Nm. Then loosen the nut and tighten it again to 20 Nm. From this position, tighten the nut by 80°, which corresponds to approximately 1D turn.


Cotter pin the castle nut. If the slot and the hole of the cotter pin do not match, loosen the nut accordingly, do not tighten it more.

Check the transmission oil level.

Tip: Do not move the vehicle with the PTO shaft removed; otherwise the wheel bearing will be damaged. If, however, the car needs to be moved, install only the outer joint.


Replacing the cuff and hinge


If both seals need to be replaced, work on the hinge first.

Install a new thrust ring. Make sure that the thrust ring fits perfectly in its groove.

Replacing the cuff and hinge

Fill the joint with fresh grease.

Slide the joint onto the shaft teeth and hammer it in with a plastic hammer until it enters the groove of the thrust ring.

Place the cuff over the hinge.

Lift the cuff slightly with a screwdriver to allow air to escape from the corrugated cover.


This article is available at russian, bulgarian, belarusian, ukrainian, serbian, croatian, romanian, polish, slovak, hungarian
Checking the article: Shapovalov Yaroslav

Share information:

Previous articles
Opel Vectra B: Gearbox and drive
Next articles

Checking the drive shaft seals
Drive shafts
Main gear
Help with automatic transmission problems
Gear shift evaluation
Automatic transmission


See similar ones from other Opel car manuals:
▶ Troubleshooting — Drive Shafts Opel Ascona C (1981-1988)
▶ Seals (drive shafts) on the differential side Opel Astra F (1991-1998, petrol)
▶ General information about clutches and drive shafts Opel Corsa B (1993-2000)
▶ Replacing the secondary drive chain (drive chain of the… Opel Insignia A (2008-2017)
▶ Removal and installation front wheel drive shafts Opel Kadett E (1984-1995)
Link to this page in different formats

Visitor comments


No comments yet


How much will 30 + 44 =


Vectra C (2002-2008) 
  • General information
  • User manual
  • Vehicle device
  • Maintenance
  • Troubleshooting
  • Power unit
  • Engine repair
  • Cooling system
  • Power and control system
  • Engine electrics
  • Transmission
  • Clutch
  • Car gearbox
  • Drive shafts
  • Chassis
  • Car suspension
  • Steering
  • Brake system
  • Body
  • Exterior
  • Interior
  • Doors, locks and windows
  • Heating and ventilation
  • Electrical equipment
  • Equipment and devices
  • Headlights and lighting
  • Electrical circuits
Vectra B (1995-2002) 
  • General information
  • User manual
  • Weekly checks
  • Maintenance (gasoline)
  • Maintenance (diesel)
  • Troubleshooting
  • Power unit
  • SOHC gasoline engine
  • DOHC petrol engine
  • Diesel engine 1.7 liter
  • Diesel engine 2.0 liters
  • Engine repair
  • Cooling system
  • Fuel system (gasoline)
  • Fuel system (diesel)
  • Charging system
  • Launch system
  • Ignition and preheat
  • Transmission
  • Clutch
  • Mechanical gearbox
  • Automatic gearbox
  • Drive shafts
  • Chassis
  • Brake system
  • Wheel suspension
  • Steering
  • Body
  • Exterior
  • Interior
  • Doors and windows
  • Heating and ventilation
  • Electrical equipment
  • Equipment and devices
  • Electrical circuits
Vectra B (1995-2002, petrol) 
  • General information
  • Maintenance
  • Help with malfunctions
  • Power unit
  • Engine repair
  • Exhaust system
  • Cooling system
  • Fuel system
  • Multec injection system
  • Four point injection
  • Transmission
  • Clutch
  • Gearbox and drive
  • Chassis
  • Wheel suspension
  • Steering
  • Brake system
  • Wheels and tires
  • Body
  • Exterior
  • Interior
  • Electrical equipment
  • Fuses and electronics
  • Power devices
  • Ignition system
  • Lighting and signaling
  • Equipment and devices
  • Heating and ventilation
  • Electrical circuits
Vectra A (1988-1995) 
  • Power unit
  • Engine repair
  • Ignition system
  • Lubrication system
  • Cooling system
  • Injection system
  • Fuel system (carburetor)
  • Fuel system (diesel)
  • Exhaust system
  • Transmission
  • Clutch
  • Car gearbox
  • Chassis
  • Front suspension
  • Rear suspension
  • Steering
  • Brake system
  • Wheels and tires
  • Body
  • Exterior
  • Interior
  • Electrical equipment
  • Electrical circuits
Vectra A (1988-1995, petrol) 
  • General information
  • User manual
  • Maintenance
  • Power unit
  • SOHC engine
  • DOHC engine
  • Cooling and ventilation
  • Fuel system (carburetor)
  • Fuel system (injector)
  • Exhaust converter
  • Transmission
  • Clutch
  • Mechanical gearbox
  • Automatic gearbox
  • Drive shafts
  • Chassis
  • Brake system
  • Car suspension
  • Steering
  • Body
  • Body elements
  • Electrical equipment
  • Power devices
  • Equipment and devices
  • Electrical circuits
OpelBook.ru © 2017–2026 · Mobile version · · Sitemap: EN BG BY UA RS HR RO PL SK HU · Feedback · Site search
Astra F, petrol · Astra G, petrol · Astra G · Astra H · Astra J, petrol · Corsa B · Corsa C, petrol · Corsa C · Insignia A · Kadett D · Kadett E · Omega A · Omega B · Omega B2 · Vectra A, petrol · Vectra A · Vectra B, petrol · Vectra B · Vectra C · Zafira A, petrol · Frontera A, petrol · Frontera B · Ascona C · Vivaro A ·
We want your visit to be comfortable 🤝! We use cookies 🍪 to make that happen.