
OpelBook.ru
Cars AvtoVAZ Cars Mitsubishi Cars BMW Cars Mercedes Cars Nissan Cars Toyota Cars Chevrolet
English Русский
Български
Беларускі
Український
Српски
Hrvatski
Română
Polski
Slovenský
Magyar
 |  Sitemap  |  Contacts  |    


Main Astra Corsa Insignia Kadett Omega Vectra Zafira Others Articles
Frontera A (1991-1998, petrol) Frontera B (1998-2004) Ascona C (1981-1988) Vivaro A (2001-2014)
  • Main
  • Opel
  • Frontera B
  • Body
  • Doors, locks and windows
  • Windshield

Windshield (Opel Frontera B)

            0

Contents: Removal ⬇ Installation ⬇

Removal


Open the hood and place a clean rag under the corners of the hood to protect the vehicle's paintwork when removing the hood.

Disconnect the hose from the windshield washer sprayers and pull it out of the hood.

Use a marker to mark the position of the hood hinges.

Remove the 4 bolts securing the hinges to the hood. With an assistant, remove the hood from the car.
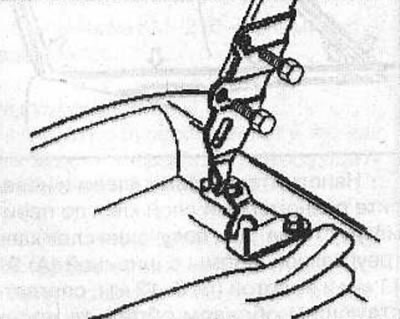
Remove the 4 bolts securing the hinges to the hood. With an assistant, remove the hood from the car.


Remove the screws and remove the sun visors from the ceiling.

Remove the interior rearview mirror from the windshield.

Remove the threshold trim (2) from the front door opening.
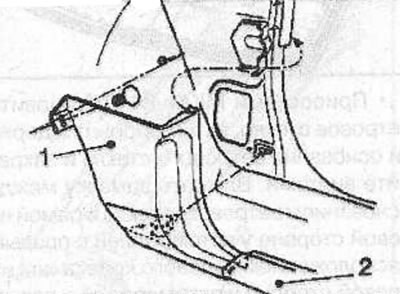
Remove the threshold trim (2) from the front door opening.


Remove the lower trim (1) of the front pillar.

Remove the door seal (2) from the upper trim (1) of the front pillar.
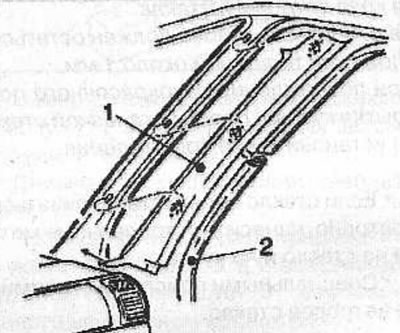


Remove the door seal (2) from the upper trim (1) of the front pillar.


Remove the upper trim (1) of the front pillar.

Remove the windshield wiper (see the relevant chapter).

Remove the protective covers, unscrew the screws and remove the front cover from the hatch panel.

Remove the top dust and moisture protection strips from each drainage guide.

Remove the windshield side trims from the A-pillars.
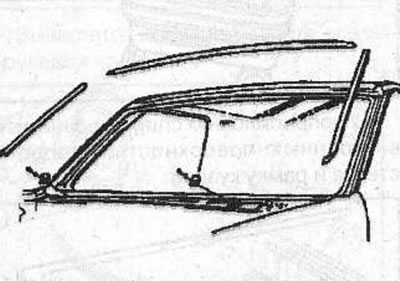
Remove the windshield side trims from the A-pillars.


Remove one screw at a time and remove the windshield base support brackets.

Remove the top trim from the windshield.

To protect the painted surfaces of the body from scratches and damage, cover them with fabric tape around the installed windshield.

Using a special pneumatic knife MKM-846-1P with a corresponding blade, cut a hole in the glue layer and pass a steel string through this hole.


Using a steel wire (arrow) like a hacksaw, saw through the layer of glue along the entire perimeter of the glass.
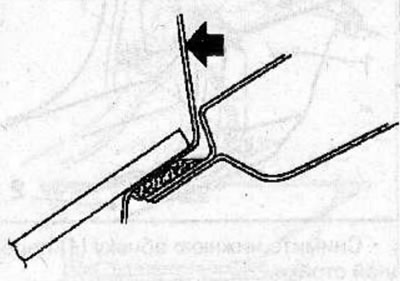
Using a steel wire (arrow) like a hacksaw, saw through the layer of glue along the entire perimeter…


Warnings:
  • The piano wire should not touch the edge of the windshield.
  • A layer of glue about 1 mm thick should remain on the body flanging.
  • If the paintwork of the body is damaged, check for any damage before installing the glass.


If the glass is to be reinstalled, apply alignment marks to the glass and body.

Remove the windshield using special suction cups.

Installation


Install the windshield on a special stand.
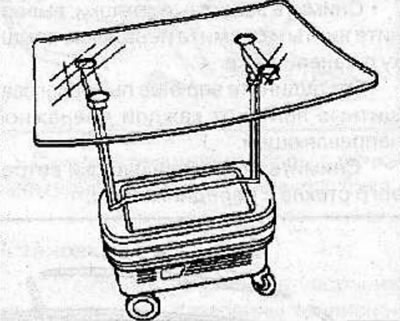
Install the windshield on a special stand.


Clean the inside of the windshield and body frame with isopropyl alcohol.
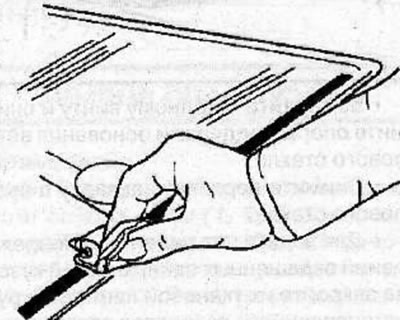
Clean the inside of the windshield and body frame with isopropyl alcohol.


Using glue, install the top trim onto the top edge of the windshield.
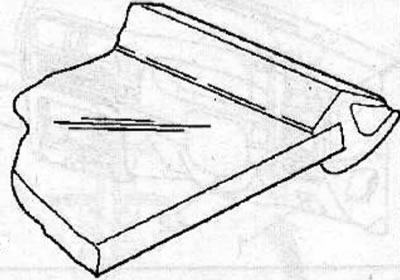


Using glue, install the top trim onto the top edge of the windshield.


Apply a 15 mm wide (A) layer of primer around the perimeter of the new glass.
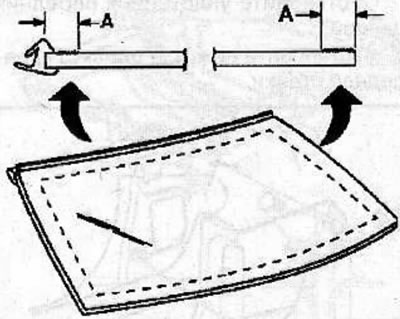
Apply a 15 mm wide (A) layer of primer around the perimeter of the new glass.


Warnings:
  • Primer increases the adhesion of the adhesive, so make sure to apply primer evenly around the perimeter of the windshield. Keep in mind that a thick layer of primer will weaken the adhesive strength of the glue. Never touch the primer surface with your hands. If this happens, the material may not bond properly to the glass, causing water leaks and drips after the glass is installed.
  • Avoid contact of the primed surface with water, dust and abrasive materials.


Install 10 spacers around the windshield opening.
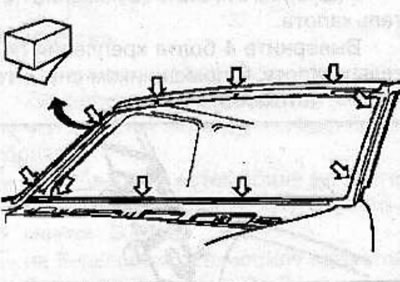
Install 10 spacers around the windshield opening.


Fill the gun with glue and apply an even layer of glue around the perimeter of the glass. To obtain a triangular adhesive layer with a width (A) of 9-11 mm and a height (B) of 8-12 mm, cut the syringe tip accordingly. The overlap of the adhesive layer (C) should be about 20 mm.
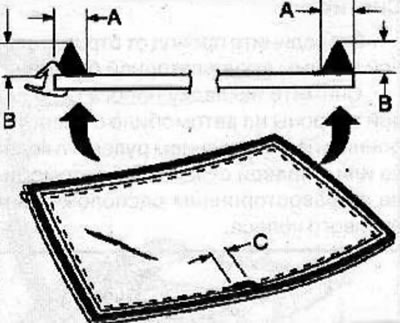


Fill the gun with glue and apply an even layer of glue around the perimeter of the glass. To obtain…


Using the MKM-641 suction cups, install the windshield, then the windshield base support supports and secure with screws. Place putty between the windshield base and frame on the left side for right-hand drive vehicles or on the right side for left-hand drive vehicles.
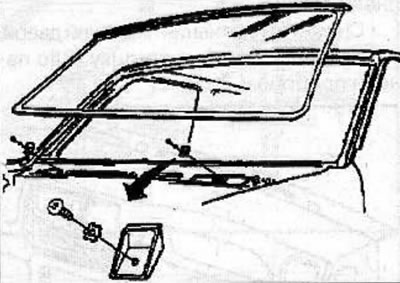
Using the MKM-641 suction cups, install the windshield, then the windshield base support supports…


Using special MKM-591 belts, press the windshield so that the thickness of the adhesive layer (A) is 5 mm.
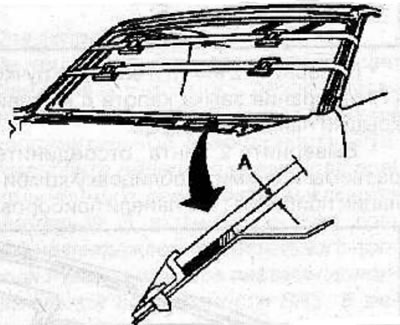
Using special MKM-591 belts, press the windshield so that the thickness of the adhesive layer (A)…


Warning: Do not open the front doors after tightening the seat belts.


Install side trims on the windshield.
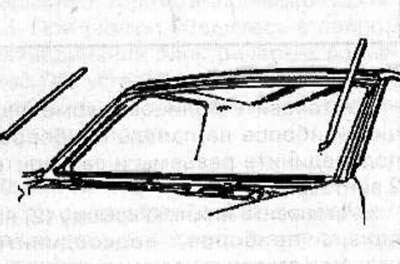
Install side trims on the windshield.


Install top dust and moisture protection tapes on each drainage guide.

Install the front cover onto the hatch panel and secure with screws.

Install the windshield wiper (see the relevant chapter).

Install the upper trim (1) of the front pillar.
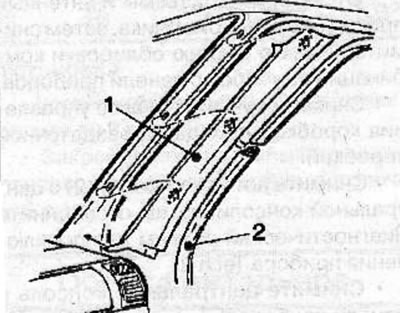
Install the upper trim (1) of the front pillar.


Install the door seal (2) onto the upper trim (1) of the front pillar.

Install the lower trim (1) of the front pillar.
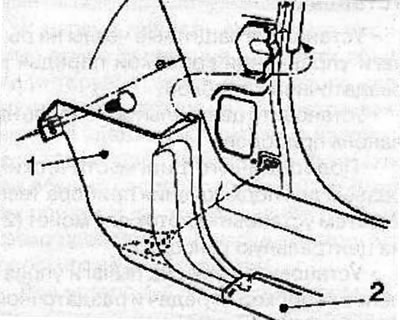
Install the lower trim (1) of the front pillar.


Install the threshold trim (2) onto the front door opening.


Install the interior rearview mirror onto the windshield.

Install the sun visors on the ceiling and secure them with screws.

Using two helpers, position the hood on the hinges and tighten the hinge mounting bolts by hand.
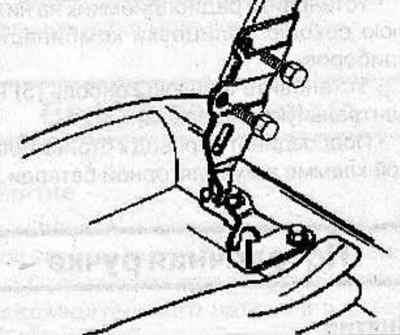
Using two helpers, position the hood on the hinges and tighten the hinge mounting bolts by hand.


Adjust the position of the bonnet and tighten the bonnet hinge bolts to a torque of 13 Nm.

Install and connect the fluid supply hose to the windshield washer sprayers.

Note: For the next 2-3 days after installation, it is not recommended to:
  • Slamming doors when all the windows are up;
  • Subject the body to excessive loads (such as when driving in deep ruts, entering and exiting them at an angle, or when driving on uneven roads).


This article is available at russian, bulgarian, belarusian, ukrainian, serbian, croatian, romanian, polish, slovak, hungarian
Checking the article: Chernov Alexander

Share information:

Previous articles
Opel Frontera B: Doors, locks and windows
Next articles

Rear window
Luggage compartment door seal
Trunk door trim for a 3-door car
Disassembling and assembling the tailgate
Luggage compartment door
Rear door seal
Hatch glass
Glass panel sunroof with manual drive
Sun protection curtain


See similar ones from other Opel car manuals:
▶ Windshield fairing panel — removal and installation Opel Astra F (1991-1998, petrol)
▶ Replacement of windshield and other fixed glass Opel Corsa B (1993-2000)
▶ Replacing windshield wiper blades Opel Insignia A (2008-2017)
▶ Removal and installation the windshield wiper gear motor Opel Kadett E (1984-1995)
▶ Windshield and rear door window/rear window — removal and… Opel Omega A (1986-1993)
Link to this page in different formats

Visitor comments


No comments yet


How much will 35 + 24 =


Vivaro A (2001-2014) 
  • General information
  • User manual
  • Power unit
  • Petrol engine F4R
  • Diesel engine F9Q
  • Diesel engine G9U
  • Transmission
  • Clutch and drive shafts
  • Manual gearbox
  • Chassis
  • Front suspension
  • Rear suspension
  • Brake system
  • Body
  • Exterior
  • Interior
  • Electrical equipment
  • Heating and ventilation
  • Air conditioner
  • Equipment and devices
  • Electrical diagrams
Ascona C (1981-1988) 
  • General information
  • Maintenance
  • Power unit
  • Gasoline engines
  • Diesel engines
  • Cooling system
  • Fuel and exhaust system
  • Contact ignition system
  • Contactless ignition system
  • Transmission
  • Clutch
  • Mechanical gearbox
  • Automatic gearbox
  • Drive shafts
  • Chassis
  • Steering
  • Brake system
  • Car suspension
  • Body
  • Exterior
  • Interior
  • Doors and windows
  • Electrical equipment
  • Equipment and devices
  • Power devices
  • Electrical circuits
Frontera B (1998-2004) 
  • General information
  • User manual
  • Maintenance
  • Power unit
  • Petrol engines 2.2 l
  • Petrol engines 3.2 l
  • Diesel engines 2.2 l
  • Cooling system
  • Fuel system (petrol)
  • Fuel system (diesel)
  • Ignition system
  • Transmission
  • Clutch
  • Manual gearbox MUA5C
  • Automatic gearbox 4L30E
  • Chassis
  • Suspension and axles
  • Steering
  • Brake system
  • Body
  • Exterior
  • Interior
  • Doors, locks and windows
  • Heating and air conditioning
  • Electrical equipment
  • Power devices
  • Equipment and devices
  • Lighting and signaling
  • Electrical diagrams
Frontera A (1991-1998, petrol) 
  • General information
  • Introduction to guide
  • User manual
  • Maintenance
  • Power unit
  • Engine repair
  • Lubrication system
  • Cooling system
  • Power and exhaust system
  • Engine electrics
  • Transmission
  • Clutch
  • Mechanical gearbox
  • Cardan shafts
  • Chassis
  • Brake system
  • Front suspension
  • Rear suspension
  • Steering
  • Body
  • Repair and care
  • Electrical equipment
  • Equipment and devices
  • Electrical circuits
OpelBook.ru © 2017–2026 · Mobile version · · Sitemap: EN BG BY UA RS HR RO PL SK HU · Feedback · Site search
Astra F, petrol · Astra G, petrol · Astra G · Astra H · Astra J, petrol · Corsa B · Corsa C, petrol · Corsa C · Insignia A · Kadett D · Kadett E · Omega A · Omega B · Omega B2 · Vectra A, petrol · Vectra A · Vectra B, petrol · Vectra B · Vectra C · Zafira A, petrol · Frontera A, petrol · Frontera B · Ascona C · Vivaro A ·
We want your visit to be comfortable 🤝! We use cookies 🍪 to make that happen.