
OpelBook.ru
Cars AvtoVAZ Cars Mitsubishi Cars BMW Cars Mercedes Cars Nissan Cars Toyota Cars Chevrolet
English Русский
Български
Беларускі
Український
Српски
Hrvatski
Română
Polski
Slovenský
Magyar
 |  Sitemap  |  Contacts  |    


Main Astra Corsa Insignia Kadett Omega Vectra Zafira Others Articles
Frontera A (1991-1998, petrol) Frontera B (1998-2004) Ascona C (1981-1988) Vivaro A (2001-2014)
  • Main
  • Opel
  • Ascona C
  • Body
  • Doors and windows
  • Window lift mechanism — removal and installation

Window lift mechanism — removal and installation (Opel Ascona C)

            0

1. Remove the inner door trim panel as described in Section 12.

2. Carefully remove the plastic water-repellent screen.

3. Temporarily install the window lift handle and lower the glass halfway. Secure the bottom edge of the glass with a wooden support.

4. Remove the mechanism mounting screws and slide the mechanism to the side, then remove it through the hole in the door panel after it is released from the guides (see photo 13.4 A and B). On some later models the mechanism is held in place with rivets rather than screws, in which case you will need to carefully drill out the rivets to remove the mechanism.
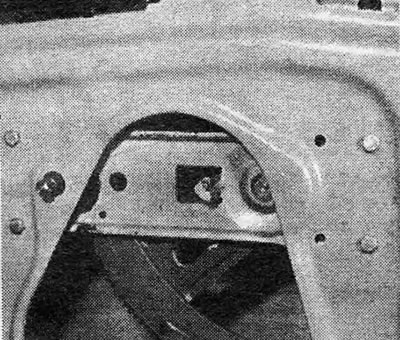
Photo 13.4A Fastening the window lift mechanism
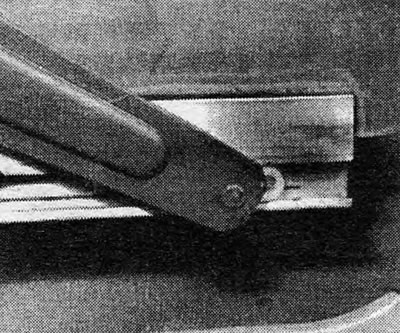
Photo 13.4A Fastening the window lift mechanism


Photo 13.4B Regulator lever inserted into the runner

Photo 13.4B Regulator lever inserted into the runner


5. Installation is carried out by performing the above steps in reverse order; before installing the mechanism, lightly lubricate it with molybdenum disulfide grease. Use new rivets to secure the mechanism if it is secured with rivets.

6. Contact Chapter 12 for information on electric window lift mechanisms.
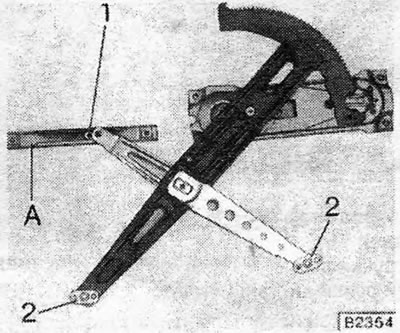
Figure 11.13. Front door window regulator rollers (1 and 2) and regulator runner (A)
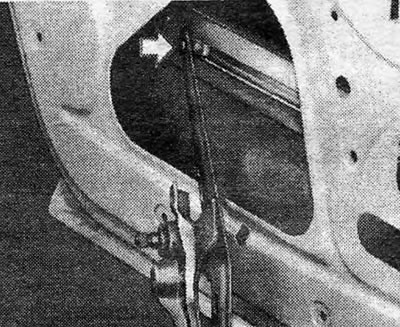
Figure 11.13. Front door window regulator rollers (1 and 2) and regulator runner (A)


Figure 11.14. Removing the rear door glass regulator (indicated by the arrow) from the glass holder

Figure 11.14. Removing the rear door glass regulator (indicated by the arrow) from the glass holder


Text copied from a web portal opelbook.ru


This article is available at russian, bulgarian, belarusian, ukrainian, serbian, croatian, romanian, polish, slovak, hungarian
Checking the article: Kornev Georgy

Share information:

Previous articles
Opel Ascona C: Doors and windows
Next articles

Interior Door Trim Panel — Removal and Installation
Door glass — removal and installation
Small fixed rear door glass — removal and installation
Front door lock — removal and installation
Front Door Outside Handle — Removal and Installation
Front Door Lock Cylinder — Removal, Disassembly, Assembly and Installation
Rear Door Lock — Removal and Installation


See similar ones from other Opel car manuals:
▶ Replacing the front door window lift motor Opel Astra J (2009-2015, petrol)
▶ Window lift control Opel Corsa C (2000-2006, petrol)
▶ Electric window lift components Opel Omega B (1993-1999)
▶ Window lift motor — removal and installation Opel Vectra B (1995-2002)
▶ Rear window wiper/washer Opel Insignia A (2008-2017)
Link to this page in different formats

Visitor comments


No comments yet


How much will 20 + 27 =


Vivaro A (2001-2014) 
  • General information
  • User manual
  • Power unit
  • Petrol engine F4R
  • Diesel engine F9Q
  • Diesel engine G9U
  • Transmission
  • Clutch and drive shafts
  • Manual gearbox
  • Chassis
  • Front suspension
  • Rear suspension
  • Brake system
  • Body
  • Exterior
  • Interior
  • Electrical equipment
  • Heating and ventilation
  • Air conditioner
  • Equipment and devices
  • Electrical diagrams
Ascona C (1981-1988) 
  • General information
  • Maintenance
  • Power unit
  • Gasoline engines
  • Diesel engines
  • Cooling system
  • Fuel and exhaust system
  • Contact ignition system
  • Contactless ignition system
  • Transmission
  • Clutch
  • Mechanical gearbox
  • Automatic gearbox
  • Drive shafts
  • Chassis
  • Steering
  • Brake system
  • Car suspension
  • Body
  • Exterior
  • Interior
  • Doors and windows
  • Electrical equipment
  • Equipment and devices
  • Power devices
  • Electrical circuits
Frontera B (1998-2004) 
  • General information
  • User manual
  • Maintenance
  • Power unit
  • Petrol engines 2.2 l
  • Petrol engines 3.2 l
  • Diesel engines 2.2 l
  • Cooling system
  • Fuel system (petrol)
  • Fuel system (diesel)
  • Ignition system
  • Transmission
  • Clutch
  • Manual gearbox MUA5C
  • Automatic gearbox 4L30E
  • Chassis
  • Suspension and axles
  • Steering
  • Brake system
  • Body
  • Exterior
  • Interior
  • Doors, locks and windows
  • Heating and air conditioning
  • Electrical equipment
  • Power devices
  • Equipment and devices
  • Lighting and signaling
  • Electrical diagrams
Frontera A (1991-1998, petrol) 
  • General information
  • Introduction to guide
  • User manual
  • Maintenance
  • Power unit
  • Engine repair
  • Lubrication system
  • Cooling system
  • Power and exhaust system
  • Engine electrics
  • Transmission
  • Clutch
  • Mechanical gearbox
  • Cardan shafts
  • Chassis
  • Brake system
  • Front suspension
  • Rear suspension
  • Steering
  • Body
  • Repair and care
  • Electrical equipment
  • Equipment and devices
  • Electrical circuits
OpelBook.ru © 2017–2026 · Mobile version · · Sitemap: EN BG BY UA RS HR RO PL SK HU · Feedback · Site search
Astra F, petrol · Astra G, petrol · Astra G · Astra H · Astra J, petrol · Corsa B · Corsa C, petrol · Corsa C · Insignia A · Kadett D · Kadett E · Omega A · Omega B · Omega B2 · Vectra A, petrol · Vectra A · Vectra B, petrol · Vectra B · Vectra C · Zafira A, petrol · Frontera A, petrol · Frontera B · Ascona C · Vivaro A ·
We want your visit to be comfortable 🤝! We use cookies 🍪 to make that happen.