
Cars with 4-cylinder engines
Removing
1. Park the vehicle on a level, level surface and set the steering wheel to the straight ahead position. On models with a driver's air bag, remove the ignition key and lock the steering lock.
2. Disconnect the negative cable from the battery and route it away from the terminal.
3. Apply handbrake, select 1st gear (or position «Park»), then jack up the front of the vehicle and place it securely on axle stands.
4. Where available, remove fasteners and lower engine compartment bottom guard.
5. Mark the position of the steering arm relative to the steering arm. Loosen the nut securing the pitman arm to the base of the steering gear, then using a suitable puller, pull the arm out of the grooves on the shaft.
6. Working in the driver's footwell, remove the retaining clips/screws and separate the trim panel from the underside of the instrument panel.
7. Unscrew and remove the upper coupling bolt of the flexible coupling of the steering column shaft (see chapter 22). Loosen and remove the bottom pinch bolt that secures the flexible coupling to the steering gear. Use a screwdriver to press the flexible coupling away from the steering gear, then slide it onto the steering column shaft as far as possible.
8. Place a container under the steering gear to catch the fluid.
9. Mark pressure head and return tubes and their branch pipes, then turn off connecting nuts and remove tubes from the steering mechanism. Seal the ends of the tubes and steering gear openings to reduce fluid loss and prevent dirt from entering.
10. Turn off bolts of fastening and remove a metal heat-insulating board from the case of the steering mechanism.
11. Turn off assembly bolts and nuts and take the steering mechanism from under the car. Remove any installed gaskets and draw their location to facilitate subsequent installation.
Installation
12. Install a new rubber seal on the steering gear so that the mark «OBEN» lined up with the identification plate on the movement.
13. Center the steering wheel, place the steering mechanism in the working position and insert the mounting bolts together with the gaskets, using the marks made during the removal of the mark. Gradually tighten the bolts to the specified tightening torque, moving clockwise from the top left bolt (viewed from the right wheel arch).
14. Make sure that the position of the steering wheel and wheels is not lost, then connect the steering arm to the steering shaft and tighten the nut with the torque specified specifications. On models equipped with a driver's air bag, first insert the ignition key to unlock the steering column lock and align the marks made during removal.
15. Install a heat shield on the steering mechanism, then insert and tighten the fastening bolts with a tightening torque regulated specifications.
16. Working in the cabin, slide the flexible coupling down to the end of the steering column shaft and connect it to the steering mechanism. Insert the upper and lower coupler pinch bolts and tighten them with the specified tightening torque specifications.
17. Install the lower dashboard trim panel.
18. Install new O-rings on the pressure and return pipes. Remove the plugs from the tubes, then connect the tubes to the pipes of the steering mechanism and tighten the connecting nuts with a tightening torque regulated specifications.
19. Install the bottom shield of the engine compartment and securely tighten the screws.
20. Lower the vehicle to the ground, then install the negative cable to the battery.
21. Check the fluid level in the power steering hydraulic reservoir. Top up if necessary and install cap.
22. Start the engine at idle and turn the steering mechanism from one extreme position to another several times to pump it. Recheck and top up the fluid level in the booster hydraulic system.
Cars with 6 cylinder engines
Removing
23. Park the vehicle on a level, level surface and set the steering wheel in the straight ahead position.
24. Disconnect the negative wire from the battery and take it away from the terminal.
25. Apply handbrake, select 1st gear (or position «Park»), then jack up the front of the vehicle and place it securely on axle stands.
26. Remove the fasteners and lower the bottom guard of the engine compartment.
27. Mark the position of the steering arm relative to the steering arm. Loosen the nut securing the pitman arm to the base of the steering gear, then, using a suitable puller, pull the lever off the grooves in the steering gear shaft.
28. Turn off bolts of fastening and remove a metal heat-insulating board from the case of the steering mechanism.
29. Disconnect steering sensor wiring harness from multi-coupler.
30. Unscrew the bolts of the engine damper strut located on the right, then remove the nut securing the right engine mount to the body bracket (see related section).
31. On models with a driver's airbag, remove the ignition key and lock the steering column lock.
32. Disconnect the vacuum hose from the brake booster (see Section 9).
33. Depressurize the fuel system (see related section), then unscrew the connecting nuts and disconnect the supply and return fuel lines from the manifold.
34. Detach the coolant reservoir from the body and move it to the side without separating the associated hoses.
35. Disconnect the hoses of the fuel vapor removal system from the nozzles of the coal canister (see related section).
36. Place a container under the steering gear to catch the fluid.
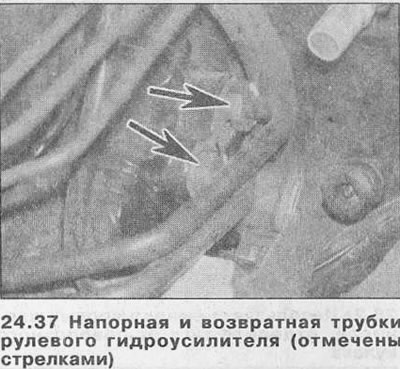
37. Mark the pressure and return pipes, as well as their nozzles, then unscrew the connecting nuts and remove the pipes from the steering mechanism (see illustration). Plug the ends of the tubes and steering gear fittings to reduce fluid loss and prevent dirt from entering.
38. Working in the driver's footwell, remove the fastening clips/screws and separate the trim panel from the underside of the dashboard. Remove the mounting screws and separate the air duct from the deflector and air distributor.
39. Unscrew and remove the upper coupling bolt of the elastic coupling of the steering column shaft (see chapter 22). Loosen and remove the bottom pinch bolt that secures the flexible coupling to the steering gear. Press the flexible coupling with a screwdriver from the steering mechanism, then slide it onto the steering column shaft as far as possible.
40. Hook the winch to the engine mounting lugs and lift the right side of the engine about 3 cm (see related section), to access the steering gear.
41. Remove the starter (see related section).
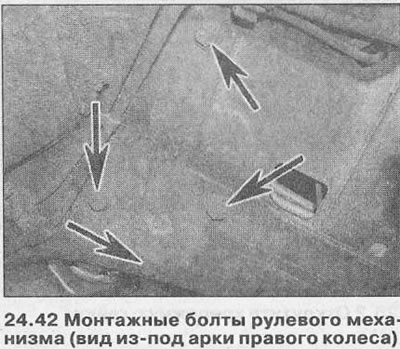
42. Unscrew the mounting bolts and nuts and remove the steering gear from under the car (see illustration). Remove all gaskets, making a note of their location to facilitate subsequent installation.
Installation
43. Install a new rubber seal on the steering mechanism so that the mark «OBEN» lined up with the identification plate on the movement.
44. Center the steering wheel, place the steering mechanism in the working position and insert the mounting bolts together with the gaskets, using the markings made during the removal of the mark. Gradually tighten the bolts with a torque specified specifications, moving clockwise from the top left bolt (viewed from the right wheel arch).
45. Connect the steering sensor wiring.
46. Install the starter (see related section).
47. Working in the cabin, slide the elastic coupling down and connect it to the steering gear. Insert the upper and lower tie bolts into the flexible coupling and tighten them with the tightening force specified specifications.
48. Attach the air duct to the working position, then install the lower instrument panel trim panel.
49. Lower the engine and unhook the winch from it. Install the suspension mounting nuts and engine damper strut (see related section).
50. Connect the vacuum hose to the brake booster (see related section).
51. Reinstall the coolant reservoir and tighten the bolts securely.
52. Place new O-rings on the pressure and return tubes of the hydraulic booster. Remove the plugs from them and their nozzles, then connect the tubes to the steering mechanism and tighten the connecting nuts with a tightening torque regulated specifications.
53. Connect the supply and return fuel lines to the manifold and tighten the union nuts with a tightening torque regulated specifications.
54. Connect the hoses of the fuel vapor removal system to the nozzles of the coal canister (see related section).
55. Make sure that the position of the steering wheel and wheels is not lost, then connect the steering arm to the shaft of the steering mechanism and tighten the nut with the tightening force regulated by the Specifications. On models equipped with a driver's air bag, first insert the ignition key to unlock the steering column lock and align the marks made during removal.
56. Install a heat shield on the steering mechanism, then insert and tighten the fastening bolts with a tightening torque regulated specifications.
57. Install the bottom shield of the engine compartment and securely tighten the screws.
58. Lower the vehicle to the ground, then install the negative cable to the battery.
59. Check the fluid level in the power steering hydraulic reservoir. Top up if necessary and install cap.
60. Start the engine at idle and turn the steering mechanism from one extreme position to another several times to pump it. Recheck and top up the fluid level in the booster hydraulic system.
Visitor comments