
Corsa models
1. Remove the front bumper cover (see Section 7).
2. Remove the side turn signal repeater (see chapter 12) and wheel arch protection (see Section 9) on the corresponding side of the vehicle.
3. Open the front door and unscrew the upper screw securing the fender to the A-pillar, then remove the plug and unscrew the central fixing screw (see resist. illustration). Remove the remaining 5 front fender mounting bolts.
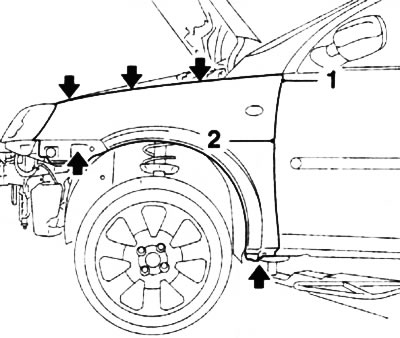
10.3. bolts (indicated by arrows) fastenings of a forward wing: 1. The top screw of fastening of a wing to a rack A; 2. Central screw securing the wing to the A-pillar
4. Heat the fender with a hair dryer at the points of contact with the A-pillar and remove it, if necessary, cut through the sealant with a knife.
Caution: The sealant should only be heated briefly and should not change color or bubble!
5. Clean the mating surfaces of the body from the remnants of the sealant, be careful not to damage the coating.
6. Cover with a special varnish those surfaces of the new wing that will be inaccessible after installation.
7. Clean the mating surfaces of the wing, align them if necessary. Apply/apply sealing tape or sealant to the mating surfaces of the wing.
8. Install the wing and set a uniform gap between adjacent body elements (see specs). Fasten the fender with bolts.
9. Further installation is carried out in the reverse order of removal.
Meriva Models
10. Remove the front bumper cover (see Section 7).
11. Drill out 2 rivets and remove the guides for installing the bumper lining.
12. Remove the corresponding headlight (see chapter 12) and remove the headlamp retaining nut from the fender.
13. Remove the side turn signal repeater (see chapter 12) and wheel arch protection (see Section 9).
Note: On petrol models, when removing the right fender, you must additionally loosen the fixing nut and remove the canister of the fuel vapor recovery system (EVAP).
14. To protect the edges of the front door and fender, cover them with adhesive textile tape or adhesive tape.
15. Turn out the bottom screw of fastening of a wing to a rack A, then loosen (do not turn out completely!) central fixing screw (see resist. illustration).
Note: Access to the central screw is possible through the wheel arch.
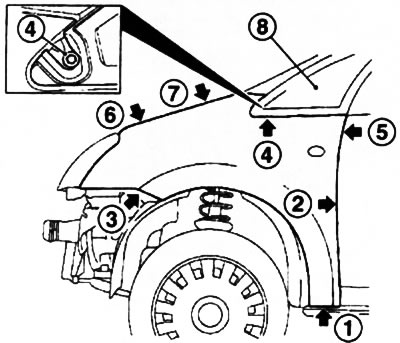
10.15. points (indicated by arrows) front fender mounts (Meriva models): 8. Triangular window
16. Remove the lower front bolt (3) and loosen the top bolt (4) and at the triangular window (see illustration 10.15), without pulling it out completely. Access to the bolt is possible through the wheel arch (use the wrench), the triangular window must be carefully pressed aside with a plastic wedge.
17. Open the door and loosen the top screw that secures the wing to the A-pillar without completely unscrewing it from the strut.
18. Turn out the top fixing bolts (6 and 7) (see illustration 10.15) and carefully remove the fender.
19. Before installing, glue the washer with quick setting adhesive to the hex of the bolt (4).
20. Install the wing and set a uniform gap between adjacent body elements (see specs). Fasten the wing.
21. Further installation is carried out in the reverse order of removal, while the bolt (4) (see illustration 10.15) should be tightened last. Don't forget to replace the triangular window rubber seal.
Visitor comments