
OpelBook.ru
Cars AvtoVAZ Cars Mitsubishi Cars BMW Cars Mercedes Cars Nissan Cars Toyota Cars Chevrolet
English Русский
Български
Беларускі
Український
Српски
Hrvatski
Română
Polski
Slovenský
Magyar
 |  Sitemap  |  Contacts  |    


Main Astra Corsa Insignia Kadett Omega Vectra Zafira Others Articles
Astra F (1991-1998, petrol) Astra G (1998-2004, petrol) Astra G (1998-2004) Astra H (2004-2009) Astra J (2009-2015, petrol)
  • Main
  • Astra
  • Astra J
  • Power unit
  • Engine repair
  • Setting the piston of the first cylinder to the TDC position

Setting the piston of the first cylinder to the TDC position (Opel Astra J)

            0

The piston of the 1st cylinder is set to the TDC position (top dead center) compression stroke so that the valve timing is not disturbed when performing work related to removing the camshaft drive belt. If the valve timing is disturbed, the engine will not operate normally.

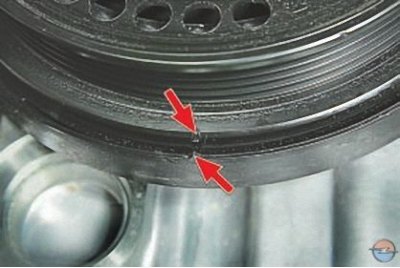
Set the TDC according to the marks on the intake and exhaust valve timing mechanisms (when installed according to the mark on the crankshaft pulley, the piston of either the 1st or 4th cylinder may be in this position). After this, be sure to check that the marks on the crankshaft pulley and on the lower timing belt cover match. If the mark on the crankshaft pulley does not match the mark on the cover, then the valve timing is out of alignment (piston of the 1st cylinder is not set to TDC). In this case, it is necessary to remove the timing belt and turn the crankshaft until the marks are aligned.
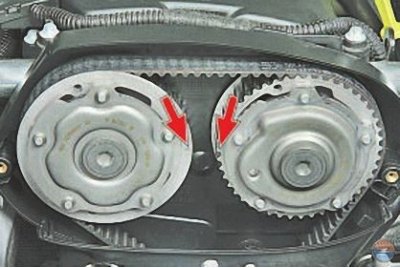
Set the TDC according to the marks on the intake and exhaust valve timing mechanisms (when…


The marks on the intake and exhaust valve timing mechanisms must be located in a horizontal plane and directed towards each other, as shown in the photo…
The marks on the intake and exhaust valve timing mechanisms must be located in a horizontal plane…


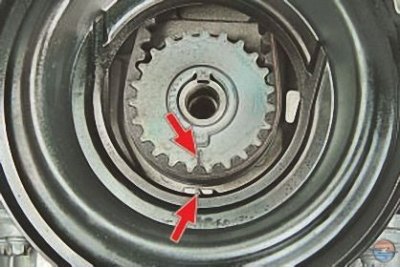
…and the mark on the toothed pulley of the crankshaft should be aligned with the mark on the oil pump housing. The mark becomes visible after removing the crankshaft pulley. The rectangular mark on the oil pump housing should coincide with the risk on the toothed pulley of the crankshaft.


…and the mark on the toothed pulley of the crankshaft should be aligned with the mark on the oil…


Material published on the website [www.opelbook.ru]

In addition, a mark (cutout) is applied to the edge of the crankshaft pulley groove for driving auxiliary units and to the lower cover of the timing belt.


This article is available at russian, bulgarian, belarusian, ukrainian, serbian, croatian, romanian, polish, slovak, hungarian
Checking the article: Trifonova Emilia

Share information:

Previous articles
Opel Astra J: Engine repair
Next articles

Replacing the rear support of the powertrain suspension
Replacing the front support of the powertrain suspension
Replacing the right powertrain suspension support
Replacing the left support of the powertrain suspension
Removal and installation mudguards and engine crankcase protection
Adjusting valve clearances
Replacement of auxiliary drive belt
Replacing the timing belt
Removal, defect detection and installation of the flywheel
Replacing the cylinder head cover gasket
Replacing the cylinder head gasket
Replacing valve stem seals


See similar ones from other Opel car manuals:
▶ Bringing the piston of the first cylinder to the position… Opel Corsa B (1993-2000)
▶ Setting the piston of cylinder No. 1 to top dead center… Opel Omega B2 (1999-2003)
▶ Bringing the piston of the first cylinder to the top dead… Opel Vectra C (2002-2008)
▶ Adjusting the position of the steering wheel Opel Insignia A (2008-2017)
▶ Cylinder head specifications Opel Kadett E (1984-1995)
Link to this page in different formats

Visitor comments


No comments yet


How much will 41 + 25 =


Astra J (2009-2015, petrol) 
  • General information
  • Vehicle device
  • User manual
  • Faults en route
  • Maintenance
  • Power unit
  • Engine repair
  • Cooling and lubrication system
  • Engine power system
  • Exhaust system
  • Transmission
  • Clutch
  • Car gearbox
  • Drive shafts
  • Chassis
  • Front suspension
  • Rear suspension
  • Steering
  • Brake system
  • Wheels and tires
  • Body
  • Exterior
  • Interior
  • Doors and windows
  • Body Care
  • Heating and air conditioning
  • Security systems
  • Electrical equipment
  • Equipment and devices
  • Lighting and signaling
  • Power devices
  • Electrical circuits
Astra H (2004-2009) 
  • General information
  • Introduction to the guide
  • Troubleshooting
  • User manual
  • Maintenance
  • Power unit
  • Engine repair
  • Cooling and heating
  • Power and exhaust system
  • Ignition system
  • Launch and charge system
  • Transmission
  • Mechanical gearbox
  • Automatic gearbox
  • Drive shafts
  • Chassis
  • Brake system
  • Car suspension
  • Steering
  • Body
  • Interior
  • Exterior
  • Electrical equipment
  • Equipment and devices
  • Electrical circuits
Astra G (1998-2004) 
  • General information
  • Introduction to manual
  • User manual
  • Maintenance
  • Power unit
  • SOHC gasoline engines
  • DOHC gasoline engines
  • Diesel engines 1.7 and 2.0
  • Engine repair
  • Cooling system
  • Supply system
  • Injection system (gasoline)
  • Injection system (diesel)
  • Exhaust system
  • Charge and launch system
  • Ignition system (gasoline)
  • Preheat system (diesel)
  • Transmission
  • Manual gearbox
  • Automatic gearbox
  • Clutch
  • Drive shafts
  • Chassis
  • Brake system
  • Wheel suspension
  • Steering
  • Body
  • Exterior
  • Interior
  • Doors and windows
  • Ventilation and heating
  • Electrical equipment
  • Equipment and devices
  • Electrical circuits
Astra G (1998-2004, petrol) 
  • General information
  • User manual
  • Car care
  • Maintenance
  • Power unit
  • Single shaft engines
  • Twin shaft engines
  • Engine repair
  • Cooling and heating
  • Fuel and exhaust systems
  • Starting and charging system
  • Ignition system
  • Transmission
  • Clutch
  • Mechanical gearbox
  • Automatic gearbox
  • Drive shafts
  • Chassis
  • Brake system
  • Car suspension
  • Steering
  • Body
  • Interior
  • Exterior
  • Electrical equipment
  • Equipment and devices
  • Wiring diagrams Opel Astra
  • Wiring diagrams Opel Zafira
Astra F (1991-1998, petrol) 
  • General information
  • Maintenance
  • Power unit
  • Engine in car
  • Engine removed
  • Cooling system
  • Heating and ventilation
  • Fuel supply (carburetor)
  • Fuel supply (injector)
  • Emission control
  • Ignition system
  • Transmission
  • Clutch
  • Mechanical gearbox
  • Automatic gearbox
  • Drive shafts
  • Chassis
  • Brake system
  • Car suspension
  • Steering
  • Body
  • Exterior
  • Interior
  • Electrical equipment
  • Equipment and devices
  • Electrical circuits
OpelBook.ru © 2017–2026 · Mobile version · · Sitemap: EN BG BY UA RS HR RO PL SK HU · Feedback · Site search
Astra F, petrol · Astra G, petrol · Astra G · Astra H · Astra J, petrol · Corsa B · Corsa C, petrol · Corsa C · Insignia A · Kadett D · Kadett E · Omega A · Omega B · Omega B2 · Vectra A, petrol · Vectra A · Vectra B, petrol · Vectra B · Vectra C · Zafira A, petrol · Frontera A, petrol · Frontera B · Ascona C · Vivaro A ·
We want your visit to be comfortable 🤝! We use cookies 🍪 to make that happen.