OpelBook.ru
Cars AvtoVAZ Cars Mitsubishi Cars BMW Cars Mercedes Cars Nissan Cars Toyota Cars Chevrolet
English Русский
Български
Беларускі
Український
Српски
Hrvatski
Română
Polski
Slovenský
Magyar
 |  Sitemap  |  Contacts  |    


Main Astra Corsa Insignia Kadett Omega Vectra Zafira Others Articles
Astra F (1991-1998, petrol) Astra G (1998-2004, petrol) Astra G (1998-2004) Astra H (2004-2009) Astra J (2009-2015, petrol)
  • Main
  • Astra
  • Astra J
  • Power unit
  • Engine repair
  • Adjusting valve clearances

Adjusting valve clearances (Opel Astra J)

            0

To compensate for thermal expansion of the valve, a gap is set between the end of the valve stem and the camshaft cam. With an increased gap, the valve will not open completely, and with a decreased gap, it will not close completely.

The gap is measured with a feeler gauge on a cold (at a temperature of +20°C) or warmed up engine (at operating temperature) between the camshaft cams (the cam must be directed away from the pushrod) and the valve tappet adjusting washer.

For a cold engine, the nominal clearance on the intake camshaft is (0.25±0.04) mm, on the exhaust shaft – (0.31±0.04) mm.

You will need: a set of feeler gauges, a micrometer.

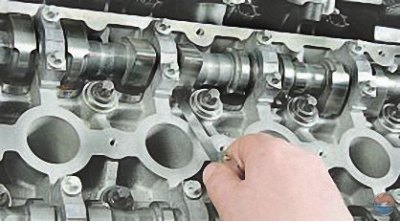
1. Remove the cylinder head cover (see Replacing the cylinder head cover gasket).

2. Set the piston of the 1st cylinder to the TDC position of the compression stroke (see Setting the piston of the first cylinder to the TDC position of the compression stroke). In this case, the cams of the intake valves of the 2nd cylinder and the exhaust valves of the 3rd cylinder should be directed upwards and located symmetrically at a slight angle inward (to the center of the cylinder head).

2. Set the piston of the 1st cylinder to the TDC position of the compression stroke (see Setting…


3. Measure the clearances with a set of feeler gauges. If the clearances are not within the norm, use the feeler gauges to determine the actual clearance and record the values obtained. Measure the clearances in the remaining valves in the same way. To do this, do the following:


  • turn the crankshaft half a turn. In this position, check the clearances on the cams of the intake valves of the 1st cylinder and the exhaust valves of the 4th cylinder;
  • turn the crankshaft again by half a turn. In this position, check the clearance on the cams of the intake valves of the 3rd cylinder and the exhaust valves of the 2nd cylinder;
  • turn the crankshaft another half turn and check the clearance on the cams of the intake valves of the 4th cylinder and the exhaust valves of the 1st cylinder.

If the valve clearances are not within the standard, adjust the clearances. It is necessary to replace the tappets of those valves whose clearances differ from the nominal values. To adjust the valve clearances, remove the camshafts (see Removal, inspection and installation of camshafts).

If the valve clearances are not within the standard, adjust the clearances. It is necessary to…


[Material published on the website OpelBook]

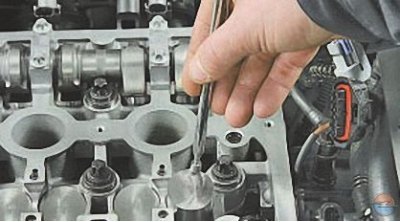
4. Remove the valve lifters.

4. Remove the valve lifters.


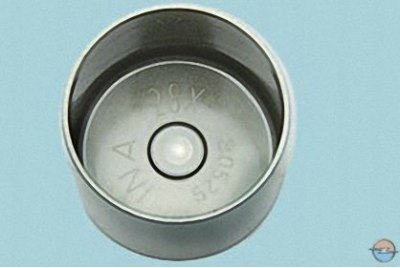
5. The adjustment size to which the pusher corresponds is marked on the inner side of the pusher.


6. Calculate the size (all values in mm) adjusting pusher N according to the formula

N = T + A – S, Where

T — size of the removed pusher;
A - measured valve clearance;
S — nominal clearance.

7. Install the valve lifters with the dimensions calculated by the formula and all the removed parts in the reverse order of removal, check the clearances. If necessary, repeat the operations indicated above.


This article is available at russian, bulgarian, belarusian, ukrainian, serbian, croatian, romanian, polish, slovak, hungarian
Checking the article: Trifonova Emilia

Share information:

Previous articles
Opel Astra J: Engine repair
Next articles

Checking the compression in the cylinders
Design Features of Turbocharged Engines
Possible engine malfunctions
Engine design features
Removal and installation mudguards and engine crankcase protection
Replacing the left support of the powertrain suspension
Replacing the right powertrain suspension support
Replacing the front support of the powertrain suspension
Replacing the rear support of the powertrain suspension
Setting the piston of the first cylinder to the TDC position


See similar ones from other Opel car manuals:
▶ Checking and adjusting valve clearances on a diesel engine Opel Corsa B (1993-2000)
▶ Adjusting clearances in the valve drive mechanism Opel Kadett E (1984-1995)
▶ Checking and adjusting valve clearances Opel Vectra A (1988-1995)
▶ Checking and adjusting valve clearances Opel Frontera B (1998-2004)
▶ Valve clearances — checking and adjustment Opel Omega A (1986-1993)
Link to this page in different formats

Visitor comments


No comments yet


How much will 26 + 34 =


Astra J (2009-2015, petrol) 
  • General information
  • Vehicle device
  • User manual
  • Faults en route
  • Maintenance
  • Power unit
  • Engine repair
  • Cooling and lubrication system
  • Engine power system
  • Exhaust system
  • Transmission
  • Clutch
  • Car gearbox
  • Drive shafts
  • Chassis
  • Front suspension
  • Rear suspension
  • Steering
  • Brake system
  • Wheels and tires
  • Body
  • Exterior
  • Interior
  • Doors and windows
  • Body Care
  • Heating and air conditioning
  • Security systems
  • Electrical equipment
  • Equipment and devices
  • Lighting and signaling
  • Power devices
  • Electrical circuits
Astra H (2004-2009) 
  • General information
  • Introduction to the guide
  • Troubleshooting
  • User manual
  • Maintenance
  • Power unit
  • Engine repair
  • Cooling and heating
  • Power and exhaust system
  • Ignition system
  • Launch and charge system
  • Transmission
  • Mechanical gearbox
  • Automatic gearbox
  • Drive shafts
  • Chassis
  • Brake system
  • Car suspension
  • Steering
  • Body
  • Interior
  • Exterior
  • Electrical equipment
  • Equipment and devices
  • Electrical circuits
Astra G (1998-2004) 
  • General information
  • Introduction to manual
  • User manual
  • Maintenance
  • Power unit
  • SOHC gasoline engines
  • DOHC gasoline engines
  • Diesel engines 1.7 and 2.0
  • Engine repair
  • Cooling system
  • Supply system
  • Injection system (gasoline)
  • Injection system (diesel)
  • Exhaust system
  • Charge and launch system
  • Ignition system (gasoline)
  • Preheat system (diesel)
  • Transmission
  • Manual gearbox
  • Automatic gearbox
  • Clutch
  • Drive shafts
  • Chassis
  • Brake system
  • Wheel suspension
  • Steering
  • Body
  • Exterior
  • Interior
  • Doors and windows
  • Ventilation and heating
  • Electrical equipment
  • Equipment and devices
  • Electrical circuits
Astra G (1998-2004, petrol) 
  • General information
  • User manual
  • Car care
  • Maintenance
  • Power unit
  • Single shaft engines
  • Twin shaft engines
  • Engine repair
  • Cooling and heating
  • Fuel and exhaust systems
  • Starting and charging system
  • Ignition system
  • Transmission
  • Clutch
  • Mechanical gearbox
  • Automatic gearbox
  • Drive shafts
  • Chassis
  • Brake system
  • Car suspension
  • Steering
  • Body
  • Interior
  • Exterior
  • Electrical equipment
  • Equipment and devices
  • Wiring diagrams Opel Astra
  • Wiring diagrams Opel Zafira
Astra F (1991-1998, petrol) 
  • General information
  • Maintenance
  • Power unit
  • Engine in car
  • Engine removed
  • Cooling system
  • Heating and ventilation
  • Fuel supply (carburetor)
  • Fuel supply (injector)
  • Emission control
  • Ignition system
  • Transmission
  • Clutch
  • Mechanical gearbox
  • Automatic gearbox
  • Drive shafts
  • Chassis
  • Brake system
  • Car suspension
  • Steering
  • Body
  • Exterior
  • Interior
  • Electrical equipment
  • Equipment and devices
  • Electrical circuits
OpelBook.ru © 2017–2026 · Mobile version · · Sitemap: EN BG BY UA RS HR RO PL SK HU · Feedback · Site search
Astra F, petrol · Astra G, petrol · Astra G · Astra H · Astra J, petrol · Corsa B · Corsa C, petrol · Corsa C · Insignia A · Kadett D · Kadett E · Omega A · Omega B · Omega B2 · Vectra A, petrol · Vectra A · Vectra B, petrol · Vectra B · Vectra C · Zafira A, petrol · Frontera A, petrol · Frontera B · Ascona C · Vivaro A ·
We want your visit to be comfortable 🤝! We use cookies 🍪 to make that happen.