
OpelBook.ru
Cars AvtoVAZ Cars Mitsubishi Cars BMW Cars Mercedes Cars Nissan Cars Toyota Cars Chevrolet
English Русский
Български
Беларускі
Український
Српски
Hrvatski
Română
Polski
Slovenský
Magyar
 |  Sitemap  |  Contacts  |    


Main Astra Corsa Insignia Kadett Omega Vectra Zafira Others Articles
Astra F (1991-1998, petrol) Astra G (1998-2004, petrol) Astra G (1998-2004) Astra H (2004-2009) Astra J (2009-2015, petrol)
  • Main
  • Astra
  • Astra G
  • Transmission
  • Manual gearbox
  • Adjusting the gear shift drive

Adjusting the gear shift drive (Opel Astra G)

            0

Contents: Models F13, F17 and F18 ⬇ Models F23 ⬇

Models F13, F17 and F18


To perform this procedure you will need a drill or punch with a diameter of 5 mm.


Adjustment of the gearshift drive is not a routine procedure for current vehicle maintenance and is only necessary after the gearshift mechanism has been removed. If gearshift clarity is impaired, the drive can be checked for proper operation and, if necessary, appropriate adjustments can be made.

Adjustment is made using the bolt of the clamp securing the gear selector rod to the shift rod (see Removal and installation the gear shift mechanism). The bolt is located under the power unit, just in front of the rear bulkhead of the engine compartment. On most models, the screw can be accessed from above, otherwise you should jack up the front of the car and place it on supports - access to the bolt from below is very limited.

1. Loosen up (but don't give it all away) gear selector shaft mounting clamp bolt.

2. In the car interior, release the gearshift lever protective cover from its clips and fold it upwards. Secure the lever using a 5 mm drill/punch inserted into the clamp on the left side of the lever base and inserted into the special fixing hole.
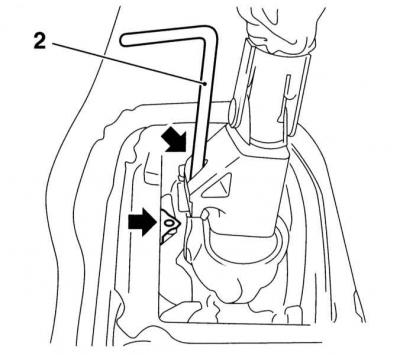
2. In the car interior, release the gearshift lever protective cover from its clips and fold it…


3. With the gearshift mechanism in neutral, turn the selector shaft against the spring and lock the mechanism in this position by pressing the spring-loaded locking pin into the cover located on top of the transmission housing.
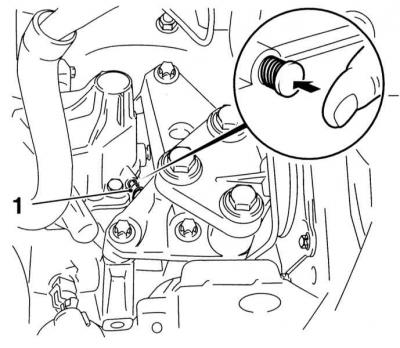


3. With the gearshift mechanism in neutral, turn the selector shaft against the spring and lock the…


4. Make sure that the lever and shift mechanism are securely locked, tighten the gear selector rod clamp bolt to stage 1, then tighten it to the stage 2 angle (see Specifications).
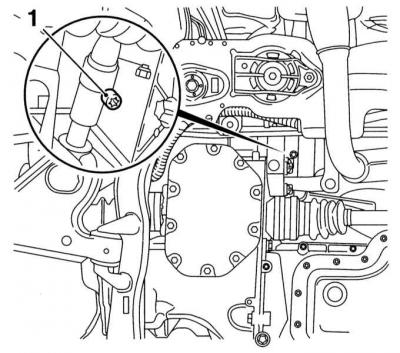
4. Make sure that the lever and shift mechanism are securely locked, tighten the gear selector rod…


5. Remove the drill/punch that secures the gear shift lever and check the operation of the shift mechanism - the spring-loaded locking pin will automatically release when the lever is moved to the reverse position.

6. Make sure the locking pin pops out of the cover, then (if you raised it) lower the car to the ground.

Models F23


1. Remove the center console cover and gearshift lever boot (see Chapter Body).

2. Using a small screwdriver, gently pry up and release both drive cable latches.
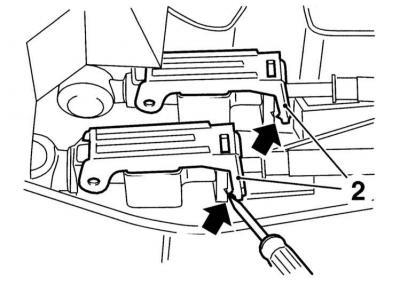
2. Using a small screwdriver, gently pry up and release both drive cable latches.


Material copied from this portal: www.opelbook.ru


3. In the engine compartment, move the selector lever to the neutral position and lock it in this position by pressing the lock.
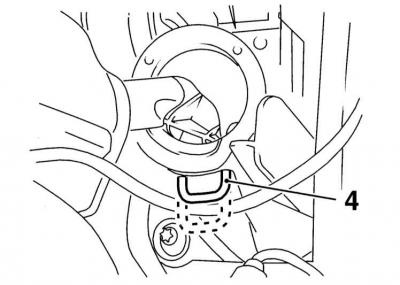
3. In the engine compartment, move the selector lever to the neutral position and lock it in this…


4. Press back to lock the locks of both cables.
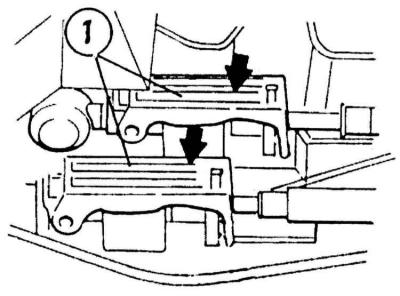
4. Press back to lock the locks of both cables.


5. Pull out the lever mounting clamp and install the lever boot and center console cover in place (see Chapter Body), then check the proper functioning of the switching mechanism.


This article is available at russian, bulgarian, belarusian, ukrainian, serbian, croatian, romanian, polish, slovak, hungarian
Checking the article: Pavlovsky Nikolay

Share information:

Previous articles
Opel Astra G: Manual gearbox
Next articles

Manual transmission specifications
General information about manual transmission
Removal and installation the gear shift mechanism
Replacing oil seals
Checking the proper functioning, removing and installing the reverse light switch sensor
Removal and installation the speed sensor (VSS)
Transmission oil change
Removal and installation of manual transmission


See similar ones from other Opel car manuals:
▶ Adjusting the gear shift drive Opel Corsa B (1993-2000)
▶ Adjusting the gear shift drive Opel Kadett E (1984-1995)
▶ Adjusting the gear shift drive (manual transmission) Opel Vectra C (2002-2008)
▶ Adjusting the gear shift cables Opel Insignia A (2008-2017)
▶ Gear Shift Lever Mounting Hanger — Removal and Installation Opel Omega A (1986-1993)
Link to this page in different formats

Visitor comments


No comments yet


How much will 32 + 25 =


Astra J (2009-2015, petrol) 
  • General information
  • Vehicle device
  • User manual
  • Faults en route
  • Maintenance
  • Power unit
  • Engine repair
  • Cooling and lubrication system
  • Engine power system
  • Exhaust system
  • Transmission
  • Clutch
  • Car gearbox
  • Drive shafts
  • Chassis
  • Front suspension
  • Rear suspension
  • Steering
  • Brake system
  • Wheels and tires
  • Body
  • Exterior
  • Interior
  • Doors and windows
  • Body Care
  • Heating and air conditioning
  • Security systems
  • Electrical equipment
  • Equipment and devices
  • Lighting and signaling
  • Power devices
  • Electrical circuits
Astra H (2004-2009) 
  • General information
  • Introduction to the guide
  • Troubleshooting
  • User manual
  • Maintenance
  • Power unit
  • Engine repair
  • Cooling and heating
  • Power and exhaust system
  • Ignition system
  • Launch and charge system
  • Transmission
  • Mechanical gearbox
  • Automatic gearbox
  • Drive shafts
  • Chassis
  • Brake system
  • Car suspension
  • Steering
  • Body
  • Interior
  • Exterior
  • Electrical equipment
  • Equipment and devices
  • Electrical circuits
Astra G (1998-2004) 
  • General information
  • Introduction to manual
  • User manual
  • Maintenance
  • Power unit
  • SOHC gasoline engines
  • DOHC gasoline engines
  • Diesel engines 1.7 and 2.0
  • Engine repair
  • Cooling system
  • Supply system
  • Injection system (gasoline)
  • Injection system (diesel)
  • Exhaust system
  • Charge and launch system
  • Ignition system (gasoline)
  • Preheat system (diesel)
  • Transmission
  • Manual gearbox
  • Automatic gearbox
  • Clutch
  • Drive shafts
  • Chassis
  • Brake system
  • Wheel suspension
  • Steering
  • Body
  • Exterior
  • Interior
  • Doors and windows
  • Ventilation and heating
  • Electrical equipment
  • Equipment and devices
  • Electrical circuits
Astra G (1998-2004, petrol) 
  • General information
  • User manual
  • Car care
  • Maintenance
  • Power unit
  • Single shaft engines
  • Twin shaft engines
  • Engine repair
  • Cooling and heating
  • Fuel and exhaust systems
  • Starting and charging system
  • Ignition system
  • Transmission
  • Clutch
  • Mechanical gearbox
  • Automatic gearbox
  • Drive shafts
  • Chassis
  • Brake system
  • Car suspension
  • Steering
  • Body
  • Interior
  • Exterior
  • Electrical equipment
  • Equipment and devices
  • Wiring diagrams Opel Astra
  • Wiring diagrams Opel Zafira
Astra F (1991-1998, petrol) 
  • General information
  • Maintenance
  • Power unit
  • Engine in car
  • Engine removed
  • Cooling system
  • Heating and ventilation
  • Fuel supply (carburetor)
  • Fuel supply (injector)
  • Emission control
  • Ignition system
  • Transmission
  • Clutch
  • Mechanical gearbox
  • Automatic gearbox
  • Drive shafts
  • Chassis
  • Brake system
  • Car suspension
  • Steering
  • Body
  • Exterior
  • Interior
  • Electrical equipment
  • Equipment and devices
  • Electrical circuits
OpelBook.ru © 2017–2026 · Mobile version · · Sitemap: EN BG BY UA RS HR RO PL SK HU · Feedback · Site search
Astra F, petrol · Astra G, petrol · Astra G · Astra H · Astra J, petrol · Corsa B · Corsa C, petrol · Corsa C · Insignia A · Kadett D · Kadett E · Omega A · Omega B · Omega B2 · Vectra A, petrol · Vectra A · Vectra B, petrol · Vectra B · Vectra C · Zafira A, petrol · Frontera A, petrol · Frontera B · Ascona C · Vivaro A ·
We want your visit to be comfortable 🤝! We use cookies 🍪 to make that happen.