OpelBook.ru
Cars AvtoVAZ Cars Mitsubishi Cars BMW Cars Mercedes Cars Nissan Cars Toyota Cars Chevrolet
English Русский
Български
Беларускі
Український
Српски
Hrvatski
Română
Polski
Slovenský
Magyar
 |  Sitemap  |  Contacts  |    


Main Astra Corsa Insignia Kadett Omega Vectra Zafira Others Articles
Vectra A (1988-1995, petrol) Vectra A (1988-1995) Vectra B (1995-2002, petrol) Vectra B (1995-2002) Vectra C (2002-2008)
  • Main
  • Vectra
  • Vectra C
  • General information
  • Maintenance
  • Jacking up a car

Jacking up a car (Opel Vectra C)

            0

Attention! The jack included in the standard vehicle package is intended only for short-term lifting of the vehicle when changing a wheel! When carrying out any other repair or maintenance work, the vehicle should be lifted using a hydraulic (or cart) jacks and must be installed on special supports placed under the load-bearing points of the bottom.


Warning! Never start the engine of a raised vehicle - it is dangerous!


Park the car on a flat horizontal surface, preferably with a hard surface. Set the steering wheel to neutral position - the front wheels should be turned along the longitudinal axis of the car.

Firmly apply the parking brake. Move the selector lever to the "P" position (models with AT)/engage reverse/forward gear (models with manual transmission) and turn off the engine. If necessary, put up an emergency stop sign and perform other actions provided for by the traffic rules.

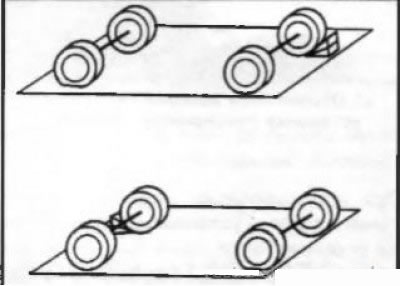
Remove all passengers from the vehicle and ensure that they do not obstruct traffic or are at risk of injury while the wheel is being changed. Chock the wheel diagonally opposite the one to be changed (see illustration 5).

Attention! Do not perform procedures on a slope, ice or other slippery surface, and if you cannot completely remove the car from the roadway, wait for the arrival of road service specialists!


Prepare the necessary tool (jack, wheel wrench) and a spare wheel - a description of the standard storage locations for the corresponding on-board tools and spare wheel is given in Chapter "Controls and operating techniques".


5. The wheel chock is installed under the wheel located diagonally relative to the corner of the…

5. The wheel chock is installed under the wheel located diagonally relative to the corner of the vehicle being jacked up

5. The wheel chock is installed under the wheel located diagonally relative to the corner of the…


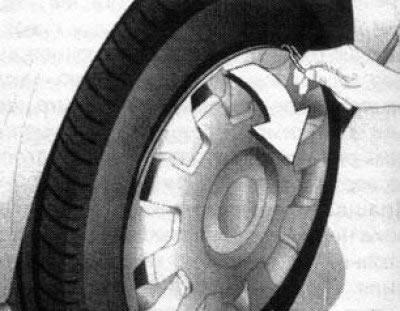
6. Removing the decorative cap

7. Removing the caps of the alloy wheel mounting bolts

7. Removing the caps of the alloy wheel mounting bolts


Note: Depending on the configuration, a compact spare wheel or a repair kit may be supplied instead of a full-size spare wheel.


Using a special hook included in the on-board tool kit or a screwdriver, remove the decorative/protective wheel cap (if available) (see illustration 6).

Note: On some models the cap is secured to the rim with wheel bolts, which at this stage only need to be loosened!


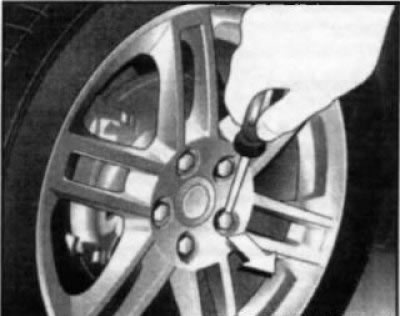
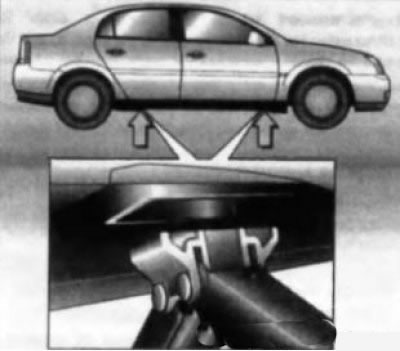
On cars with alloy wheels, pry with a screwdriver (see illustration 7), remove the wheel bolt caps. Use a wheel wrench to loosen the mounting bolts of the wheel to be replaced by 1+2 turns. When performing work, use only the standard jack. Place the jack head under the appropriate point under the body threshold (see illustration 8), - make sure that the jack is positioned strictly vertically (see illustration 9), and its heel rested on the ground with its entire surface. Try to install the jack on a hard surface, if necessary, you need to put some hard pad with a sufficiently developed surface under it (for example, a piece of board that is useful to have in a car).
8. The location of the jack installation points is marked with arrows on the lower edge of the body

8. The location of the jack installation points is marked with arrows on the lower edge of the body


Attention! Remember that regardless of the slope, the jack must always be in a strictly vertical position!


Manually rotate the jack winch until the distance from the ground to the vehicle threshold is completely selected. Then connect the handle to the winch and, using the handle, hang up the damaged wheel. Unscrew the wheel bolts and replace the wheel. Before installing the spare wheel, clean the mating surfaces. Tighten the bolts alternately.
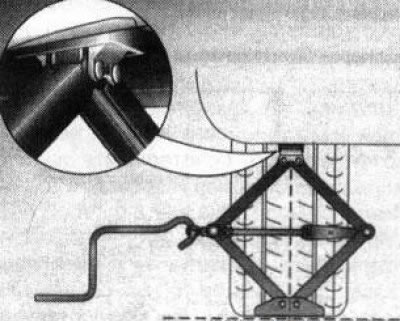
9. Correct installation of the jack

9. Correct installation of the jack


Lower the jack until the tire touches the ground and tighten the wheel bolts diagonally. Have the bolts tightened to the required torque at a service station with a special wrench as soon as possible. Check the air pressure in the spare tire and adjust if necessary (see Chapter 1, Section 5). Reinstall the cap and the bolt caps of the alloy wheels (with appropriate equipment).

Note: When designed accordingly, the cap is put on before tightening the bolts.


Do not start the engine until the jack is removed. Place the removed wheel and tool in their proper places. If equipped, initiate the tire pressure monitoring system.
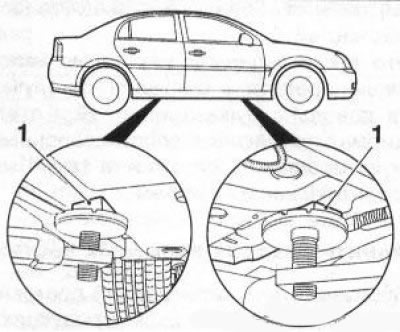
10. Lift lever installation points (1)

10. Lift lever installation points (1)


When using a lift, its levers should be installed under the same support points as when installing a jack. To avoid damage to the underbody, use suitable wooden or rubber pads. After about 100 km mileage it is necessary to check the tightening of the wheel bolts.


This article is available at russian, bulgarian, belarusian, ukrainian, serbian, croatian, romanian, polish, slovak, hungarian
Checking the article: Meshcheryakov Damir

Share information:

Previous articles
Opel Vectra C: Maintenance
Next articles

Purchase of spare parts
General information about maintenance
Towing a damaged vehicle
Starting the engine from an auxiliary power source
Schedule of scheduled maintenance (TO)
Checking fluid levels
Checking the condition of tires, inflation pressure, wheel rotation
Changing engine oil and oil filter


See similar ones from other Opel car manuals:
▶ Jacking up a car Opel Astra H (2004-2009)
▶ Jacking and towing Opel Corsa B (1993-2000)
▶ Jacking up a car Opel Omega B2 (1999-2003)
▶ Jacking and towing a car Opel Frontera A (1991-1998, petrol)
Link to this page in different formats

Visitor comments


No comments yet


How much will 30 + 38 =


Vectra C (2002-2008) 
  • General information
  • User manual
  • Vehicle device
  • Maintenance
  • Troubleshooting
  • Power unit
  • Engine repair
  • Cooling system
  • Power and control system
  • Engine electrics
  • Transmission
  • Clutch
  • Car gearbox
  • Drive shafts
  • Chassis
  • Car suspension
  • Steering
  • Brake system
  • Body
  • Exterior
  • Interior
  • Doors, locks and windows
  • Heating and ventilation
  • Electrical equipment
  • Equipment and devices
  • Headlights and lighting
  • Electrical circuits
Vectra B (1995-2002) 
  • General information
  • User manual
  • Weekly checks
  • Maintenance (gasoline)
  • Maintenance (diesel)
  • Troubleshooting
  • Power unit
  • SOHC gasoline engine
  • DOHC petrol engine
  • Diesel engine 1.7 liter
  • Diesel engine 2.0 liters
  • Engine repair
  • Cooling system
  • Fuel system (gasoline)
  • Fuel system (diesel)
  • Charging system
  • Launch system
  • Ignition and preheat
  • Transmission
  • Clutch
  • Mechanical gearbox
  • Automatic gearbox
  • Drive shafts
  • Chassis
  • Brake system
  • Wheel suspension
  • Steering
  • Body
  • Exterior
  • Interior
  • Doors and windows
  • Heating and ventilation
  • Electrical equipment
  • Equipment and devices
  • Electrical circuits
Vectra B (1995-2002, petrol) 
  • General information
  • Maintenance
  • Help with malfunctions
  • Power unit
  • Engine repair
  • Exhaust system
  • Cooling system
  • Fuel system
  • Multec injection system
  • Four point injection
  • Transmission
  • Clutch
  • Gearbox and drive
  • Chassis
  • Wheel suspension
  • Steering
  • Brake system
  • Wheels and tires
  • Body
  • Exterior
  • Interior
  • Electrical equipment
  • Fuses and electronics
  • Power devices
  • Ignition system
  • Lighting and signaling
  • Equipment and devices
  • Heating and ventilation
  • Electrical circuits
Vectra A (1988-1995) 
  • Power unit
  • Engine repair
  • Ignition system
  • Lubrication system
  • Cooling system
  • Injection system
  • Fuel system (carburetor)
  • Fuel system (diesel)
  • Exhaust system
  • Transmission
  • Clutch
  • Car gearbox
  • Chassis
  • Front suspension
  • Rear suspension
  • Steering
  • Brake system
  • Wheels and tires
  • Body
  • Exterior
  • Interior
  • Electrical equipment
  • Electrical circuits
Vectra A (1988-1995, petrol) 
  • General information
  • User manual
  • Maintenance
  • Power unit
  • SOHC engine
  • DOHC engine
  • Cooling and ventilation
  • Fuel system (carburetor)
  • Fuel system (injector)
  • Exhaust converter
  • Transmission
  • Clutch
  • Mechanical gearbox
  • Automatic gearbox
  • Drive shafts
  • Chassis
  • Brake system
  • Car suspension
  • Steering
  • Body
  • Body elements
  • Electrical equipment
  • Power devices
  • Equipment and devices
  • Electrical circuits
OpelBook.ru © 2017–2026 · Mobile version · · Sitemap: EN BG BY UA RS HR RO PL SK HU · Feedback · Site search
Astra F, petrol · Astra G, petrol · Astra G · Astra H · Astra J, petrol · Corsa B · Corsa C, petrol · Corsa C · Insignia A · Kadett D · Kadett E · Omega A · Omega B · Omega B2 · Vectra A, petrol · Vectra A · Vectra B, petrol · Vectra B · Vectra C · Zafira A, petrol · Frontera A, petrol · Frontera B · Ascona C · Vivaro A ·
We want your visit to be comfortable 🤝! We use cookies 🍪 to make that happen.