
Jacking
The jack supplied as standard on the vehicle is for wheel changing procedures only! When carrying out any other repair or maintenance work, the vehicle must be raised using the hydraulic (or trolley) jack and be sure to install on special supports wound up under the bearing points of the bottom. If there is no need to remove the wheels, the car can be driven into a viewing hole or overpass.
Do not start the engine of a raised vehicle - it is dangerous!
To avoid serious damage to the units, do not place the jack under the crankcase, gearbox or rear axle!
To jack up the car, apply the parking brake and, for safety, place a wheel chock under the rear wheel diagonally located to the corner to be jacked up.
When jacking up the rear corner of the vehicle, the transmission should be in gear instead of the parking brake.
If working on a slope, set the stop on the lower side of the wheel.
Before jacking up the vehicle, remove the trim cap and use a wheelbrace to loosen the bolts securing the wheel to be replaced. Prepare a spare.
Try to set the jack on a hard surface, if necessary, try to get some kind of hard pad with a sufficiently developed surface (e.g. a piece of board).
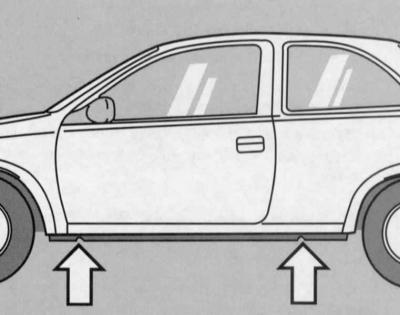
The jack should be brought into the reinforced points specially designed for this in the front or rear of the thresholds.
Jacking points
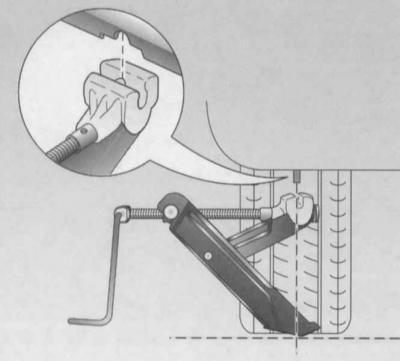
On models with side sill trim elements, before installing the jack under the bottom of the car, it is necessary to remove the trim element - pull its lower edge, turn it up and remove.
Take care of the reliability of the input of the head of the jack into engagement with the protrusion of the stiffening ribs of the threshold.
Special groove on the head of the jack
By rotating the jack handle, raise the car so that the wheel to be replaced is off the ground - make sure that the jack bearing constantly rests on the ground with its entire surface and is located strictly under the head. Having thrown off the mounting bolts, remove the wheel and install a spare in its place. Install the wheel bolts, then lower the vehicle to the ground, remove the jack and tighten the wheel bolts diagonally to the correct torque. Replace the cap. Fold up and put away the tool. Remember to remove and stow the wheel chocks.
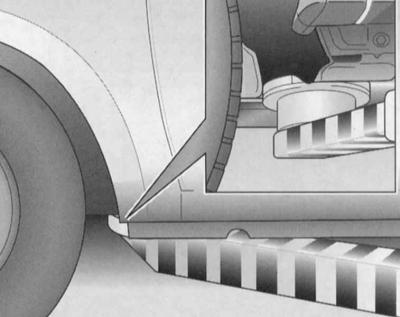
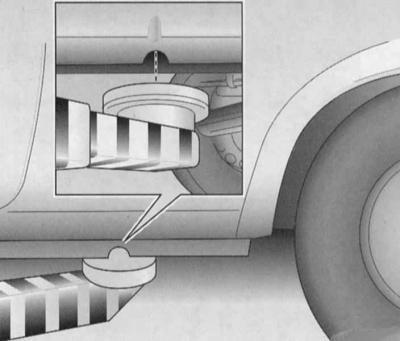
When fixing the car in the raised position, the heads of the props / legs of the lift should be turned in a little outside (along the axis of the car) jacking points thresholds.
Points of placement of legs of the elevator
Emergency vehicle towing
If there is no gear oil / ATF in the manual transmission or AT, the car must be towed only with the driving wheels off the ground!
Strictly speaking, the vehicle should be towed with the front wheels off the ground (best at all on a tow truck platform). If you have to tow the vehicle without lifting the front wheels, turn the ignition key to the OFF position to prevent damage to the steering lock.
Cars equipped with AT can be towed forward on all four wheels at a speed not exceeding 80 km/h and for a distance of not more than 100 km. Check the transmission fluid level before towing (see chapter Vehicle settings and routine maintenance). Carry out the following preparatory procedures:
- Release the parking brake;
- Start the engine;
- Move the selector lever to position D, then to neutral (N);
- Stop the engine;
- Turn the ignition key to the OFF position (never leave it in the LOCK position).
Never tow an AT-equipped vehicle backwards with the front wheels off the ground!
If it becomes necessary to tow a vehicle equipped with a manual transmission without lifting the wheels off the ground, be sure to shift the control lever to neutral and release the parking brake.
When towing an emergency vehicle, use only a specially designed towing lanyard, which is available inexpensively at almost any auto supply store. The sling should only cling to the load-bearing body elements - in no case to the bumper. The vehicles covered in this manual are equipped with rear and front towing eyelets.

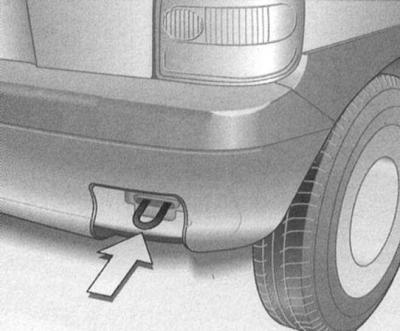
Towing eye in front of the car
Towing eye at the rear of the vehicle - Hatchback models
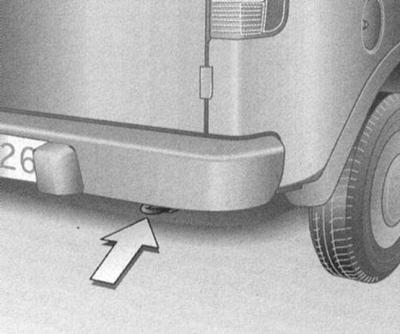
Towing eye at the rear of the vehicle - Combo models
To install a removable front eye, you must first remove the plug installed on the bumper, or flip the cover (depending on body type). Remove the removable eyelet stored in the spare tire niche from the cover and screw its threaded part into the socket until it stops.
Do not forget to turn the key in the ignition of the towed vehicle to the ON position, otherwise the steering column lock will inevitably work. In addition, when the ignition is switched on, the direction indicators and brake lights are also activated.
Remember that when the engine is off, the vehicle's braking performance is noticeably reduced due to the fact that the vacuum brake booster ceases to function. In this case, you should squeeze the foot brake pedal with a slightly greater force than usual. On models equipped with power steering, more force will have to be applied to the steering wheel when maneuvering.
When starting off and changing gears, the driver of the towing vehicle must pay particular attention to the smoothness of the clutch release. The driver of the towed vehicle should try to keep the towing line taut at all times to avoid jerks and collisions with the sling by wheels - ideally, a sling of an elastic design should be used, and a rigid bar is better.
Before driving, the drivers of both vehicles (towing and towed) the itinerary must be agreed upon.
Movement should be carried out only at moderate speeds, along the shortest route and in compliance with traffic rules. Avoid sudden braking, acceleration and maneuvering. Be aware that there is always a risk of drifting off the road when towing your vehicle on the shoulder or on a narrow dirt road.
Both vehicles must have external lighting devices in accordance with the traffic rules.
Visitor comments