
Removing
1. Open the hood and disconnect the gas-filled telescopic stop from it, for which slightly raise the locking bracket with a screwdriver and remove the rack from the upper spherical support - you will need the help of an assistant to support the hood.
2.. For subsequent installation, circle the position of the hinges on the hood with a marker (see resist. illustration).
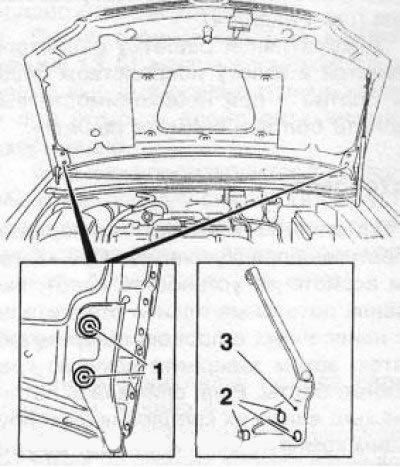
10.2 Bolts (1) hood hinges (3): 2. Screws for attaching the hinge to the body
3. Turn out 4 fixing bolts (2 on each side) (see illustration 10.2), then with the help of an assistant, remove the hood and set it aside. If necessary, after removing 3 screws, remove the hinges from the body.
Note: To do this, you must first remove the fairing grille (see Section 4).
4. The decorative radiator grille is attached to the hood with eight bolts - if necessary, remove the bolts and remove the grille.
Installation
5. Installation is made in an order, the return to an order of removal. With the help of an assistant, install the hood, aligning the hinge strips with the marks made during the dismantling process, then hand-tighten the mounting bolts. If the hinges were removed, lubricate the screws of their fastening with a fixing compound (e.g. Loctite 243)
6. Close the hood, align it in the body opening and adjust the gaps (see below).
7. At the end of the adjustment, tighten the bolts and secure the upper end of the gas-filled stop to the hood.
Hood Gap Adjustment
8. Loosen the hood bolts (if it has not been removed before).
9. Close the hood and make sure that the gaps of its mating with the right and left fenders are the same, if necessary, make the appropriate adjustments, then tighten the hood mounting bolts with the required force. (see specs).
10. Remove the fairing grille (see Section 4), loosen the bolts securing the hinges to the body (if they have not been removed before) and set the height of the side of the hood by shifting the hinges to the required amount.
11. By rotating the four damper stops mounted on the hood latch holder bar, adjust the height of the front edge of the latter. The bonnet is adjusted correctly if, in the closed position, its edges coincide in height with the edges of adjacent body elements. Tighten the fixing screws to the required torque.
12. Install and adjust the hood latch (see below). Close the hood and once again check its position and ease of opening / closing, repeat the adjustment if necessary.
13. Install the fairing grille (see Section 4).
Installation of a safety hook and a latch of the lock of a cowl
Note: When installing a new hood, the hook and spindle must be reinstalled from the old one or purchased separately.
14. Install a safety hook with a spring and a riveted axial pin on the hood, at the same time make a notch at the end of the rivet with tongs and expand it (see resist. illustration).
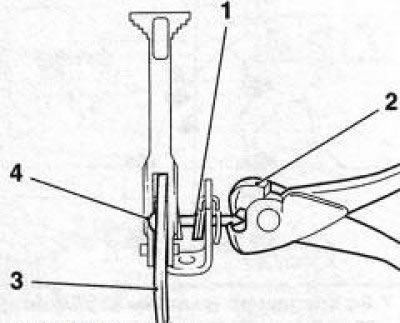
10.14 Scheme of fastening the safety hook of the hood lock: 1. Spring; 2. Pincers; 3. Hook; 4. Riveted axle pin
15. Attach the lock latch assembly to the hood (see resist. illustration) and adjust the size «X», which should not go beyond the range of 40-45 mm. Size «X» measured from the surface of the hood to the edge of the washer. Then, while holding the latch of the lock with a wrench, tighten the nut to 22 Nm.
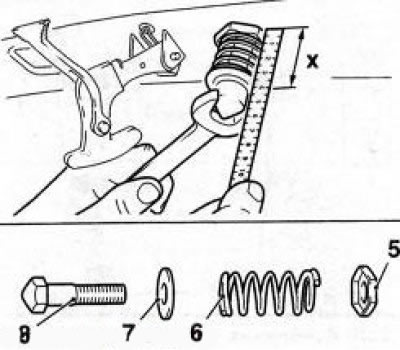
10.15 Adjusting the height of the hood lock latch: 5. Locknut; 6. Spring; 7. Washer; 8. Latch X=40-45mm
16. At the end of the adjustment, lubricate the trunnion of the lock with universal grease.
Visitor comments