
Removing the mirror assembly
1. Remove the front door triangular trim (see Section 21).
2. Disconnect the mirror wiring connector (see resist. illustration). While holding the mirror out, remove the 3 fixing screws and remove the mirror from the door.
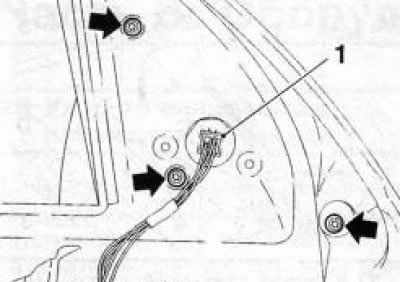
22.2 Connector (1) wiring door rear-view mirror arrows indicate mounting screws
3. Installation is carried out in the reverse order.
Side Mirror Glass Replacement
1. Fold out the door mirror.
2. Install the mirror so that the top corner of the glass (see resist. illustration) was tilted to the right (on the right mirror - to the left) as far as it will go in the mirror housing. Insert a plastic wedge under the mirror glass (see ibid) and carefully remove the glass.

23.2 Removing the glass (2) door rear-view mirror - the arrow indicates the upper corner: 1. Plastic wedge; 3. Contact pads of wires of the heating system
3. If equipped, disconnect the 2 wires of the glass heating system from the back (see illustration 23.2), while holding the riveted tabs of the contacts to avoid damaging them.
4. Installation is made in an order, the return to an order of removal. Don't forget to adjust the position of the mirror.
Replacement of the electric motor of a lateral rear-view mirror
1. Remove the door mirror glass (see Section 22).
2. Remove 3 screws (see resist. illustration) and remove the motor from the mirror housing.
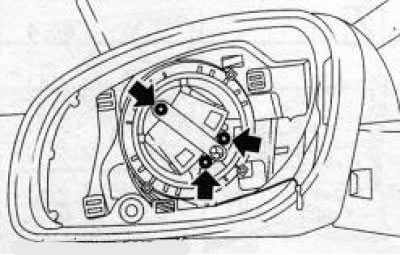
24.2 Screws (indicated by arrows) door mirror drive motor mounts
3. Disconnect the wiring connector from the back of the electric motor (see resist. illustration).
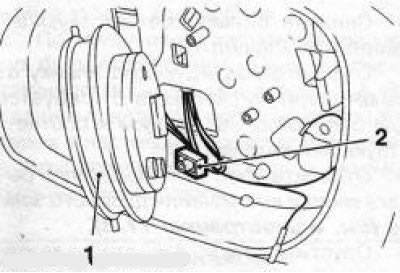
24.3 Connector (2) electric motor (1) door mirror drive
4. Installation is carried out in the reverse order.
Removal and installation of a cover of a lateral rear-view mirror
1. Remove the door mirror glass (see Section 22).
2. Using a plastic wedge, separate the trim from the door mirror cover (see resist. illustration). Remove the locking pin from the seat.
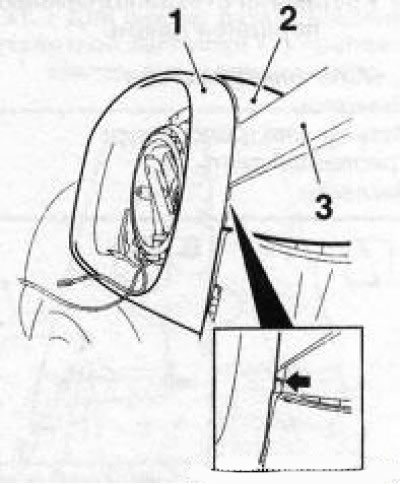
25.2 Overlay (1) lids (2) door rear-view mirror - the locking pin is indicated by the arrow: 3. Plastic wedge
3. Squeeze 4 latches in the indicated on the resist. illustrations in order and remove the cover.
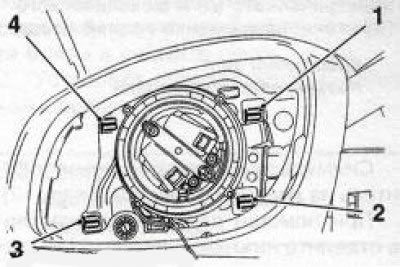
25.3 Fasteners (1,2,3 and 4) door mirror covers
4. Installation is made in an order, the return to an order of removal. The locking pin is installed with a plastic wedge.
Visitor comments