
OpelBook.ru
Cars AvtoVAZ Cars Mitsubishi Cars BMW Cars Mercedes Cars Nissan Cars Toyota Cars Chevrolet
English Русский
Български
Беларускі
Український
Српски
Hrvatski
Română
Polski
Slovenský
Magyar
 |  Sitemap  |  Contacts  |    


Main Astra Corsa Insignia Kadett Omega Vectra Zafira Others Articles
Vectra A (1988-1995, petrol) Vectra A (1988-1995) Vectra B (1995-2002, petrol) Vectra B (1995-2002) Vectra C (2002-2008)
  • Main
  • Vectra
  • Vectra A
  • Power unit
  • Exhaust system
  • Removal and installation of the exhaust system

Removal and installation of the exhaust system (Opel Vectra A)

            0

Contents: Removal ⬇ Installation ⬇
All elements of the system can be replaced individually.

Removal


Raise the vehicle and place it on supports.

Lubricate all threaded connections with a rust dissolving agent and leave for a while.
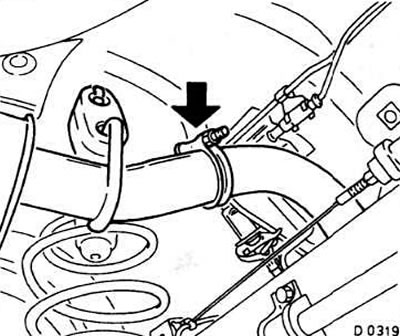
Lubricate all threaded connections with a rust dissolving agent and leave for a while.


Loosen the clamp on the rear (main) muffler.

Remove the main muffler from the rubber mounts and disconnect it from the additional muffler.

Place wooden shims under the exhaust system.
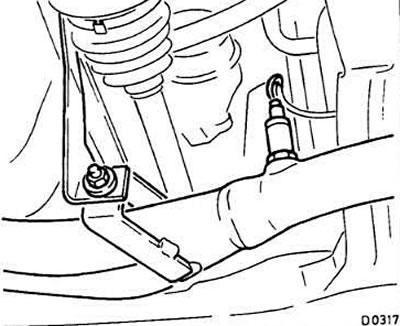
Place wooden shims under the exhaust system.


For vehicles with 2.0L engines with a catalytic converter: unscrew the lambda probe from the inlet pipe with a wrench, after disconnecting the connector.

Attention! The lambda probe and catalytic converter are sensitive to impacts. It is not recommended to hit them or drop them.


Attention! The lambda probe and catalytic converter are sensitive to impacts. It is not recommended…


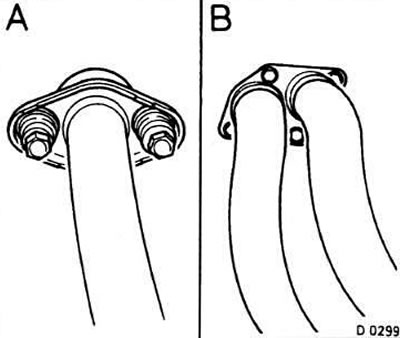
Loosen the bolts securing the intake pipe to the exhaust manifold (see Fig.). Fig. A shows the C16NZ engine flange, and Fig. B shows the E16NZ.

For vehicles with 1.7L turbodiesel engines and 2.0L turbopetrol engines: Loosen the bolts securing the intake pipe to the turbocharger.
For vehicles with 1.7L turbodiesel engines and 2.0L turbopetrol engines: Loosen the bolts securing…


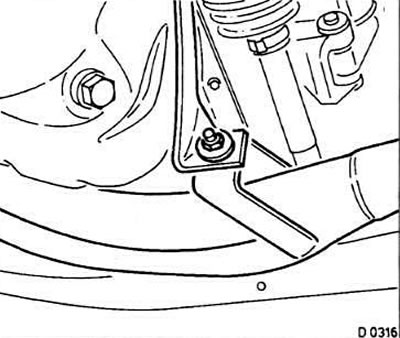
Loosen, where necessary, the bolts securing the intake pipe to the body.
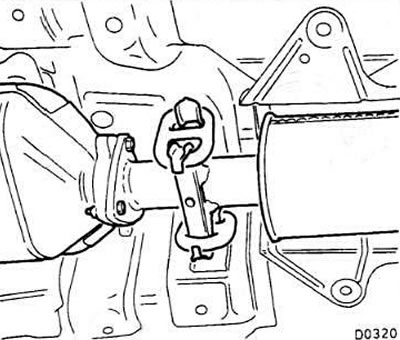
Loosen, where necessary, the bolts securing the intake pipe to the body.


Remove the exhaust system mount in front of the additional muffler from the rubber mounts and remove the muffler.


(Original posted on the website: OpelBook)

Installation


Install the intake pipe of the new exhaust system, having previously cleaned the mating surfaces and laid new sealing and damping gaskets. Do not tighten the mounting bolts yet.

To ensure the possibility of subsequent disassembly, it is recommended to cover the threaded connections with a special anti-stick paste before assembly.

Raise the exhaust system with the help of an assistant or place it on wooden spacers.

Install an additional muffler on rubber suspensions.

Place a new gasket under the intake pipe flange and pre-secure the pipe with new bolts, without tightening them yet.

If necessary, tighten the exhaust pipe bracket mounting bolts.

Install the main muffler onto the exhaust pipe from behind, having first installed the clamp.

Adjust the position of the main muffler and install it on rubber suspensions.

Before tightening the bolts of the exhaust system, adjust the position of all its elements without distortions and deformations. Maintain the required distance between the system elements and the car body and ensure uniform load on the rubber suspensions.

Tighten the system mounting bolts to the following torques:
  • the inlet pipe with the exhaust manifold - with a torque of 25 Nm,
  • the inlet pipe with a turbocharger in cars with a 2.0 l turbo petrol engine - 12 Nm,
  • the intake pipe with a turbocharger in cars with 1.7 l turbodiesel engines - 65 Nm,
  • receiving pipe with support - 20 Nm,
  • ball joint - 12 Nm,
  • clamps - 25 Nm,
  • exhaust manifold on cars with 16-valve engines - 20 Nm.

In cars with 2.0 l engines with a catalytic converter: before screwing in the lambda probe, lubricate its thread with Opel paste N1948602 (05613905). Screw in the lambda probe and tighten to a torque of 30 Nm. Connect the connector, routing the wire so that it does not come into contact with the exhaust system anywhere. Secure the wire with clamps.


This article is available at russian, bulgarian, belarusian, ukrainian, serbian, croatian, romanian, polish, slovak, hungarian
Checking the article: Zinoviev Kirill

Share information:

Previous articles
Opel Vectra A: Exhaust system
Next articles

General information and structure
Replacing the hinge flange gasket
Cars with a catalytic converter
Checking the exhaust gas recirculation valve
Visual inspection of the exhaust system


See similar ones from other Opel car manuals:
▶ Exhaust gas cleaning system Opel Astra F (1991-1998, petrol)
▶ Checking the exhaust system Opel Corsa B (1993-2000)
▶ Replacing the exhaust system Opel Insignia A (2008-2017)
▶ Device of the exhaust gas system Opel Kadett E (1984-1995)
▶ Exhaust system — removal and installation Opel Omega A (1986-1993)
Link to this page in different formats

Visitor comments


No comments yet


How much will 50 + 37 =


Vectra C (2002-2008) 
  • General information
  • User manual
  • Vehicle device
  • Maintenance
  • Troubleshooting
  • Power unit
  • Engine repair
  • Cooling system
  • Power and control system
  • Engine electrics
  • Transmission
  • Clutch
  • Car gearbox
  • Drive shafts
  • Chassis
  • Car suspension
  • Steering
  • Brake system
  • Body
  • Exterior
  • Interior
  • Doors, locks and windows
  • Heating and ventilation
  • Electrical equipment
  • Equipment and devices
  • Headlights and lighting
  • Electrical circuits
Vectra B (1995-2002) 
  • General information
  • User manual
  • Weekly checks
  • Maintenance (gasoline)
  • Maintenance (diesel)
  • Troubleshooting
  • Power unit
  • SOHC gasoline engine
  • DOHC petrol engine
  • Diesel engine 1.7 liter
  • Diesel engine 2.0 liters
  • Engine repair
  • Cooling system
  • Fuel system (gasoline)
  • Fuel system (diesel)
  • Charging system
  • Launch system
  • Ignition and preheat
  • Transmission
  • Clutch
  • Mechanical gearbox
  • Automatic gearbox
  • Drive shafts
  • Chassis
  • Brake system
  • Wheel suspension
  • Steering
  • Body
  • Exterior
  • Interior
  • Doors and windows
  • Heating and ventilation
  • Electrical equipment
  • Equipment and devices
  • Electrical circuits
Vectra B (1995-2002, petrol) 
  • General information
  • Maintenance
  • Help with malfunctions
  • Power unit
  • Engine repair
  • Exhaust system
  • Cooling system
  • Fuel system
  • Multec injection system
  • Four point injection
  • Transmission
  • Clutch
  • Gearbox and drive
  • Chassis
  • Wheel suspension
  • Steering
  • Brake system
  • Wheels and tires
  • Body
  • Exterior
  • Interior
  • Electrical equipment
  • Fuses and electronics
  • Power devices
  • Ignition system
  • Lighting and signaling
  • Equipment and devices
  • Heating and ventilation
  • Electrical circuits
Vectra A (1988-1995) 
  • Power unit
  • Engine repair
  • Ignition system
  • Lubrication system
  • Cooling system
  • Injection system
  • Fuel system (carburetor)
  • Fuel system (diesel)
  • Exhaust system
  • Transmission
  • Clutch
  • Car gearbox
  • Chassis
  • Front suspension
  • Rear suspension
  • Steering
  • Brake system
  • Wheels and tires
  • Body
  • Exterior
  • Interior
  • Electrical equipment
  • Electrical circuits
Vectra A (1988-1995, petrol) 
  • General information
  • User manual
  • Maintenance
  • Power unit
  • SOHC engine
  • DOHC engine
  • Cooling and ventilation
  • Fuel system (carburetor)
  • Fuel system (injector)
  • Exhaust converter
  • Transmission
  • Clutch
  • Mechanical gearbox
  • Automatic gearbox
  • Drive shafts
  • Chassis
  • Brake system
  • Car suspension
  • Steering
  • Body
  • Body elements
  • Electrical equipment
  • Power devices
  • Equipment and devices
  • Electrical circuits
OpelBook.ru © 2017–2026 · Mobile version · · Sitemap: EN BG BY UA RS HR RO PL SK HU · Feedback · Site search
Astra F, petrol · Astra G, petrol · Astra G · Astra H · Astra J, petrol · Corsa B · Corsa C, petrol · Corsa C · Insignia A · Kadett D · Kadett E · Omega A · Omega B · Omega B2 · Vectra A, petrol · Vectra A · Vectra B, petrol · Vectra B · Vectra C · Zafira A, petrol · Frontera A, petrol · Frontera B · Ascona C · Vivaro A ·
We want your visit to be comfortable 🤝! We use cookies 🍪 to make that happen.