
Engine OHC 2.0 l
To ensure warranty, the thermostat is only supplied with a drain plug, i.e. parts are replaced as a set.
The thermostat is removed as follows:
1. Disconnect the ground cable from the battery.
2. Drain the coolant (chapter Filling the cooling system cooler Chapters Ongoing care and maintenance).
3. Disconnect the upper hose from the connecting pipe on the engine, and unscrew the plug together with the thermostat from the thermostat housing.
Installation is carried out in the reverse order of removal. The sealing ring is always installed new. Tighten the bolts to 8 Nm.
If there is a leak under the sealing ring, then removing and installing the thermostat housing is a rather laborious operation. To get to the thermostat housing, you need to remove the toothed belt. In addition, the crankshaft pulley, cylinder block cover, toothed belt tensioner and toothed belt guard must be removed.
1. Disconnect the ground cable from the battery.
2. Remove the multi-ribbed V-belt as described.
3. Drain the liquid from the cooling system (chapter Filling the cooling system cooler Chapters Ongoing care and maintenance).
4. Remove the four alternator mounting bolts.
5. Disconnect the two hoses from the thermostat housing and disconnect the plug connection of the temperature gauge sensor.
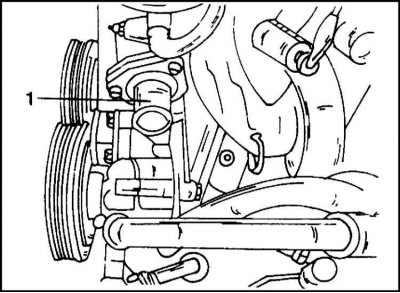
6. Disconnect the hose from the thermostat housing and from the fluid outlet (1).
7. Remove the toothed belt as described for the OHC engine.
8. Remove the toothed belt tensioner (tightening torque 25 Nm).
9. Holding the crankshaft from turning (turn on the transmission), unscrew the bolt securing the pulley (tightening torque 130 Nm + 40°to 50°, always replace the bolt with a new one). Remove pulley (sits heavily).
13 Disconnect the cables from the camshaft housing cover. Disconnect the two hoses and the housing cover (tightening torque 8 Nm).
10. Remove the gear from the camshaft by unscrewing the bolt (the shaft is kept from turning by the hexagon). Bolt tightening torque 45 Nm.
11. Disconnect the camshaft position sensor cable from the inner shield, remembering its connection.
12. Loosen the mounting bolts and remove the protective cover from the oil pump and camshaft housing (tightening torque 6 Nm).
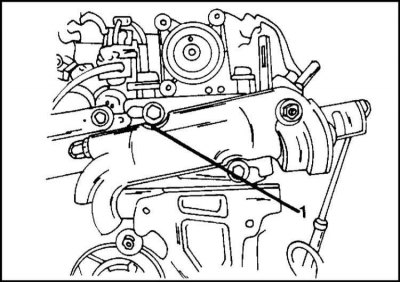
13. Now access to the thermostat housing (1) free, as shown in the illustration. After unscrewing the mounting bolts, the housing is removed and the sealing ring is visible in the hole. This ring is always replaced, even if it appears to be undamaged.
When replacing the thermostat housing, the temperature sensor (if he's ok) screwed into the new body (11 Nm). The water outlet is secured with a tightening torque of 8 Nm (new o-ring).
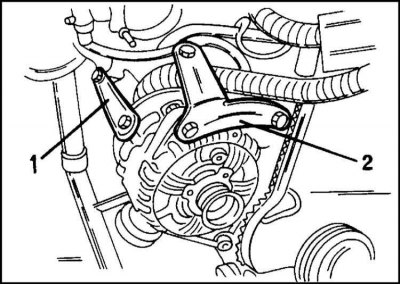
14. The thermostat housing is installed in the reverse order of its removal. Insert a new O-ring into the hole and secure the housing with bolts. Bolt tightening torque 15 Nm. Pay special attention to the generator mounting:

15. Support bars (1) And (2) on illustration fastened with a torque of 18 Nm.
16. Tighten the lower mounting bolt to 35 Nm.
The thermostat cannot be repaired and should be replaced if it is damaged. A simple check is done in the following way:
1. Hang the thermostat with outlet on a wire in a container of cold water.
2. Attach the thermometer in the same way.
3. Gradually heat up the water and check if the thermostat begins to open at the temperature indicated in Specifications and if it opens completely. If this does not happen, replace the pipe and thermostat as a set.
DOHC engine
The location of the thermostat here is similar to the location of the thermostat on an eight-valve engine (2.0L engine with OHC). The difference is that the thermostat is located directly in the housing. To ensure warranty, the thermostat is only supplied complete with housing.
1. Drain the liquid from the cooling system (chapter Filling the cooling system cooler Chapters Ongoing care and maintenance). and disconnect the upper hose from the fitting on the thermostat housing.
2. Turn away bolts and remove the case of the thermostat with a sealing ring from a head of cylinders. Thoroughly clean mating surfaces.
3. Install a new thermostat housing with thermostat and new O-ring on the cylinder head and secure with bolts. Tighten the bolts to a torque of 15 Nm.
This engine has a different flange attached to the cylinder head than the other two attached hoses. Seal replacement is carried out as follows:
4. Disconnect the ground cable from the battery.
5. Remove the V-belt as described.
6. Drain the liquid from the cooling system (chapter Filling the cooling system cooler Chapters Ongoing care and maintenance)..
7. Disconnect both straps from the exhaust manifold and alternator. Turn away the bottom bolt of fastening of the generator and reject the generator back.
8. Disconnect both hoses from the connecting flange and disconnect the flange itself. Clean the mating surface immediately.
9. Install the flange with a new seal on the cylinder head. Tighten the bolts to 15 Nm.
10. Reattach the hoses and secure them with clamps.
11. Install the generator in working position. Tighten the mounting bolts of both supports (1, 2) torque of 20 Nm, and the lower bolt of the generator with a torque of 35 Nm. The generator mounting of this engine is shown in fig.
12. Install the belt according to the instructions for this engine, connect the battery and fill the system with fluid.
Start the engine and after a while check the system for leaks.
Engine 2.4 l
1. Partially drain the liquid from the cooling system, as described in the section Filling the cooling system cooler Chapters Ongoing care and maintenance. The coolant level must be at least below the height of the thermostat.
2. Remove the screws securing the thermostat housing (illustrations) and remove the cover. The thermostat is now free and can be removed. Above the thermostat is a rubber o-ring.
The thermostat is installed in the reverse order of removal. The sealing ring is always replaced with a new one.
1. Bolts of fastening of a cover tighten the moment of 6 Nm.
Finally, fill the cooling system with liquid as described in section Filling the cooling system cooler Chapters Ongoing care and maintenance.
Visitor comments