
OpelBook.ru
Cars AvtoVAZ Cars Mitsubishi Cars BMW Cars Mercedes Cars Nissan Cars Toyota Cars Chevrolet
English Русский
Български
Беларускі
Український
Српски
Hrvatski
Română
Polski
Slovenský
Magyar
 |  Sitemap  |  Contacts  |    


Main Astra Corsa Insignia Kadett Omega Vectra Zafira Others Articles
Kadett D (1979-1984) Kadett E (1984-1995)
  • Main
  • Kadett
  • Kadett E
  • OHC power unit
  • Engine repair
  • Removal and installation the camshaft of 8-valve engines

Removal and installation the camshaft of 8-valve engines (Opel Kadett E)

            0

To remove the camshaft, you need to remove the cylinder head. When installing it, be sure to install a new gasket.

Place the camshaft bearing housing on a support and remove its cover.

Loosen the camshaft toothed pulley mounting bolt, while holding the shaft from turning with a wrench placed on the flats of the shaft (see photo).
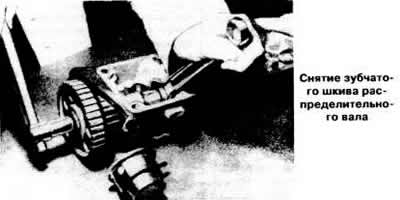
Loosen the camshaft toothed pulley mounting bolt, while holding the shaft from turning with a…


Remove the timing belt.

Remove the camshaft thrust flange (see photo) and pull it out of the bearing housing towards the ignition distributor sensor.
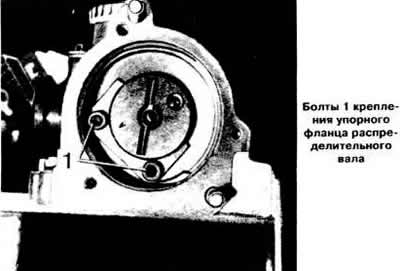
Remove the camshaft thrust flange (see photo) and pull it out of the bearing housing towards the…


The camshaft is installed in the reverse order of removal, taking into account the following:
  • put the timing belt on the camshaft pulley. Align the marks on the camshaft pulley and the camshaft bearing housing, as well as the mark on the crankshaft pulley with the pointer on the cylinder block, then adjust the timing belt tension;
  • tighten the camshaft toothed pulley mounting bolt to a torque of 4.5 kgf·m.

Replacing the camshaft drive belt


Remove the front timing belt cover.


Set the piston of the 1st cylinder to the TDC of the end of the compression stroke by turning the crankshaft until the mark on the crankshaft pulley and the installation protrusion on the cylinder block are aligned. In this case, depending on the engine model, the mark on the toothed pulley of the camshaft should be opposite the mark on the rear protective cover of the toothed belt or the mark on the camshaft bearing housing.

Apply the parking brake to the vehicle, engage any gear, and remove the crankshaft pulley.

Loosen the water pump mounting bolts, loosen the timing belt and remove it from the pulleys.

Place a new timing belt on the pulleys, align the mark on the crankshaft pulley with the alignment lug on the cylinder block and the marks on the camshaft timing belt pulley and the rear timing belt cover or camshaft bearing housing. Adjust the belt tension, which should be 45 kg·m.

The tension of the toothed belt is measured on the branch between the pulleys of the camshaft and the water pump using the GM KM 420 device installed above the generator (see photo). The movable pointer of the device should be opposite the division 0±1. The belt tension is adjusted by turning the water pump housing using a special fork-type key GM KM 421 "by 41", which is put on the hexagon of the pump housing. When turning the key upwards, the belt tension increases and vice versa.
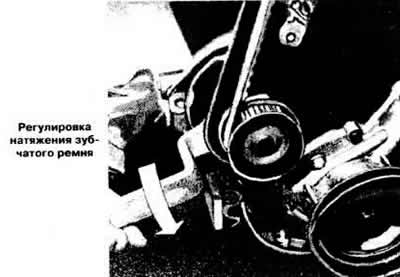
The tension of the toothed belt is measured on the branch between the pulleys of the camshaft and…


Install the crankshaft pulley and tighten its mounting bolt, lubricating its threads with sealant.


Turn the crankshaft one full revolution and check the timing belt tension again.

Install the front timing belt cover.

Note: Since June 1990, engines "14NV", "16SV" and "C16NZ" are equipped with an automatic timing belt tensioner.


After removing and installing the timing belt, it is necessary to adjust the position of the tension roller on a cold engine, having first set the piston of the 1st cylinder to the TDC position and having removed the crankshaft pulley and the front protective cover of the timing belt.

Align the marks on the camshaft toothed pulley and on the rear toothed belt cover.

Align the mark on the crankshaft toothed pulley with the center of the milled hole in the oil pump housing.

Loosen the water pump mounting bolt.

Place the toothed belt on the pulleys, tensioning the belt section.

Tighten the timing belt by turning the water pump housing.

Holding the movable part of the tensioner in the extreme right position, turn the crankshaft two turns in the normal direction of rotation until the TDC position marks of the piston of the 1st cylinder on the toothed pulleys of the camshaft and crankshaft are aligned with the corresponding fixed marks.

Loosen the tension of the toothed belt by turning the water pump housing using the KM 421 device so that pointer 1 (see picture) aligned with the cutout of the mounting plate of the 1 tension roller.
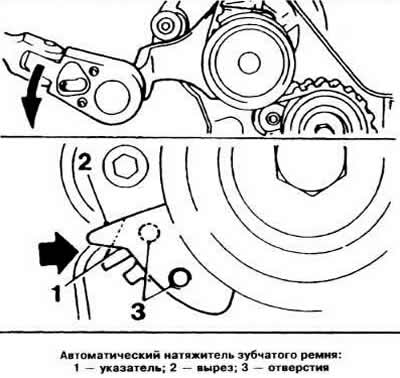
Loosen the tension of the toothed belt by turning the water pump housing using the KM 421 device so…


Tighten the water pump mounting bolt to a torque of 8 kgf·m.
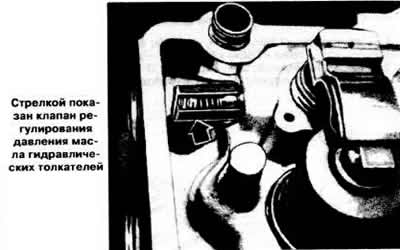


Tighten the water pump mounting bolt to a torque of 8 kgf·m.
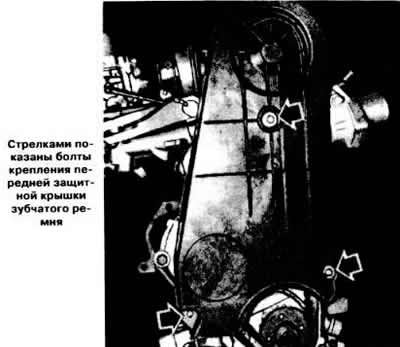

Tighten the water pump mounting bolt to a torque of 8 kgf·m.


This article is available at russian, bulgarian, belarusian, ukrainian, serbian, croatian, romanian, polish, slovak, hungarian
Checking the article: Shapovalov Yaroslav

Share information:

Previous articles
Opel Kadett E: Engine repair
Next articles

Disassembly and assembly of cylinder heads of 8-valve engines
Installation of cylinder head of 8-valve engines
Removal the cylinder head of 8-valve engines
Checking the technical condition of hydraulic tappets
Operating principle of hydraulic tappets
Construction of hydraulic tappets
The device of the gas distribution mechanism of 8-valve engines
Removal and installation the cylinder head of a 16-valve engine
Disassembly and assembly of the cylinder head of a 16-valve engine
The device of the valve timing mechanism of 16-valve engines
Checking the installation of the timing mechanism drive of a 16-valve engine
Replacing the camshaft drive belt of a 16-valve engine


See similar ones from other Opel car manuals:
▶ Checking and adjusting valve timing (2.0L engines) Opel Astra G (1998-2004)
▶ Adjustment of valve timing by acting on the camshaft… Opel Corsa C (2000-2006, petrol)
▶ Replacing the primary drive chain (camshaft drive chain) Opel Insignia A (2008-2017)
▶ Maintenance Procedures (Diesel Engines) Opel Omega A (1986-1993)
▶ Starting the engines Opel Vectra A (1988-1995, petrol)
Link to this page in different formats

Visitor comments


No comments yet


How much will 22 + 33 =


Kadett E (1984-1995) 
  • General information
  • Vehicle description
  • Operation and maintenance
  • OHV power unit
  • Engine design
  • Check and repair
  • Engine work
  • OHC power unit
  • Engine design
  • Engine repair
  • Ignition system
  • Cooling and lubrication
  • Supply system
  • Fuel injection «LE-Jetronic»
  • Fuel injection «LE3-Jetronic»
  • Motronic ML4.1 system
  • Motronic M1.5 system
  • Motronic M2.5 system
  • Transmission
  • Clutch
  • Gearbox F10 and F13
  • Gearbox F16 and F20
  • Automatic gearbox
  • Drive shafts
  • Chassis
  • Front suspension
  • Rear suspension
  • Steering
  • Brake system
  • Electrical equipment
  • Equipment and devices
  • Electrical circuits
Kadett D (1979-1984) 
  • General information
  • Car care
  • Maintenance
  • Power unit
  • Gasoline engines
  • Lubrication system
  • Cooling system
  • Power system (gasoline)
  • Carburetor Solex 35 PDSI
  • Carburetor Varajet II
  • Carburetor 1B1
  • Fuel injection (gasoline)
  • Diesel engines
  • Fuel system (diesel)
  • Transmission
  • Clutch
  • Manual gearbox
  • Chassis
  • Front suspension
  • Rear suspension
  • Steering
  • Brake system
  • Wheels and tires
  • Body
  • Body elements
  • Doors and windows
  • Electrical equipment
  • Equipment and devices
  • Lighting system
  • Power devices
  • Ignition system
  • Electrical circuits
OpelBook.ru © 2017–2026 · Mobile version · · Sitemap: EN BG BY UA RS HR RO PL SK HU · Feedback · Site search
Astra F, petrol · Astra G, petrol · Astra G · Astra H · Astra J, petrol · Corsa B · Corsa C, petrol · Corsa C · Insignia A · Kadett D · Kadett E · Omega A · Omega B · Omega B2 · Vectra A, petrol · Vectra A · Vectra B, petrol · Vectra B · Vectra C · Zafira A, petrol · Frontera A, petrol · Frontera B · Ascona C · Vivaro A ·
We want your visit to be comfortable 🤝! We use cookies 🍪 to make that happen.