
In the upper part of the display field there are symbolic images of the display modes. Depending on the configuration, the following modes may be available:
- audio system;
- navigation;
- telephone;
- on-board computer.
The field with the symbol of the current display mode is highlighted in a brighter color (see illustration 17.57).
Note: The display indication in the audio system operating modes is discussed in more detail in Section 19.
In the central part of the display field, the current parameters of the corresponding mode are displayed. When the mode is changed, the main menu of the newly selected mode appears in the field.
At the bottom of the display fields are highlighted (from left to right) outdoor temperature, mode of operation of ventilation, heating and air conditioning systems (see Section 18), chronometer readings.
The brightness of the screen is adjusted using the same potentiometer that controls the intensity of the instrument backlight (see above).
Control is carried out using buttons, 4-position switch (see illustration 17.55) or rotary handle (see illustration 17.58) infotainment system, and if equipped with a roller control integrated in the left panel on the steering wheel (see illustration 17.56).
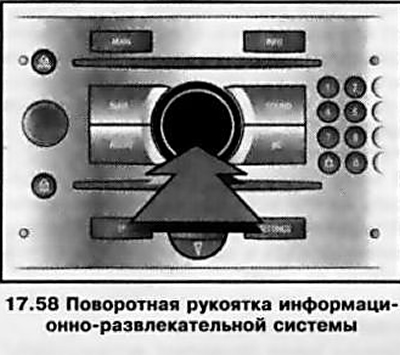
When operating with the rotary knob, the selection of parameters / options is done by turning it clockwise / counterclockwise, and the selection of the highlighted item / confirmation of the command - by pressing its central part. To exit the menu, select Return or Main and confirm your choice. When operating with the left roller control on the steering wheel, the selection of parameters / options is made by scrolling the wheel in one direction or the other, to select the highlighted item / confirm the command, it is necessary to press it.
When displaying warning messages of the monitoring system (if equipped - see below) viewing of other information is not available until the message is acknowledged by pressing the right/left sector of the 4-position switch, or by pressing the center part of the rotary knob or by pressing the left roller control on the steering wheel. When multiple warning messages are received, they must be acknowledged one at a time. Appearance on the display «F» warns of a system malfunction - as soon as possible, contact an Opel workshop to have the problem rectified.
Outdoor temperature display
The thermometer reacts to a decrease in air temperature immediately, and to an increase - with some delay. Be careful: when the thermometer shows a few degrees above zero, there may already be sleet on the road.
To warn of the risk of icing on the road, when the outside temperature drops to a value of about 3°C, a warning message is displayed on the display screen (see illustration 17.59).
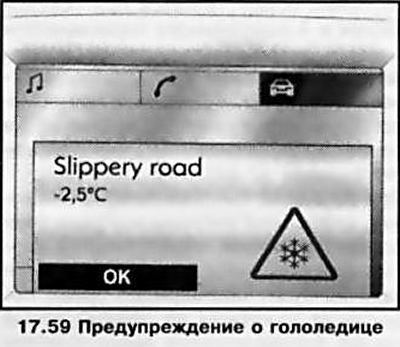
When the outdoor temperature is below -5°C, the message is not displayed.
Setting display functions
To enter the display function settings menu, press the Settings or Main button (depending on configuration) on the infotainment system control panel (see Section 19) - the Settings menu will be displayed (see illustration 17.60).
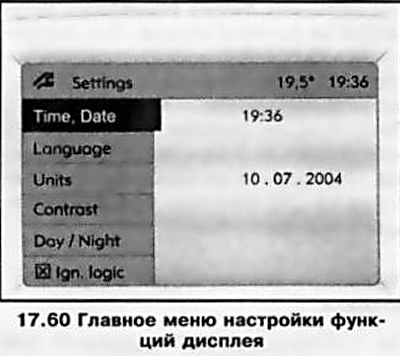
On the left side of the menu is a list of available functions. When you select any of the functions (the field with the name of the selected function is highlighted in a brighter color) the right side of the menu displays the current settings for that function.
To change the parameters, enter the submenu of the selected function by pressing the rotary knob / 4-position switch button, or the left roller control on the steering wheel - a field for setting the corresponding function will open.
Setting the time and date
Select the Time, Date item in the Settings menu - the corresponding submenu will be displayed (see illustration 17.61). Select the parameter to be adjusted and set the desired values. On models equipped with an infotainment system capable of receiving a signal from a global positioning system satellite (GPS), the current time and date can be set automatically. If the displayed time does not correspond to the local time, the corresponding adjustment can be made manually, or will be made automatically when a signal from the radio data system arrives at the radio (RDS).
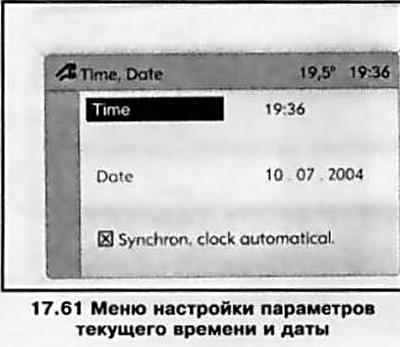
To synchronize the current time readings using the RDS system, select the Time, Date item in the Time, Date menu «Synchron. clock automatical.» (see ibid) — activation of this function is confirmed by the appearance of a diagonal cross in the square field in front of the menu item.
Some RDS radios broadcast inaccurate times. If this causes the chronometer to show frequently inaccurate times, turn off automatic synchronization and set the time manually.
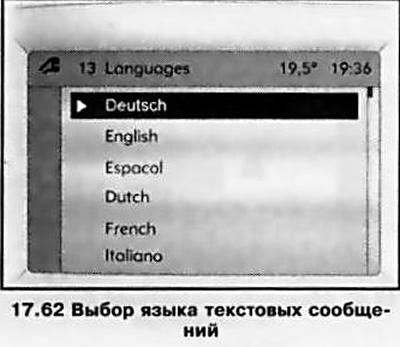
Language selection
Using this menu item, you can set the language of text messages for some functions.
To select a language, you must enter the Language menu - a list of available languages will appear. Choose your preferred language (the selected value is marked with a symbol > in front of the menu item) (see illustration 17.62).
Note: On systems with the voice messaging feature, after changing the language of the text messages, you will be asked if the language of the voice announcer should also be changed.
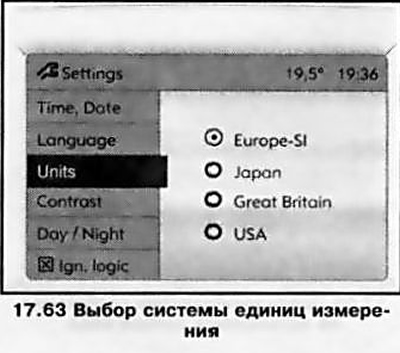
Selecting systems of units
To select the system of units of measure most familiar to the user, select the Units item in the Settings menu - a list of available systems of units of measure is displayed, then select the desired system (the selected value is marked with an icon in front of the menu item) (see illustration 17.63). Contrast setting (graphic information display)
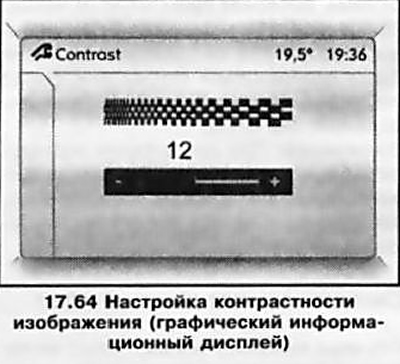
To set the most optimal image contrast value, select the Contrast item in the Settings menu - a contrast adjustment scale will appear in the display field (see illustration 17.64). Make the necessary adjustments and confirm the new parameter setting.
Setting the display mode (with appropriate equipment) For ease of use of the display (depending on illumination) You can adjust the color of the image by selecting the Day/Night item in the Settings menu - the possible options will be displayed:
- Automatic - automatic adjustment depending on the lighting conditions in the car.
- Always day design - black/color text on a light background.
- Always night design - white/colored text on a dark background.
The selected value is marked with the symbol «fat dot» before the menu item.
Ignition logic (with appropriate equipment)
This menu allows you to activate/deactivate the automatic activation/deactivation of the infotainment system when the ignition is switched on/off (see Section 19).
Selecting functions of the on-board computer (with appropriate equipment)
The on-board computer receives electrical signals from various sensors that monitor the operating parameters of various systems. All signals are continuously collected and analyzed electronically, after which the main resulting performance indicators are displayed on the information display.
The on-board computer, when installed on the car with an infotainment system with a graphical information display, allows you to independently monitor the main performance indicators of two trips.
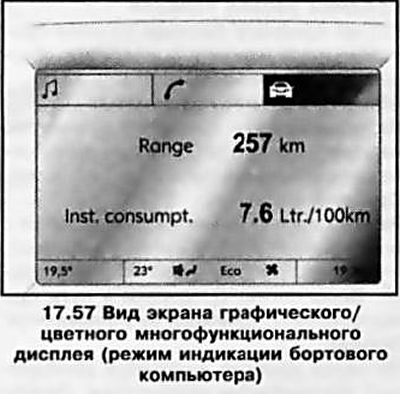
To enter the on-board computer functions menu, press the BC button on the control panel of the infotainment system, or select the field with the on-board computer system icon in the upper part of the display and confirm the choice of this mode - the main page of the on-board computer menu will be displayed on the display (see illustration 17.57). The base page displays information about the range and instantaneous fuel consumption.
To display other operational indicators, it is necessary to press the BC button again or the left roller control on the steering wheel - the on-board computer system menu will appear in the display field (see illustration 17.65). The list of available control modes is located on the left side of the menu. When choosing any of the modes (the field with the name of the selected mode is highlighted in a brighter color) the right side of the menu displays the current performance of that mode.
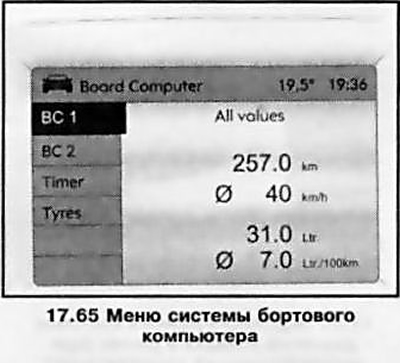
When choosing the control modes of the first (BC1) or second (BC2) trips in the right field, indicators of the corresponding trip will appear in the following sequence:
- mileage;
- average speed;
- absolute fuel consumption;
- average fuel consumption.
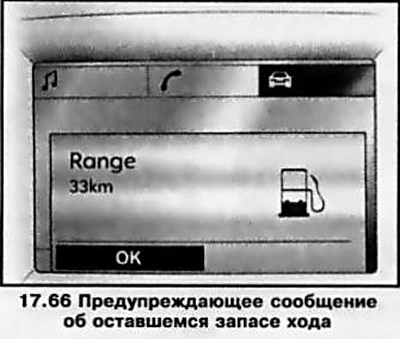
Power reserve
The range is calculated based on the current remaining fuel in the tank and the current fuel consumption, the average value is displayed on the display. Some time after refueling the vehicle, the range display is automatically updated. When there is less than 50 km of fuel left in the tank, the warning message Range appears on the display (see illustration 17.66) — acknowledge receipt of the message as described above.
Current fuel consumption
Units of measurement change depending on the speed - below 13 km/h the calculation is in l/h, above 13 km/h in l/100 km.
Mileage
Shows the distance traveled since the last reset. The start of the countdown at any time at the request of the operator can be done again (see below).
average speed
The calculation of the average speed is made from the moment of the last reset, for example, before the start of each trip.
Note: Stops along the way with the ignition off are not taken into account.
Absolute fuel consumption
The display screen shows the amount of fuel used since the last reset (see below).
Average fuel consumption
The calculation of the average fuel consumption is made since the last reset of the readings (see below).
Stopwatch
To control the stopwatch, you need to select the Timer item in the Board Computer menu - the corresponding indication will be displayed on the display (see illustration 17.68). To start the stopwatch, you must select the Start menu item, to reset it, select the Reset menu item.
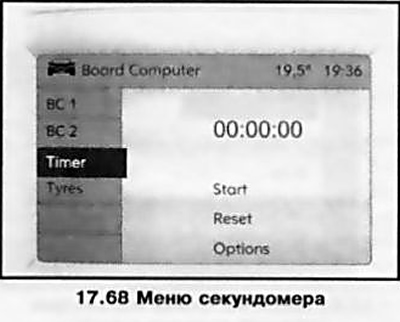
With the appropriate performance, the stopwatch menu may have an Options item. Using the settings available in this menu item, you can set the time tracking parameters:
- Driving Time excl. Stops The time that the car is in motion is measured, the time of stops is not taken into account.
- Driving Time incl. Stops The time that the car is in motion is measured, and the time of stops with the key in the ignition is additionally taken into account.
- Travel Time The time between the start and stop points of the timer is measured manually using the menu items Stan and Reset, respectively.
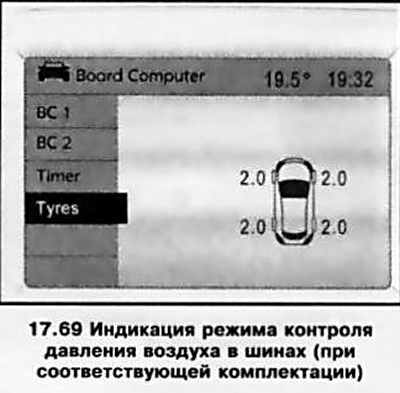
Display of current tire pressures (with appropriate equipment)
When you select Tires in the Board Computer menu, the current air pressure value in each tire will be displayed (see illustration 17.69).
For more information see Section 27.
Resetting the on-board computer (reinstallation)
The following trip computer data can be reset (measurement or calculation will restart):
- average fuel consumption;
- absolute fuel consumption;
- average speed;
- mileage.
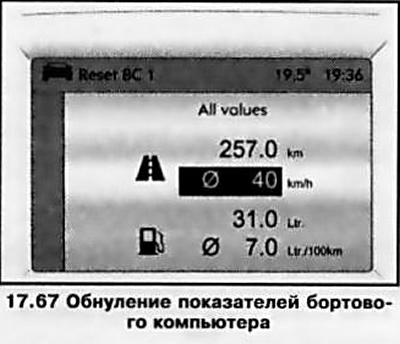
To reset the readings of the desired parameter, enter the submenu of the selected on-board computer mode (BC1 or BC2) and select the indicator that needs to be reset (see illustration 17.67).
To reset all data of the selected mode, select the All values menu item. After reset, the on-board computer display will show the line instead of the selected readings «—». After a while, the newly defined value will appear.
Note: If the power supply is interrupted or if the battery voltage is insufficient, the values stored in the memory of the on-board computer are erased.
Visitor comments