
OpelBook.ru
Cars AvtoVAZ Cars Mitsubishi Cars BMW Cars Mercedes Cars Nissan Cars Toyota Cars Chevrolet
English Русский
Български
Беларускі
Український
Српски
Hrvatski
Română
Polski
Slovenský
Magyar
 |  Sitemap  |  Contacts  |    


Main Astra Corsa Insignia Kadett Omega Vectra Zafira Others Articles
Astra F (1991-1998, petrol) Astra G (1998-2004, petrol) Astra G (1998-2004) Astra H (2004-2009) Astra J (2009-2015, petrol)
  • Main
  • Astra
  • Astra G
  • Power unit
  • DOHC gasoline engines
  • Removal and installation the oil pan

Removal and installation the oil pan (Opel Astra G)

            0

Contents: Engines 1.4, 1.6 and 1.8 l ⬇ 2.0L Engines ⬇

Engines 1.4, 1.6 and 1.8 l


Cm. Removal and installation the oil pan - models with a cast tray.

Please note that on 1.4 and 1.6 l models the sump is installed via a gasket, which must be replaced during assembly.
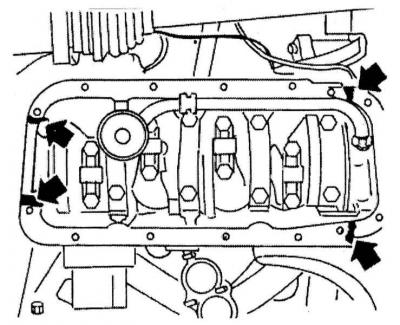

Please note that on 1.4 and 1.6 l models the sump is installed via a gasket, which must be replaced…


When installing on 1.4 and 1.6 L models, the sealant is applied to the mating surface of the cylinder block in the areas where the oil pump housing and rear main bearing cover are joined.
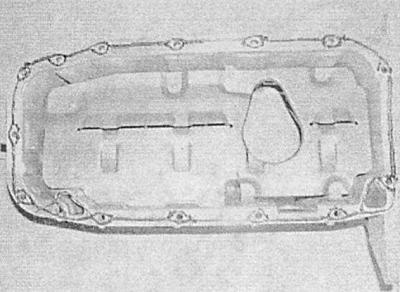
When installing on 1.4 and 1.6 L models, the sealant is applied to the mating surface of the…


On 1.8 L models, a sealant cushion of approximately 2.5 mm thickness should be applied to the entire mating surface of the mating flange; at the point where the fifth main bearing cap is mated, the thickness of the cushion should be increased to 3.5 mm.


2.0L Engines


Removal


1. Perform the procedures - see. Removal and installation the oil pan — Removal, - after disconnecting the electrical wiring from the oil level sensor, release the retainer and push the sensor into the pan.

2. Remove the bolts securing the lower pan section to the main cast section. Remove the lower section and its sealing gasket, being careful not to damage the sensor wiring.

3. To remove the main section of the sump, you must first remove the oil filter (see Chapter Routine maintenance).

It would be wise to replace the filter when installing it.


4. On models with manual transmission, disconnect the right drive shaft from the transmission (see Chapter Clutch and drive shafts). To ensure adequate access, remove the right shaft bearing flange from the gearbox housing.

5. Unscrew the bolts securing the oil pan mounting flange to the transmission housing.

6. Unscrew the bolts securing the oil intake to the main bearing cap bridge and to the oil pump.

7. Using several steps, evenly loosen and then remove the bolts of the main section of the oil pan to the cylinder block/oil pump. If the pan is "stuck" and does not give in, lightly tap it on the sides with a soft-faced hammer. Lower the pan and remove it from under the car, complete with the oil intake. Remove and discard the sealing gasket - the gasket must be replaced during assembly.

Installation


The pan mounting bolts must be replaced without fail.


1. Thoroughly clean the mating surfaces of the pan, oil intake and block, completely removing traces of dirt and oil from them. Clean the threaded holes in the pan from traces of old anaerobic sealant.


2. Replace the oil pickup sealing ring.

3. Make sure that the mating surfaces of the main section of the sump and the cylinder block are absolutely clean and dry, remove traces of anaerobic sealant from the threaded portion of the mounting bolts.

4. Apply a bead of sealant to the mating surface of the cylinder block around the oil pump housing and rear main bearing cap.

5. Place a new gasket on the main pan section and apply a few drops of anaerobic sealant to the threaded portion of the mounting bolts.

6. Press the pan assembly with the oil pickup and sealing gasket to the block and tighten the mounting bolts. Moving from the center to the edges in a diagonal sequence, gradually tighten the casting mounting bolts to the required force. Also tighten the oil pickup mounting bolts to the required force.

7. Tighten the bolts securing the main section flange of the oil pan to the transmission housing to the required torque.

8. Install the exhaust pipe (see Chapter Power and exhaust systems). Install the drive shaft bearing flange.

9. Install the drive shaft (see Chapter Clutch and drive shafts).

10. Make sure that the mating surfaces of the lower and main sections of the pan are absolutely clean and dry, place a new gasket on the lower section and press the assembly onto the main assembly - do not forget to install a new sealing ring on the oil level sensor connector and seat the connector into the main section of the pan.

11. Tighten the new bolts to secure the bathtub tray, then tighten the bolts to stage 1 torque moving diagonally from the center to the edges. Then tighten the fasteners to stage 2 torque in the same order to the corner.


12. Install a new oil filter.

13. Connect the wiring to the oil level sensor.

14. Lower the vehicle and add fresh engine oil (see Chapter Routine maintenance).


This article is available at russian, bulgarian, belarusian, ukrainian, serbian, croatian, romanian, polish, slovak, hungarian
Checking the article: Pavlovsky Nikolay

Share information:

Previous articles
Opel Astra G: DOHC gasoline engines
Next articles

Removal and installation the cylinder head
Removal and installation of camshafts and valve lifters, checking the condition of components
Replacing camshaft seals
Removal and installation of crankshaft/camshaft gears and intermediate rollers
Removal and installation the timing belt
Removal and installation the timing belt cover
Removal and installation the engine oil level sensor
Removal, maintenance and installation of the oil pump
Removal, checking condition and installing flywheel/drive disk
Replacing crankshaft seals
Checking the condition and replacing the powertrain suspension supports
Removal, installation and adjustment of the crankshaft balancing mechanism (2.0 l engines)


Link to this page in different formats

Visitor comments


No comments yet


How much will 36 + 39 =


Astra J (2009-2015, petrol) 
  • General information
  • Vehicle device
  • User manual
  • Faults en route
  • Maintenance
  • Power unit
  • Engine repair
  • Cooling and lubrication system
  • Engine power system
  • Exhaust system
  • Transmission
  • Clutch
  • Car gearbox
  • Drive shafts
  • Chassis
  • Front suspension
  • Rear suspension
  • Steering
  • Brake system
  • Wheels and tires
  • Body
  • Exterior
  • Interior
  • Doors and windows
  • Body Care
  • Heating and air conditioning
  • Security systems
  • Electrical equipment
  • Equipment and devices
  • Lighting and signaling
  • Power devices
  • Electrical circuits
Astra H (2004-2009) 
  • General information
  • Introduction to the guide
  • Troubleshooting
  • User manual
  • Maintenance
  • Power unit
  • Engine repair
  • Cooling and heating
  • Power and exhaust system
  • Ignition system
  • Launch and charge system
  • Transmission
  • Mechanical gearbox
  • Automatic gearbox
  • Drive shafts
  • Chassis
  • Brake system
  • Car suspension
  • Steering
  • Body
  • Interior
  • Exterior
  • Electrical equipment
  • Equipment and devices
  • Electrical circuits
Astra G (1998-2004) 
  • General information
  • Introduction to manual
  • User manual
  • Maintenance
  • Power unit
  • SOHC gasoline engines
  • DOHC gasoline engines
  • Diesel engines 1.7 and 2.0
  • Engine repair
  • Cooling system
  • Supply system
  • Injection system (gasoline)
  • Injection system (diesel)
  • Exhaust system
  • Charge and launch system
  • Ignition system (gasoline)
  • Preheat system (diesel)
  • Transmission
  • Manual gearbox
  • Automatic gearbox
  • Clutch
  • Drive shafts
  • Chassis
  • Brake system
  • Wheel suspension
  • Steering
  • Body
  • Exterior
  • Interior
  • Doors and windows
  • Ventilation and heating
  • Electrical equipment
  • Equipment and devices
  • Electrical circuits
Astra G (1998-2004, petrol) 
  • General information
  • User manual
  • Car care
  • Maintenance
  • Power unit
  • Single shaft engines
  • Twin shaft engines
  • Engine repair
  • Cooling and heating
  • Fuel and exhaust systems
  • Starting and charging system
  • Ignition system
  • Transmission
  • Clutch
  • Mechanical gearbox
  • Automatic gearbox
  • Drive shafts
  • Chassis
  • Brake system
  • Car suspension
  • Steering
  • Body
  • Interior
  • Exterior
  • Electrical equipment
  • Equipment and devices
  • Wiring diagrams Opel Astra
  • Wiring diagrams Opel Zafira
Astra F (1991-1998, petrol) 
  • General information
  • Maintenance
  • Power unit
  • Engine in car
  • Engine removed
  • Cooling system
  • Heating and ventilation
  • Fuel supply (carburetor)
  • Fuel supply (injector)
  • Emission control
  • Ignition system
  • Transmission
  • Clutch
  • Mechanical gearbox
  • Automatic gearbox
  • Drive shafts
  • Chassis
  • Brake system
  • Car suspension
  • Steering
  • Body
  • Exterior
  • Interior
  • Electrical equipment
  • Equipment and devices
  • Electrical circuits
OpelBook.ru © 2017–2026 · Mobile version · · Sitemap: EN BG BY UA RS HR RO PL SK HU · Feedback · Site search
Astra F, petrol · Astra G, petrol · Astra G · Astra H · Astra J, petrol · Corsa B · Corsa C, petrol · Corsa C · Insignia A · Kadett D · Kadett E · Omega A · Omega B · Omega B2 · Vectra A, petrol · Vectra A · Vectra B, petrol · Vectra B · Vectra C · Zafira A, petrol · Frontera A, petrol · Frontera B · Ascona C · Vivaro A ·
We want your visit to be comfortable 🤝! We use cookies 🍪 to make that happen.