
Coolant temperature sensor (ECT)
Examination
To perform this check, special diagnostic equipment is required and it would be more correct to entrust it to car service specialists.
Removing
Petrol models
1. Empty the cooling system (see chapter Current service).
Models with SOHC engines
1. Remove the air cleaner and the air duct to the right of the engine (see chapter Power and exhaust systems).
2. Disconnect wiring from the gauge located on the inlet pipeline behind the generator.
3. Turn out the gauge and remove it from the inlet pipeline. Remove the sealing ring - during installation it must be replaced without fail.
Models with 1.4 and 1.6 L DOHC engines
1. Remove the air cleaner assembly with air duct (see chapter Power and exhaust systems).
2. Disconnect the electrical wiring from the temperature sensor installed in the thermostat housing on the right side of the engine.
3. Turn out the gauge from the case of the thermostat and remove it from the car.
Models with 1.8L engines
1. Remove the thermostat housing (see Removal, installation and check of serviceability of functioning of the thermostat).
2. Unscrew and remove the temperature sensor.
Models with 2.0L engines
1. Remove the ignition module from the thermostat housing.
2. Disconnect the wiring from the sensor.
3. Unscrew the sensor and remove it from the thermostat housing/cooling flange.
Diesel models
Models with 1.7L engines
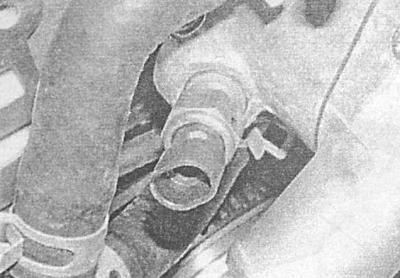
The temperature sensor is located on the thermostat housing on the right (SOHC engines) / left (DOHC engines - see illustration) parts of the cylinder head.
1. Apply the parking brake, jack up the front of the vehicle and place it on jack stands. If equipped, remove the crankcase protection. Place a suitable drain container under the sensor to collect spilled coolant.
2. Wait for the engine to cool completely, unscrew the cap of the expansion tank, then install it back and tighten it tightly - this should help minimize fluid loss when removing the sensor. Select a suitable plug to plug the sensor mounting hole.
3. Remove the engine guard.
4. Disconnect the electrical wiring from the temperature sensor, release it from the intermediate clamps and separate from the thermostat housing. In order to minimize the loss of coolant, immediately screw a new sensor into the hole, or a plug prepared in advance.
Models with 2.0L engines
On all 2.0L engines, the temperature sensor is located on top of the thermostat housing, on the right side of the cylinder head.
The sensor is dismantled in a manner similar to that described above for models equipped with 1.7 l engines (see above Models with 1.7L engines).
Installation
All models
Installation is carried out in the reverse order to the dismantling of the components. Do not forget to replace the sealing element/lubricate the threaded part of the sensor with sealant. Tightening the sensor must be done with the required force.
Finally, correct the coolant level (see chapter Current service) and check the sensor for signs of leaks.
Coolant level switch
Removal and installation
All models
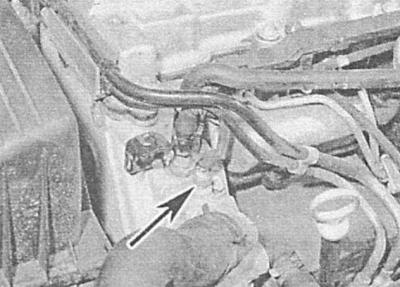
The sensor is installed in the bottom of the expansion tank.
1. Wait for the engine to cool completely, and unscrew the expansion tank cap to relieve residual pressure.
2. Release the reservoir from the support brackets, remove it and drain the coolant into a suitable container.
3. Disconnect the electrical wiring and remove the sensor-switch from the tank.
4. Installation is carried out in the reverse order.
Cooling system control module
Removal and installation
All models
1. Disconnect the negative cable from the battery (see chapter Engine electrical equipment) and move it away from the pole terminal.
2. Remove the front bumper (see chapter Body).
3. The module is installed on the left under the front spoiler. Pull out the latches and disconnect the two module wiring connectors.
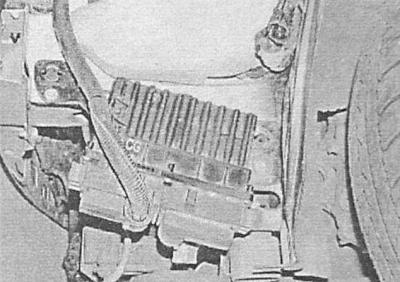
4. Turn out fixing bolts and remove the module from a forward spoiler.
5. Installation is carried out in the reverse order.
Visitor comments