
OpelBook.ru
Cars AvtoVAZ Cars Mitsubishi Cars BMW Cars Mercedes Cars Nissan Cars Toyota Cars Chevrolet
English Русский
Български
Беларускі
Український
Српски
Hrvatski
Română
Polski
Slovenský
Magyar
 |  Sitemap  |  Contacts  |    


Main Astra Corsa Insignia Kadett Omega Vectra Zafira Others Articles
Vectra A (1988-1995, petrol) Vectra A (1988-1995) Vectra B (1995-2002, petrol) Vectra B (1995-2002) Vectra C (2002-2008)
  • Main
  • Vectra
  • Vectra A
  • Transmission
  • Drive shafts
  • Intermediate shaft — removal, overhaul and installation

Intermediate shaft — removal, overhaul and installation (Opel Vectra A)

            0

Contents: Removal ⬇ Bulkhead ⬇ Installation ⬇

Removal


1. First remove the right outer drive shaft as described in Chapter 2.

2. Unscrew the bolts securing the support bearing bracket to the cylinder block.

3. Using a suitable container to catch the oil, remove the intermediate shaft from the differential and plug the exposed hole to minimize oil loss and prevent dirt from entering the block.

Bulkhead


4. Rotate the bearing by hand, checking for smooth rotation and play. If there is any doubt about the condition of the bearing, replace it.

5. Unscrew the two bolts securing the flange to the bearing bracket. Remove the bracket.

6. Remove the snap ring from the outer end of the intermediate shaft, then the O-ring and the large snap ring securing the bearing.

7. Remove the bearing and flange assembly from the shaft. If this cannot be done manually, use a hydraulic puller or press; be careful to support the inner bearing race during removal to ensure the bearing can be reused.

8. Place the flange on two wooden blocks placed on the work surface and press out the bearing.

9. To install the new bearing, heat it evenly, using a hair dryer for example. Using a hammer and a tubular drift the same diameter as the bearing inner race, drive the bearing onto the shaft until it reaches the shaft shoulder. Place the flange on the opposite end of the shaft and install it on the bearing outer race, then install the bearing retaining ring, then the new O-ring and the new shaft retaining ring.


10. Install the bracket onto the shaft assembly.

11. To ensure alignment, do not tighten the flange bolts until the shaft is installed in the differential and the bearing bracket is secured to the cylinder block (see below). Once this has been accomplished, apply a few drops of locking compound (for example Vauxhall P/N 90167347) on the threads of the bolts and tighten them with the tightening force specified Specifications.

Installation


12. Installation is carried out in the reverse order of removal, paying attention to the following: (see illustration):
  • a) Lubricate the shaft grooves to avoid damaging the seal lip when installing the shaft.
  • b) Apply the bracket to the cylinder block and tighten the bolt to the specified tightening torque Specifications.
  • c) If the support bearing assembly has been removed, install the flange onto the bracket and tighten the two bolts (see above).
  • d) Install the outer drive shaft (Chapter 2).
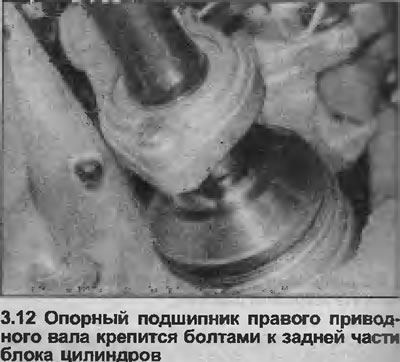
d) Install the outer drive shaft (Chapter 2).


This article is available at russian, bulgarian, belarusian, ukrainian, serbian, croatian, romanian, polish, slovak, hungarian
Checking the article: Chernov Alexander

Share information:

Previous articles
Opel Vectra A: Drive shafts
Next articles

Drive shaft — removal and installation
General description of drive shafts
Drive shaft specifications
Drive shaft CV joint — replacement
Protective cover of CV joint — replacement
Troubleshooting drive shafts


See similar ones from other Opel car manuals:
▶ Intermediate shaft of the steering column — removal and… Opel Astra G (1998-2004, petrol)
▶ Right drive shaft with intermediate shaft (diesel) Opel Corsa C (2000-2006)
▶ Replacing the right drive shaft with the intermediate shaft Opel Insignia A (2008-2017)
▶ Drive shaft (type F10 and F 10.4 boxes) — overhaul Opel Ascona C (1981-1988)
▶ Replacing the front wheel drive shaft joints Opel Kadett E (1984-1995)
Link to this page in different formats

Visitor comments


No comments yet


How much will 29 + 39 =


Vectra C (2002-2008) 
  • General information
  • User manual
  • Vehicle device
  • Maintenance
  • Troubleshooting
  • Power unit
  • Engine repair
  • Cooling system
  • Power and control system
  • Engine electrics
  • Transmission
  • Clutch
  • Car gearbox
  • Drive shafts
  • Chassis
  • Car suspension
  • Steering
  • Brake system
  • Body
  • Exterior
  • Interior
  • Doors, locks and windows
  • Heating and ventilation
  • Electrical equipment
  • Equipment and devices
  • Headlights and lighting
  • Electrical circuits
Vectra B (1995-2002) 
  • General information
  • User manual
  • Weekly checks
  • Maintenance (gasoline)
  • Maintenance (diesel)
  • Troubleshooting
  • Power unit
  • SOHC gasoline engine
  • DOHC petrol engine
  • Diesel engine 1.7 liter
  • Diesel engine 2.0 liters
  • Engine repair
  • Cooling system
  • Fuel system (gasoline)
  • Fuel system (diesel)
  • Charging system
  • Launch system
  • Ignition and preheat
  • Transmission
  • Clutch
  • Mechanical gearbox
  • Automatic gearbox
  • Drive shafts
  • Chassis
  • Brake system
  • Wheel suspension
  • Steering
  • Body
  • Exterior
  • Interior
  • Doors and windows
  • Heating and ventilation
  • Electrical equipment
  • Equipment and devices
  • Electrical circuits
Vectra B (1995-2002, petrol) 
  • General information
  • Maintenance
  • Help with malfunctions
  • Power unit
  • Engine repair
  • Exhaust system
  • Cooling system
  • Fuel system
  • Multec injection system
  • Four point injection
  • Transmission
  • Clutch
  • Gearbox and drive
  • Chassis
  • Wheel suspension
  • Steering
  • Brake system
  • Wheels and tires
  • Body
  • Exterior
  • Interior
  • Electrical equipment
  • Fuses and electronics
  • Power devices
  • Ignition system
  • Lighting and signaling
  • Equipment and devices
  • Heating and ventilation
  • Electrical circuits
Vectra A (1988-1995) 
  • Power unit
  • Engine repair
  • Ignition system
  • Lubrication system
  • Cooling system
  • Injection system
  • Fuel system (carburetor)
  • Fuel system (diesel)
  • Exhaust system
  • Transmission
  • Clutch
  • Car gearbox
  • Chassis
  • Front suspension
  • Rear suspension
  • Steering
  • Brake system
  • Wheels and tires
  • Body
  • Exterior
  • Interior
  • Electrical equipment
  • Electrical circuits
Vectra A (1988-1995, petrol) 
  • General information
  • User manual
  • Maintenance
  • Power unit
  • SOHC engine
  • DOHC engine
  • Cooling and ventilation
  • Fuel system (carburetor)
  • Fuel system (injector)
  • Exhaust converter
  • Transmission
  • Clutch
  • Mechanical gearbox
  • Automatic gearbox
  • Drive shafts
  • Chassis
  • Brake system
  • Car suspension
  • Steering
  • Body
  • Body elements
  • Electrical equipment
  • Power devices
  • Equipment and devices
  • Electrical circuits
OpelBook.ru © 2017–2026 · Mobile version · · Sitemap: EN BG BY UA RS HR RO PL SK HU · Feedback · Site search
Astra F, petrol · Astra G, petrol · Astra G · Astra H · Astra J, petrol · Corsa B · Corsa C, petrol · Corsa C · Insignia A · Kadett D · Kadett E · Omega A · Omega B · Omega B2 · Vectra A, petrol · Vectra A · Vectra B, petrol · Vectra B · Vectra C · Zafira A, petrol · Frontera A, petrol · Frontera B · Ascona C · Vivaro A ·
We want your visit to be comfortable 🤝! We use cookies 🍪 to make that happen.