
OpelBook.ru
Cars AvtoVAZ Cars Mitsubishi Cars BMW Cars Mercedes Cars Nissan Cars Toyota Cars Chevrolet
English Русский
Български
Беларускі
Український
Српски
Hrvatski
Română
Polski
Slovenský
Magyar
 |  Sitemap  |  Contacts  |    


Main Astra Corsa Insignia Kadett Omega Vectra Zafira Others Articles
Omega A (1986-1993) Omega B (1993-1999) Omega B2 (1999-2003)
  • Main
  • Omega
  • Omega A
  • Power unit
  • Fuel system (gasoline)
  • Fuel Pump (Fuel Injection Models) — Checking, Removing and Installing

Fuel Pump (Fuel Injection Models) — Checking, Removing and Installing (Opel Omega A)

            0

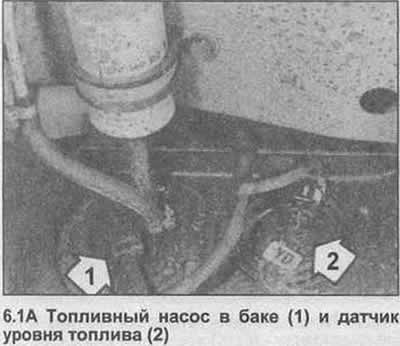
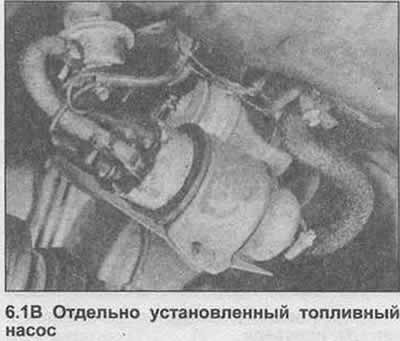
1. Depending on the model, the fuel pump can be installed inside the fuel tank, or separately in front of the fuel tank (photo).

1. Depending on the model, the fuel pump can be installed inside the fuel tank, or separately in…


1. Depending on the model, the fuel pump can be installed inside the fuel tank, or separately in…


2. To check its operation, disconnect the fuel supply hose on the fuel distribution line in the engine compartment, direct it into a calibrated container with a capacity of about 5 liters.

3. Remove the relay cover in the right rear corner of the engine bay. Pull the fuel pump relay out and pull the base off the hanger.

4. Using a jumper, connect the 30V and 87V terminals together for one minute (photo).
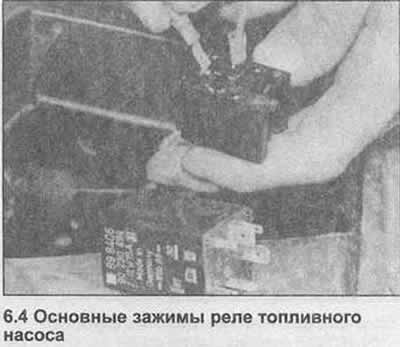
4. Using a jumper, connect the 30V and 87V terminals together for one minute (photo).


5. The container should collect about 1.6-2.4 liters of fuel. If not, the fuel filter may be clogged or faulty.


6. To remove the fuel pump, block the front wheels, jack up the rear of the vehicle and secure it on axle stands.

7. On a separate fuel pump, disconnect the wiring, then install clamps to both hoses and disconnect them. Unscrew the clamp bolt, remove the fuel pump.

8. On the in-tank pump, remove the filler cap and pump out the fuel. Disconnect the connector, then install clamps on the feed and return hoses and disconnect them. Unscrew the bolts, remove the fuel pump. Remove the gasket.

9. Installation is carried out in reverse order.


This article is available at russian, bulgarian, belarusian, ukrainian, serbian, croatian, romanian, polish, slovak, hungarian
Checking the article: Zinoviev Kirill

Share information:

Previous articles
Opel Omega A: Fuel system (gasoline)
Next articles

Fuel pump (carburetor models) — removal, inspection and installation
Air Filter and Element — Removal and Installation
Capped Adjustment Screws — General Description
Routine maintenance
General description of the fuel system
Fuel System Specifications
Fuel Filter (Fuel Injection Models) — Replacement
Fuel tank — removal and installation
Fuel level sensor — removal and installation
Diaphragm Damper (Fuel Injected Engines) — Removal and Installation
Accelerator cable — removal, installation and adjustment
Fuel Pedal — Removal and Installation


See similar ones from other Opel car manuals:
▶ Checking and replacing the fuel pump — gasoline models Opel Corsa B (1993-2000)
▶ Checking and adjusting the moment of start of injection of… Opel Kadett D (1979-1984)
▶ Fuel pump — checking, removal, installation Opel Astra F (1991-1998, petrol)
▶ Fuel filter (models with fuel pump) — removal and… Opel Vectra A (1988-1995, petrol)
▶ Single-row fuel injection pump drive chain Opel Frontera B (1998-2004)
Link to this page in different formats

Visitor comments


No comments yet


How much will 32 + 15 =


Omega B2 (1999-2003) 
  • General information
  • User manual
  • Maintenance
  • Troubleshooting
  • Power unit
  • Petrol 4-cylinder
  • Petrol 6-cylinder
  • Engine overhaul
  • Diesel engines 2.0 l
  • Diesel engines 2.5 l
  • Cooling and heating
  • Injection system (gasoline)
  • Fuel system (diesel)
  • Fuel system
  • Exhaust system
  • Ignition system
  • Transmission
  • Clutch
  • Mechanical gearbox
  • Automatic gearbox
  • Main gear and shafts
  • Chassis
  • Brake system
  • Car suspension
  • Steering
  • Body
  • Body elements
  • Electrical equipment
  • Equipment and devices
  • Electrical circuits
Omega B (1993-1999) 
  • General information
  • User manual
  • Tips for the car owner
  • Maintenance (gasoline)
  • Maintenance (diesel)
  • Power unit
  • Petrol engine SOHC 2.0 l
  • Petrol engine DOHC 2.0 l
  • Petrol engines 2.5 and 3.0 l
  • Repair of gasoline engines
  • Diesel engine 2.0 l
  • Diesel engine repair 2.0 l
  • Diesel engine 2.5 l
  • Cooling and heating
  • Power system (petrol)
  • Emission reduction
  • Fuel system (diesel 2.0 l)
  • Fuel system (diesel 2.5 l)
  • Launch system
  • Ignition system
  • Transmission
  • Clutch
  • Mechanical gearbox
  • Automatic gearbox
  • Drive shafts
  • Chassis
  • Brake system
  • Wheel suspension
  • Steering
  • Body
  • Exterior
  • Interior
  • Doors and windows
  • Electrical equipment
  • Equipment and devices
  • Wiring diagrams (early)
  • Wiring diagrams (late)
Omega A (1986-1993) 
  • General information
  • User manual
  • Maintenance
  • Changes and additions
  • Troubleshooting
  • Power unit
  • Gasoline engines
  • Diesel engines
  • Cooling system
  • Fuel system (gasoline)
  • Fuel system (diesel)
  • Ignition system
  • Transmission
  • Clutch
  • Mechanical gearbox
  • Automatic gearbox
  • Cardan shaft
  • Drive shafts
  • Chassis
  • Brake system
  • Car suspension
  • Steering
  • Body
  • Exterior
  • Interior
  • Electrical equipment
  • Power devices
  • Lighting and appliances
  • Electrical circuits
OpelBook.ru © 2017–2026 · Mobile version · · Sitemap: EN BG BY UA RS HR RO PL SK HU · Feedback · Site search
Astra F, petrol · Astra G, petrol · Astra G · Astra H · Astra J, petrol · Corsa B · Corsa C, petrol · Corsa C · Insignia A · Kadett D · Kadett E · Omega A · Omega B · Omega B2 · Vectra A, petrol · Vectra A · Vectra B, petrol · Vectra B · Vectra C · Zafira A, petrol · Frontera A, petrol · Frontera B · Ascona C · Vivaro A ·
We want your visit to be comfortable 🤝! We use cookies 🍪 to make that happen.