
OpelBook.ru
Cars AvtoVAZ Cars Mitsubishi Cars BMW Cars Mercedes Cars Nissan Cars Toyota Cars Chevrolet
English Русский
Български
Беларускі
Український
Српски
Hrvatski
Română
Polski
Slovenský
Magyar
 |  Sitemap  |  Contacts  |    


Main Astra Corsa Insignia Kadett Omega Vectra Zafira Others Articles
Omega A (1986-1993) Omega B (1993-1999) Omega B2 (1999-2003)
  • Main
  • Omega
  • Omega A
  • Chassis
  • Car suspension
  • Front suspension strut — bulkhead

Front suspension strut — bulkhead (Opel Omega A)

            0

Note: A special puller is required to perform this job.


1. Remove the rack as described in Chapter 3.

2. Install the spring compressor and clamp it onto the upper support and installation.

3. Clamp the piston rod with a socket wrench, then unscrew the nut and remove the upper support and the installation. Separate the bearing from the installation and remove the piston rod stop gaskets.

4. Remove the coil spring and upper support and remove the rubber boot, rings and rubber cushion.

5. Unscrew the anti-roll bar from the strut.

6. Mark the position of the top of the steering knuckle relative to the strut to establish the camber setting, then remove the bolts and the joint (photo). Note that the bolt head surfaces are facing forward.
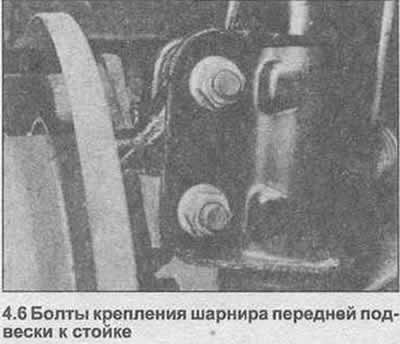
6. Mark the position of the top of the steering knuckle relative to the strut to establish the…


7. The shock absorber rod is not replaced separately from the strut. If the shock absorber rod is defective, the strut assembly must be replaced as a whole. The shock absorber rod can be checked by moving the piston rod up and down. If the rod movement is uneven, weak resistance is felt or dips are felt, then a new unit is required.

8. Clean all components and inspect them for wear and damage. When replacing a coil spring, both front springs must be replaced at the same time.


9. When installing, first install the steering knuckle on the strut. If you are installing a previously removed strut, insert new bolts, align the previously made marks and tighten the new nuts with the tightening force specified Specification. If a new strut is being installed, attach the steering knuckle to the strut using the old bolts and tighten to the specified tightening torque Specification and adjust the front camber angle immediately after installation. New bolts can be installed during front camber adjustment.

10. Install the anti-roll bar and tighten the nut.

11. Take the stand and pull the piston rod out completely.

12. Place the lower damping ring on the strut, then the coil spring.

13. Install the spring compressor to the coil spring.

14. Install the rubber cushion.

15. Install the rubber boot and upper damping ring onto the upper coil spring support.

16. Place the stopper gasket on the piston rod with the concave side facing down, then place the upper support on the coil spring. The hole in the upper support should be on the opposite side from the steering knuckle (Figure 10.5).
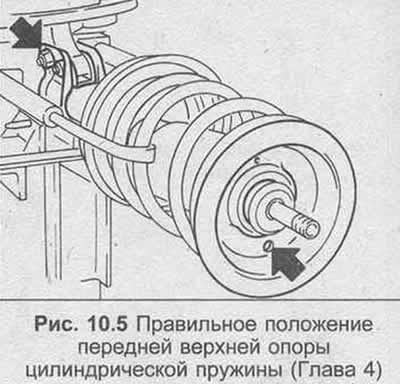
16. Place the stopper gasket on the piston rod with the concave side facing down, then place the…


17. Place the bearing in the top mounting with the yellow colored pad on the inner race, then install the mounting onto the piston rod.


18. Place the limiter gasket on the piston rod with the concave side facing up. Install and tighten the nut.

19. Release the spring compressor and ensure that the coil spring is positioned correctly on the damping rings.

20. Now you can install the front suspension strut as described in Chapter 3.


This article is available at russian, bulgarian, belarusian, ukrainian, serbian, croatian, romanian, polish, slovak, hungarian
Checking the article: Zinoviev Kirill

Share information:

Previous articles
Opel Omega A: Car suspension
Next articles

Front suspension strut — removal and installation
Technical support
General description
Suspension specifications
Lower control arm front suspension — removal and installation
Front lower ball joint — replacement
Front Anti-Roll Bar — Removal and Installation
Steering knuckle — removal and installation
Front Hub and Bearings — Removal and Installation


See similar ones from other Opel car manuals:
▶ Front suspension strut — removal and installation Opel Astra F (1991-1998, petrol)
▶ Removal and installation the GMA front suspension strut… Opel Insignia A (2008-2017)
▶ Front suspension strut — removal, overhaul and installation Opel Vectra A (1988-1995, petrol)
▶ Front suspension strut — removal and installation Opel Zafira A (1999-2005, petrol)
▶ Front Suspension Strut — Inspection Opel Ascona C (1981-1988)
Link to this page in different formats

Visitor comments


No comments yet


How much will 33 + 44 =


Omega B2 (1999-2003) 
  • General information
  • User manual
  • Maintenance
  • Troubleshooting
  • Power unit
  • Petrol 4-cylinder
  • Petrol 6-cylinder
  • Engine overhaul
  • Diesel engines 2.0 l
  • Diesel engines 2.5 l
  • Cooling and heating
  • Injection system (gasoline)
  • Fuel system (diesel)
  • Fuel system
  • Exhaust system
  • Ignition system
  • Transmission
  • Clutch
  • Mechanical gearbox
  • Automatic gearbox
  • Main gear and shafts
  • Chassis
  • Brake system
  • Car suspension
  • Steering
  • Body
  • Body elements
  • Electrical equipment
  • Equipment and devices
  • Electrical circuits
Omega B (1993-1999) 
  • General information
  • User manual
  • Tips for the car owner
  • Maintenance (gasoline)
  • Maintenance (diesel)
  • Power unit
  • Petrol engine SOHC 2.0 l
  • Petrol engine DOHC 2.0 l
  • Petrol engines 2.5 and 3.0 l
  • Repair of gasoline engines
  • Diesel engine 2.0 l
  • Diesel engine repair 2.0 l
  • Diesel engine 2.5 l
  • Cooling and heating
  • Power system (petrol)
  • Emission reduction
  • Fuel system (diesel 2.0 l)
  • Fuel system (diesel 2.5 l)
  • Launch system
  • Ignition system
  • Transmission
  • Clutch
  • Mechanical gearbox
  • Automatic gearbox
  • Drive shafts
  • Chassis
  • Brake system
  • Wheel suspension
  • Steering
  • Body
  • Exterior
  • Interior
  • Doors and windows
  • Electrical equipment
  • Equipment and devices
  • Wiring diagrams (early)
  • Wiring diagrams (late)
Omega A (1986-1993) 
  • General information
  • User manual
  • Maintenance
  • Changes and additions
  • Troubleshooting
  • Power unit
  • Gasoline engines
  • Diesel engines
  • Cooling system
  • Fuel system (gasoline)
  • Fuel system (diesel)
  • Ignition system
  • Transmission
  • Clutch
  • Mechanical gearbox
  • Automatic gearbox
  • Cardan shaft
  • Drive shafts
  • Chassis
  • Brake system
  • Car suspension
  • Steering
  • Body
  • Exterior
  • Interior
  • Electrical equipment
  • Power devices
  • Lighting and appliances
  • Electrical circuits
OpelBook.ru © 2017–2026 · Mobile version · · Sitemap: EN BG BY UA RS HR RO PL SK HU · Feedback · Site search
Astra F, petrol · Astra G, petrol · Astra G · Astra H · Astra J, petrol · Corsa B · Corsa C, petrol · Corsa C · Insignia A · Kadett D · Kadett E · Omega A · Omega B · Omega B2 · Vectra A, petrol · Vectra A · Vectra B, petrol · Vectra B · Vectra C · Zafira A, petrol · Frontera A, petrol · Frontera B · Ascona C · Vivaro A ·
We want your visit to be comfortable 🤝! We use cookies 🍪 to make that happen.