
Three function information display
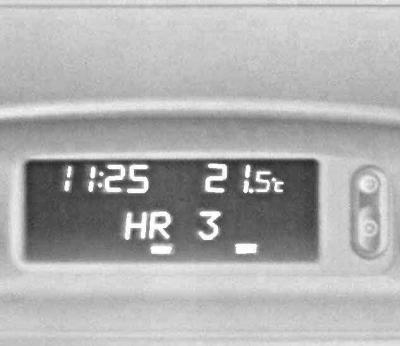
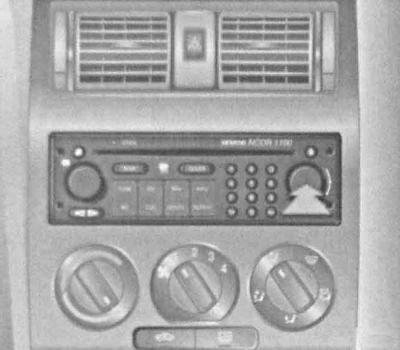
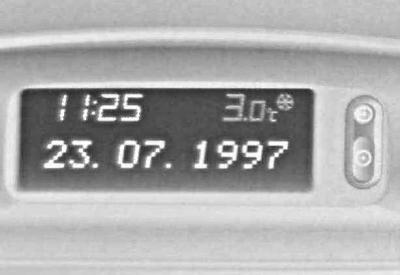
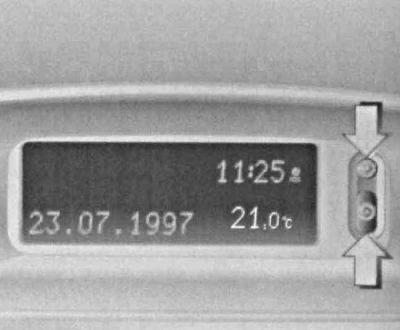
The display screen with the ignition on shows the time of day and outside temperature, as well as the date / parameters of the car radio (see illustration The location of the controls on the dashboard of the car). The brightness of the screen is adjusted using the same potentiometer that controls the intensity of the instrument backlight (see above). With the ignition off, the current information (time, date, outdoor temperature) can be displayed for 15 seconds by briefly pressing one of the two control buttons located to the right of the screen (see ibid).
Multifunctional information display
The display allows you to display on your screen an indication of the time, outdoor temperature, date / parameters of the radio, as well as on-board processor data. When the ignition is switched on, the backlight of the display screen is activated, the intensity of which is regulated by the same potentiometer as the intensity of the instrument backlight. The value of the current time and the data of the onboard processor are displayed continuously, the date is displayed only when the radio is turned off. As in the case of the three-function display, when the ignition is switched off, operating information can be briefly displayed on the screen using one of the two control buttons. All other features characteristic of the three-function display also remain valid.
Multifunctional display with the option of displaying the operating parameters of the radiotelephone operation
The standard display specifications are exactly the same as those listed above for a conventional multifunction display (see previous paragraph). Additionally, in the lower right corner of the screen, a field is allocated for displaying the operating parameters of the radiotelephone connected to the on-board network.
Controlling the output of on-board processor messages on the screen of the multifunctional information display
The on-board processor message output is controlled by means of the S and R pushbutton switches mounted in the end of the right stalk lever handle, or (with appropriate equipment) on the front panel of the infotainment center. When monitoring system warnings are displayed, other values are disabled.
Acknowledge receipt of fault signals by pressing the S and R buttons on the right-hand steering column switch, or navigate through the menu items by turning the rotary knob of the infotainment center control panel (the processor is called by pressing the button BC).
When messages about several failures are received at once, confirmation of their receipt is performed sequentially. After acknowledging the receipt of messages about detected malfunctions, the corresponding warnings are removed from the display screen, which is again freed to display information coming from the onboard processor, while the inscription may be displayed on the right side of the screen «CHECK», warning about the need to search for and eliminate the causes of failures.
Graphic multifunctional information display
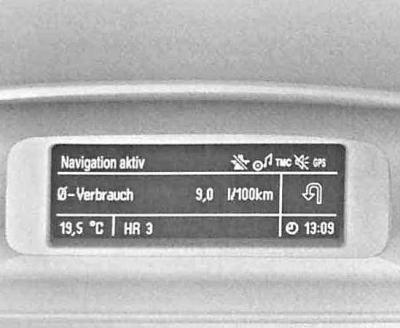
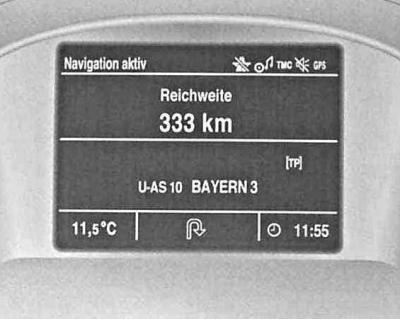
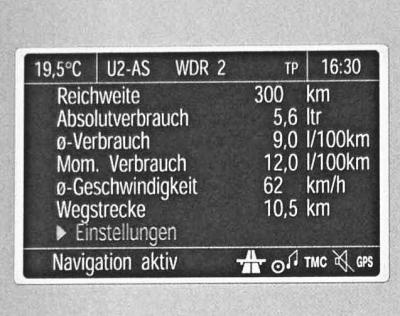
The display is designed to display the values of the current time, date, outdoor temperature, as well as information from the control system, on-board processor and infotainment center. The display can be narrow-screen or full-screen with monochrome or color data output.
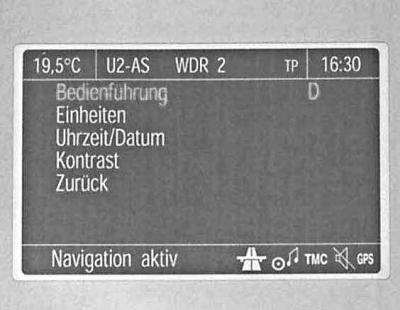
Entering the system settings of the graphical multifunctional information display
To enter the system settings of the multifunctional information display, select the System Settings/ Systemeinstellungen item in the settings menu of the on-board processor Settings / Einstellungen.
Language selection

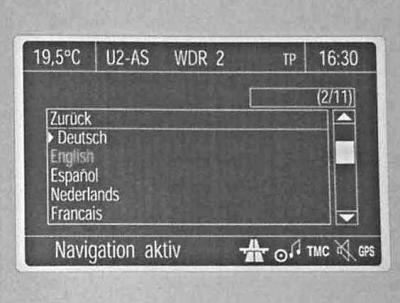
To select the language for displaying messages, enter the Instructions/Bedienführung section of the system settings menu (up), — the list of implemented communication languages will be displayed on the screen (at the bottom), from which you should select the required one.
Access to the higher menu level is via the item Undo/ Zurück (return).
Selecting a system of units

To select the desired system of units, enter the Units/Einheiten item in the system settings menu. A list of suggested units of measurement will appear on the screen.

The selected menu item is marked with the
 symbol. For a description of the procedure for exiting a menu section to a higher level, see the previous paragraph.
Setting the Image Contrast
To adjust the contrast of the image displayed on the screen, enter the Contrast / Kontrast item of the system settings menu and make the required adjustment. The setting is exited via the item Undo/Zurück.
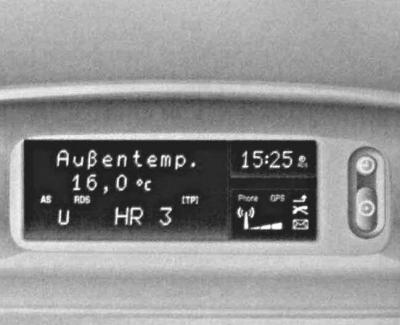
Outdoor temperature display
The thermometer reacts to a decrease in air temperature immediately, and to an increase - with some delay. Be careful: when the thermometer shows a few degrees above zero, there may already be sleet on the road.
To warn of the risk of road icing when the outside temperature drops to about 3°C, the snowflake icon

On models equipped with a graphical multi-information display, the last screen additionally (in addition to the warning symbol) a text message is also displayed EIS/ICE.
A signal of a malfunction in the system is the display of the inscription on the display screen «—.-°C», — drive the car to the manufacturer's authorized service station.
Setting the date and time
Models with Tri-Function and Multi-Function Information Display
Manual installation
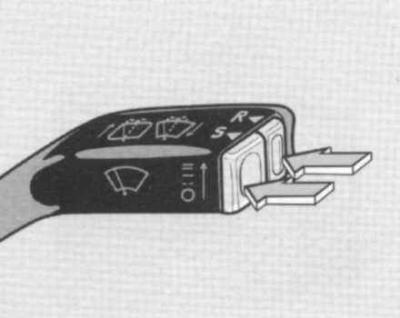
1. Turn on the radio. Installation is done using two buttons
 located to the right of the display:
2. Hold down the
3. Use the
button to set the day of the week;
4. Using the
5. Use the
 button to correct the reading;
6.
7.
 correct the reading;
8.
9.
 correct the reading;
10.
11.
 correct the reading;
12.
Automatic installation
On models equipped with an infotainment center, the current time and date can be set automatically when receiving a signal from a global positioning system satellite (GPS). If the displayed time does not correspond to the local time, the corresponding adjustment can be made manually in steps of 30 minutes, or will be made automatically when the radio receives a signal from the radio data system (RDS).
Entering the automatic time setting mode by RDS signal is performed as follows:
1. Hold down the
2. Press the
 button twice, the year should start flashing;
3. Hold down the
4. Press the
 button to enable or disable the automatic time setting mode: RDS TIME 0 = off; RDS TIME 1 = on;
5. Press the
Models with graphic multi-information display
1. Go to the system settings menu of the bot processor (see above p. Control lamp of the engine cooling system with electronic control) and select Time/Date (Uhrzeit/Datum).

2. Once in the date / time setting section, select the required item in it and make the necessary adjustments (confirmation of the choice is made through the item OK).
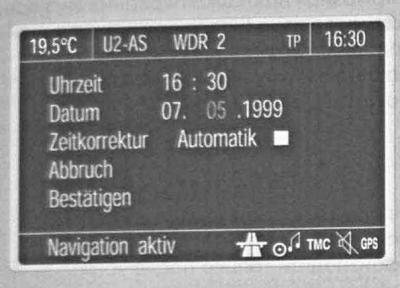
3. To enable automatic RDS time/date setting, enter the subsection Auto. Time Correction and check the box immediately after the item of the same name.
Control system
The control system monitors the main operating parameters that determine the safety of the vehicle operation. These parameters include fluid levels, front brake lining thickness, condition of main exterior lighting bulbs, on-board wiring and circuit protection fuses.
The control of the state of lamps of lighting devices is carried out only when power is supplied to the corresponding electrical circuit.
When the ignition is switched on, automatic diagnostics of all functions of the control system is performed, while the inscription appears on the display screen CHECK. If no violations are detected during the test, the inscription goes out after approximately four seconds after depressing the foot brake pedal once.
If a malfunction is detected on the display screen, in addition to the inscription CHECK an appropriate warning is displayed. If several violations are recorded, warnings are displayed on the display screen in turn.
Abbreviations can be used to display individual messages. The procedure for acknowledging the receipt of warnings from the control system about malfunctions detected during the diagnostics is described above (see p. Managing the display of on-board processor messages on the screen of the multifunctional information display). After receiving confirmation, messages are automatically deleted from the display screen - only the inscription CHECK continues to be displayed, reminding you of the fact that violations have been detected.
Messages about the failure of the dipped beam / rear position lamps, brake lights and brake light fuse will be displayed again 15 minutes after the system receives confirmation of their receipt. After turning the ignition off and on again, the messages recorded in the processor memory will again be displayed on the information display screen. After troubleshooting, the records about them are automatically deleted from the memory.
The messages of the control system when displayed on the screen have the highest priority over other information.
Power outages
In case of interruptions in the power supply / a significant decrease in the output voltage of the battery, the messages recorded in the processor memory about previously detected malfunctions are erased. After the restoration of the power supply, the control system automatically checks all operating functions with the display of a message on the information display about all detected problems. Description of the procedures for restoring the indications of the current time and date, see above p. Setting the date and time, trip computer activation scheme is described below.
Examples of monitoring system messages
Brake light/ Bremslicht (brake lights)
A malfunction of the brake lights was detected.
Oil Level/ Motoröl Stand (engine oil level)
When the ignition is turned on, the system detected an excessively low level of impellent oil. Check oil level, correct if necessary (see chapter Current service).
Oil Lack/ Ölmangel (oil shortage)
The oil level has dropped to a critical value. Stop the engine immediately, check the engine oil level, make any necessary adjustments (see chapter Current service). Drive the car to the manufacturer's authorized service station for a more detailed check and eliminate the causes of oil loss.
Coolant Level/ Kühlmittel Stand (coolant level)
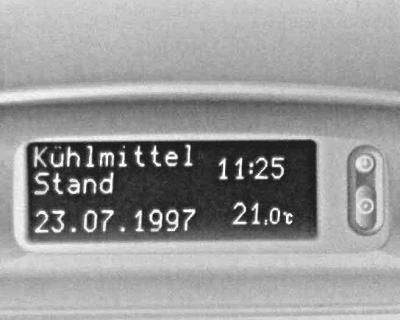
An excessively low level of coolant in the expansion tank of the cooling system is fixed. Stop the engine, check the fluid level, make any necessary adjustments (see chapter Current service), if necessary, drive the car to the manufacturer's authorized service station to eliminate the causes of leaks.
Brake pad/ Bremsbelag (brake pads)
The friction linings of the brake pads of the front wheels are worn out to the minimum allowable value. Perform an immediate pad replacement (see chapter Brake system).
Brake Lamp Fuse/ Bremslicht Sicherung (brake light fuse)
Identified signs of failure of the corresponding fuse. Determine and eliminate the cause of the overload, then replace the fuse (see chapter Onboard electrical equipment).
Headlight/ Abbelendlicht, Taillight/ Rücklicht (dipped headlights, taillights)
The dipped beam headlights or taillights are out of order. Check appropriate lighting fixtures, replace failed lamps.
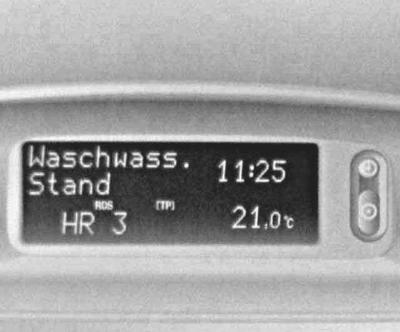
Wash Fluid Level/ Waschwasser Stand (washer fluid level)
The fact of a critical lowering of the liquid level in the reservoir of the windshield washer path was recorded. Add the required amount of fresh fluid (see chapter Current service).
Displaying trip computer readings on the multifunctional information display
During the trip, the trip computer informs the driver about the current performance, which it continuously records and processes accordingly.
When you press the control button, the following information can be displayed on the display screen:
1. Current fuel consumption;
2. Average fuel consumption;
3. Absolute fuel consumption since the start of measurements;
4. Average movement speed;
5. Mileage;
6. Estimated power reserve before refueling;
7. Stopwatch indications;
8. Outside air temperature.
The conclusion of some characteristics and indicators is carried out using abbreviations. Messages are displayed on the display screen in order of their priority. The output of trip computer readings is controlled by means of buttons mounted on the end of the handle of the right steering column switch, while the button S is used to select the operating mode of the computer, the button R - to exit the mode.
Current fuel consumption

Depending on the speed of the car, the current fuel consumption is displayed on the display screen in the following units of measurement:
1. l/h - For speeds below 13 km/h;
2. l/100 km - For driving speeds over 13 km/h.
Average fuel consumption
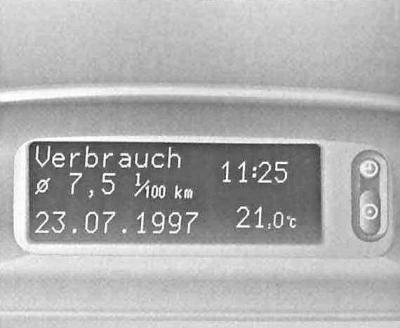
The calculation of the average fuel consumption at any time at the request of the operator can be started again.
Absolute fuel consumption
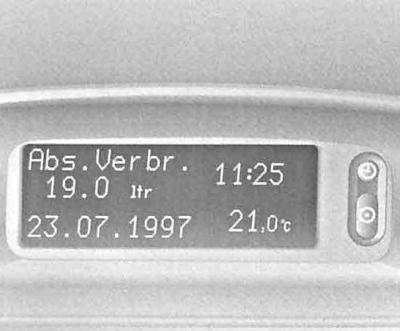
Starting the measurement of absolute fuel consumption at any time at the request of the operator can be done again by pressing the button R.
Average moving speed
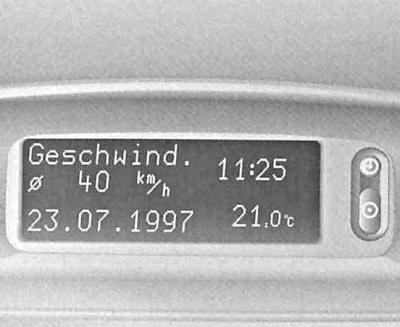
The start of the countdown of the average speed of movement at any time at the request of the operator can be restarted using the button R, — for example, at the beginning of each trip.
Stops along the way with the ignition off are not taken into account.
Mileage
The mileage traveled by the vehicle is displayed on the display screen. The start of the countdown at any time at the request of the operator can be done again.
Power reserve until the next refueling
With a power reserve of more than 50 km, its value is calculated on the basis of information about the residual amount of fuel in the tank and data on the average fuel consumption over the last 20-30 kilometers. After refueling, a new indication is displayed on the display screen or by pressing the button R, or is set automatically after the start of movement and the passage of a certain short distance by the car.
When there is less than 50 km of fuel left in the tank, the computer enters the mode «Estimated range before refueling» without pressing a button S. In this case, the indication may start flashing, or a message may appear on the screen Range. This warning mode of computer operation can be forcibly disabled by selecting another one instead. Automatic return to mode «Estimated range before refueling» occurs after a stop along the way.
On models equipped with a diesel engine X20DTL, in order to accelerate the heating of the latter to normal operating temperature, heating of the coolant is implemented. The additional fuel consumption associated with this option is not taken into account by the trip computer, which may lead to some overestimation of the calculated cruising range until the next refueling.
Stopwatch
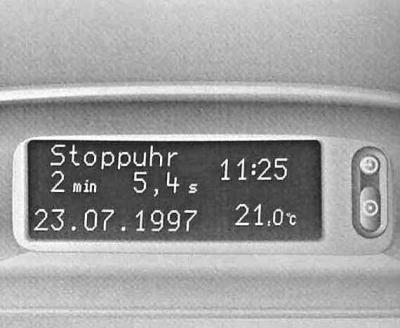
Enable features «Reset» - «Start» - «Stop» - «Reset» done by pressing a button R. The stopwatch is designed to keep track of the time spent on the road, while turning off the ignition entails stopping the stopwatch. When the ignition is switched on, the countdown resumes. The start of a new countdown can be made at any time at the request of the operator.
Outside temperature
See p. Outside Temperature Display.
Reset trip computer
Multifunctional information display


It is possible to reset the following trip computer parameters at the same time by holding down the button R pressed for at least 2 seconds:
a. Absolute fuel consumption;
b. Average fuel consumption;
c. Average movement speed;
d. Mileage;
e. Stopwatch indication.
Graphic multifunctional information display

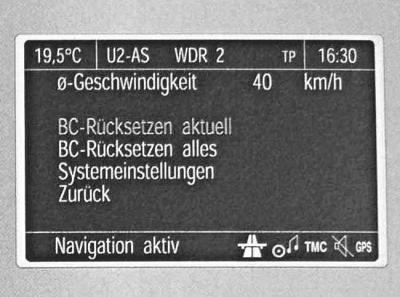
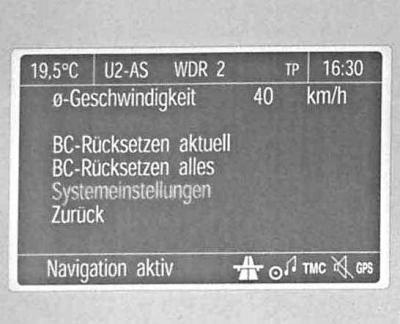
Enter the on-board processor settings menu and select the item BC Reset Present/ BC Rücksetzen aktuell — the value of the selected function is reset and then recalculated.
The value of the range until the next refueling can only be reset when the vehicle is stationary. Upon completion of the reset, the display will show the line instead of the selected readings «_ _ _», then, after a while, the newly calculated value will appear. To reset all readings, select the menu item BC Reset All/ BC Rücksetzen alles (see ibid) - the line will appear on the screen «---», then a new countdown will begin.
Visitor comments