
OpelBook.ru
Cars AvtoVAZ Cars Mitsubishi Cars BMW Cars Mercedes Cars Nissan Cars Toyota Cars Chevrolet
English Русский
Български
Беларускі
Український
Српски
Hrvatski
Română
Polski
Slovenský
Magyar
 |  Sitemap  |  Contacts  |    


Main Astra Corsa Insignia Kadett Omega Vectra Zafira Others Articles
Astra F (1991-1998, petrol) Astra G (1998-2004, petrol) Astra G (1998-2004) Astra H (2004-2009) Astra J (2009-2015, petrol)
  • Main
  • Astra
  • Astra G
  • Body
  • Ventilation and heating
  • Removal and installation the main heater body

Removal and installation the main heater body (Opel Astra G)

            0

Contents: Removal ⬇ Installation ⬇
On models equipped with air conditioning, it is necessary to first discharge the air conditioning system in a specialized auto repair shop.


Control cables connected to the heater body (execution A)
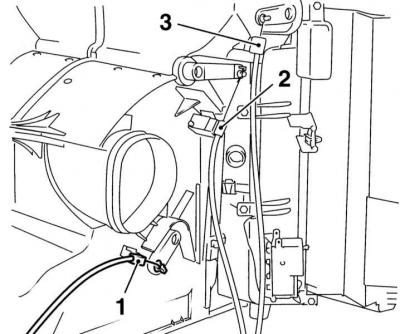
Control cables connected to the heater body (execution A)


1. Mixing flap drive cable retainer.

2. Valve timing cable retainer (air supply to the lower level).

3. Valve timing cable retainer (air supply to the upper level).

Control cables connected to the heater body (execution B)
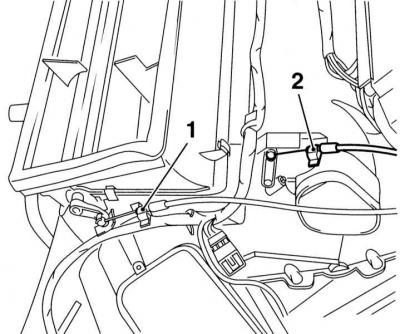
Control cables connected to the heater body (execution B)


1. Valve timing cable retainer (air supply to the upper level).

2. Mixing flap drive cable retainer.

Removal


1. Remove the center console and instrument panel (see Chapter Body).

2. Disconnect the air supply hose to the rear footwells from the main heater body - prepare a rag to collect the coolant flowing out of the heater heat exchanger.


Article posted on an online resource [www.opelbook.ru]

3. Remove the passenger airbag (see Chapter On-board electrical equipment).

4. Open both front doors, remove the TORX head bolts and remove the steering crossmember from the engine compartment bulkhead.

5. On equipped with K/V models set the parking brake, jack up the front of the vehicle and place it on supports, if equipped, remove the crankcase guard. Remove the rear engine mount (see Chapter Engine).
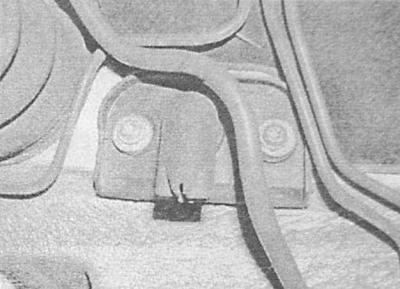
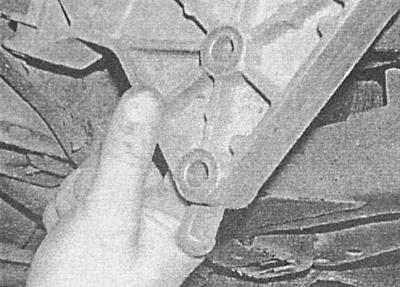
5. On equipped with K/V models set the parking brake, jack up the front of the vehicle and place it…


5. On equipped with K/V models set the parking brake, jack up the front of the vehicle and place it…


6. Unscrew the two mounting bolts and remove the condensate drainage unit from the floor panel.

6. Unscrew the two mounting bolts and remove the condensate drainage unit from the floor panel.


6. Unscrew the two mounting bolts and remove the condensate drainage unit from the floor panel.
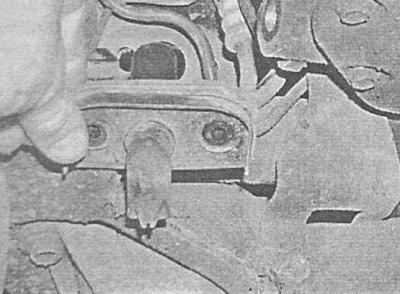
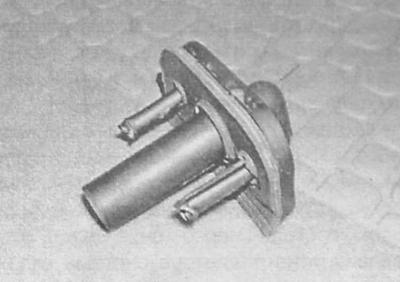
Dismantling the drainage unit is possible without first removing the support, but this makes the work significantly more difficult.


7. Drain the cooling system (see Chapter Routine maintenance).

8. Remove the plastic insert from the windshield, unscrew the mounting bolts and remove the lower cover panel.

9. In the engine compartment, disconnect the heater hoses from the heat exchanger pipes - mark the hoses first to ensure that they are connected correctly during assembly.
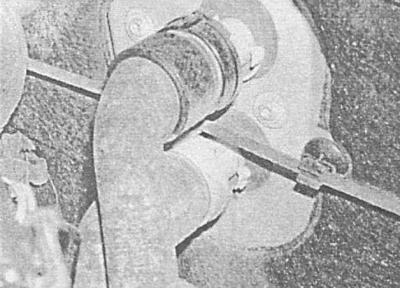
9. In the engine compartment, disconnect the heater hoses from the heat exchanger pipes - mark the…


Branded hoses are equipped with quick-connect connectors.


10. On equipped with K/V models unscrew the union bolt of the refrigeration pipe connector on the expansion valve.

11. Remove the air distributor housings from the top of the engine compartment bulkhead.

12. On equipped with K/V models disconnect the electrical wiring from the coolant shut-off valve.
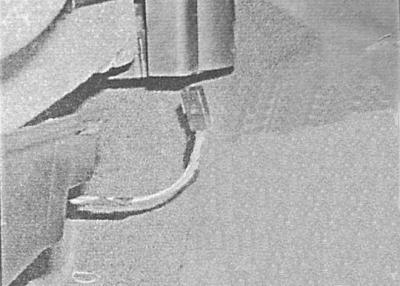
12. On equipped with K/V models disconnect the electrical wiring from the coolant shut-off valve.


13. In the passenger compartment, disconnect the electrical wiring from the servomotor of the circulation flap and from the electric motor of the heater fan. Disconnect the control cables from the heater housing (shown Distribution flap drive cable retainer (air supply to the upper level), execution B) (see also illustrations Control cables connected to the heater body (execution A) and Control cables connected to the heater body (execution B)).
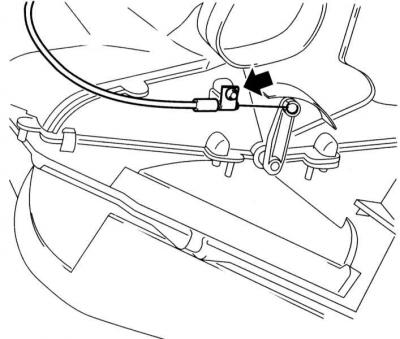


13. In the passenger compartment, disconnect the electrical wiring from the servomotor of the…


14. With the help of an assistant, free the main heater housing from the engine compartment bulkhead and remove it from the passenger compartment.

Installation


Installation is carried out in the reverse order of dismantling the components.

Finally, fill the cooling system (see Chapter Routine maintenance). If equipped, take the vehicle to a specialist workshop to have the air conditioning system recharged. When installing the steering crossmember, make sure the upper guides are installed in their proper places before tightening the bolts.


This article is available at russian, bulgarian, belarusian, ukrainian, serbian, croatian, romanian, polish, slovak, hungarian
Checking the article: Pavlovsky Nikolay

Share information:

Previous articles
Opel Astra G: Ventilation and heating
Next articles

Removal and installation the control panel for the heating / ventilation / air conditioning systems
Removal and installation the heater fan drive motor
Removal and installation the resistive assembly of the heater fan drive motor
Removal and installation air duct deflectors
Removal and installation the heater heat exchanger
Removal and installation the heater switch
Checking the proper functioning and maintenance of heating and air conditioning systems
Removal and installation the air conditioning compressor
Removal and installation the air conditioning evaporator
Removal and installation the air conditioning condenser


See similar ones from other Opel car manuals:
▶ Monitoring the condition of the anti-corrosion coating of… Opel Corsa B (1993-2000)
▶ Checking the clearance in the crankshaft main bearings Opel Insignia A (2008-2017)
▶ Main technical characteristics Opel Kadett E (1984-1995)
▶ Structural safety of the body Opel Omega A (1986-1993)
▶ Body check Opel Vectra A (1988-1995, petrol)
Link to this page in different formats

Visitor comments


No comments yet


How much will 27 + 15 =


Astra J (2009-2015, petrol) 
  • General information
  • Vehicle device
  • User manual
  • Faults en route
  • Maintenance
  • Power unit
  • Engine repair
  • Cooling and lubrication system
  • Engine power system
  • Exhaust system
  • Transmission
  • Clutch
  • Car gearbox
  • Drive shafts
  • Chassis
  • Front suspension
  • Rear suspension
  • Steering
  • Brake system
  • Wheels and tires
  • Body
  • Exterior
  • Interior
  • Doors and windows
  • Body Care
  • Heating and air conditioning
  • Security systems
  • Electrical equipment
  • Equipment and devices
  • Lighting and signaling
  • Power devices
  • Electrical circuits
Astra H (2004-2009) 
  • General information
  • Introduction to the guide
  • Troubleshooting
  • User manual
  • Maintenance
  • Power unit
  • Engine repair
  • Cooling and heating
  • Power and exhaust system
  • Ignition system
  • Launch and charge system
  • Transmission
  • Mechanical gearbox
  • Automatic gearbox
  • Drive shafts
  • Chassis
  • Brake system
  • Car suspension
  • Steering
  • Body
  • Interior
  • Exterior
  • Electrical equipment
  • Equipment and devices
  • Electrical circuits
Astra G (1998-2004) 
  • General information
  • Introduction to manual
  • User manual
  • Maintenance
  • Power unit
  • SOHC gasoline engines
  • DOHC gasoline engines
  • Diesel engines 1.7 and 2.0
  • Engine repair
  • Cooling system
  • Supply system
  • Injection system (gasoline)
  • Injection system (diesel)
  • Exhaust system
  • Charge and launch system
  • Ignition system (gasoline)
  • Preheat system (diesel)
  • Transmission
  • Manual gearbox
  • Automatic gearbox
  • Clutch
  • Drive shafts
  • Chassis
  • Brake system
  • Wheel suspension
  • Steering
  • Body
  • Exterior
  • Interior
  • Doors and windows
  • Ventilation and heating
  • Electrical equipment
  • Equipment and devices
  • Electrical circuits
Astra G (1998-2004, petrol) 
  • General information
  • User manual
  • Car care
  • Maintenance
  • Power unit
  • Single shaft engines
  • Twin shaft engines
  • Engine repair
  • Cooling and heating
  • Fuel and exhaust systems
  • Starting and charging system
  • Ignition system
  • Transmission
  • Clutch
  • Mechanical gearbox
  • Automatic gearbox
  • Drive shafts
  • Chassis
  • Brake system
  • Car suspension
  • Steering
  • Body
  • Interior
  • Exterior
  • Electrical equipment
  • Equipment and devices
  • Wiring diagrams Opel Astra
  • Wiring diagrams Opel Zafira
Astra F (1991-1998, petrol) 
  • General information
  • Maintenance
  • Power unit
  • Engine in car
  • Engine removed
  • Cooling system
  • Heating and ventilation
  • Fuel supply (carburetor)
  • Fuel supply (injector)
  • Emission control
  • Ignition system
  • Transmission
  • Clutch
  • Mechanical gearbox
  • Automatic gearbox
  • Drive shafts
  • Chassis
  • Brake system
  • Car suspension
  • Steering
  • Body
  • Exterior
  • Interior
  • Electrical equipment
  • Equipment and devices
  • Electrical circuits
OpelBook.ru © 2017–2026 · Mobile version · · Sitemap: EN BG BY UA RS HR RO PL SK HU · Feedback · Site search
Astra F, petrol · Astra G, petrol · Astra G · Astra H · Astra J, petrol · Corsa B · Corsa C, petrol · Corsa C · Insignia A · Kadett D · Kadett E · Omega A · Omega B · Omega B2 · Vectra A, petrol · Vectra A · Vectra B, petrol · Vectra B · Vectra C · Zafira A, petrol · Frontera A, petrol · Frontera B · Ascona C · Vivaro A ·
We want your visit to be comfortable 🤝! We use cookies 🍪 to make that happen.