
OpelBook.ru
Cars AvtoVAZ Cars Mitsubishi Cars BMW Cars Mercedes Cars Nissan Cars Toyota Cars Chevrolet
English Русский
Български
Беларускі
Український
Српски
Hrvatski
Română
Polski
Slovenský
Magyar
 |  Sitemap  |  Contacts  |    


Main Astra Corsa Insignia Kadett Omega Vectra Zafira Others Articles
Vectra A (1988-1995, petrol) Vectra A (1988-1995) Vectra B (1995-2002, petrol) Vectra B (1995-2002) Vectra C (2002-2008)
  • Main
  • Vectra
  • Vectra B
  • Electrical equipment
  • Equipment and devices
  • Filling with water for washing the glass

Filling with water for washing the glass (Opel Vectra B)

            0

Contents: Constant control ⬇ Adjusting the water jet ⬇ Replacing the wiper blade ⬇ Replacing the rubber wiper pad ⬇ Removal the windshield wiper arms ⬇

Constant control


Exhaust gas residue, oil fumes and silicone from varnish care products stubbornly settle on the glass. In warm weather, it is recommended to add cleaning additives to the water for washing the glass; in winter - antifreeze and cleaning agents.
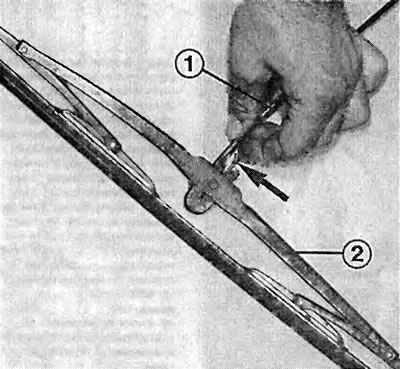
Removing the windshield wiper blade from the lever: squeeze the plastic lever (arrow), press the…

Removing the windshield wiper blade from the lever: squeeze the plastic lever (arrow), press the windshield wiper blade (2) away from the lever (1).
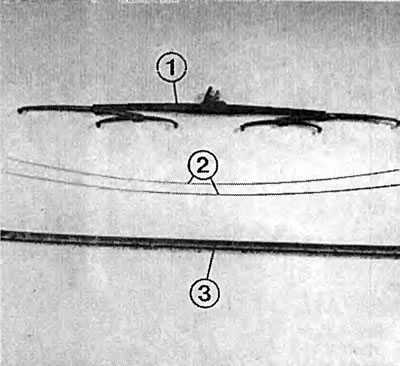

Disassembled windshield wiper blade. The numbers indicate: 1 - metal lever mechanism; 2 - metal…

Disassembled windshield wiper blade. The numbers indicate: 1 - metal lever mechanism; 2 - metal strip; 3 - rubber wiper pad.


Pour the additive first and then the water to ensure the liquids mix well.


To prevent the washer nozzles from freezing in severe frost, use undiluted antifreeze if necessary.

Mixing denatured alcohol with antifreeze can cause flakes to form and therefore clog the nozzles.

Tips: Do not fill up with water from the cans standing ready at petrol stations. It often contains oil or grease residues, which will then end up on your windshield and form an annoying film of grease in the viewing area when it rains.

If the viewing area of the windshield is still slippery despite cleaning additives in the washing water, then the old well-known brass cleaner "Sidol" will help (but not Sidol Spezial) It is applied with a cloth and left to dry before the white dust is wiped off with a clean cloth. This method reliably removes residues of oils, varnish care products and other substances.


Adjusting the water jet


Insert the needle into the sprayer.

The nozzle hole is located in a ball that is rotated by a needle

Rotate the spray nozzle so that the water jets hit slightly below the imaginary center line on the windshield.

Tip: If the spray nozzle often gets clogged, a regular gasoline filter from a parts store will help; it simply plugs into the water pump hose that goes to the spray nozzles.


Replacing the wiper blade


The rubber wiper blades last about one year. After that, you can decide whether to replace the entire wiper blade or, cheaper, just the rubber blade. In either case, the wiper blade must be removed from the arm. Note that the wiper blades on the driver's side and the passenger's side next to the driver are different lengths.


Fold the windshield wiper arm up.

Rotate the wiper blade 90°.

Press the plastic lever down in the middle axis of the wiper blade.

At the same time, pull the wiper blade down and then up off the arm.

When installing, press the wiper blade onto the arm so that the mounting tabs fit into the grooves.

Replacing the rubber wiper pad


Buy a rubber pad according to the sample.

Bend the retaining clip around the rubber pad at the end of the wiper blade.

Remove the old rubber pad and insert the new one into the metal strips inserted on both sides. Make sure that the bend is facing downwards (towards the glass).

Slide the new rubber pad in place and tighten the retaining clip again.
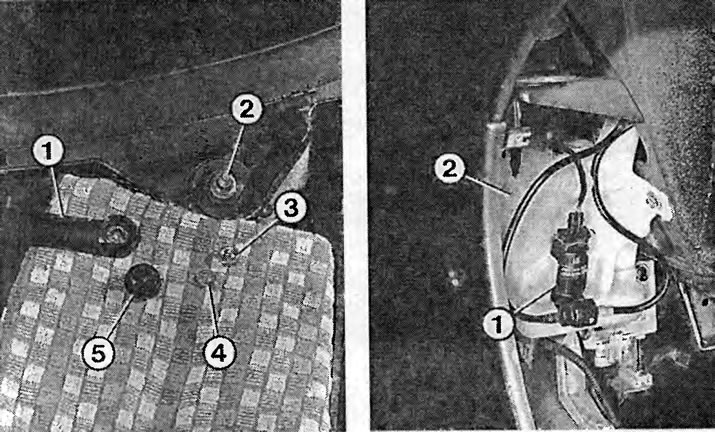
Left:the windshield wiper arm is mounted on a fine-spline shaft. When removing the windshield wiper…

Left:the windshield wiper arm is mounted on a fine-spline shaft. When removing the windshield wiper arm (1), press back the protective cap (5), unscrew the fastening nut (3) located underneath it and remove the washer (4). Very often, the arm is difficult to remove from the windshield wiper shaft (2), because the fine-spline profile rusts and the parts "sinter". In this case, insert screwdrivers wrapped in a rag under the arm on both sides and press it away from the shaft.

Right: on the left in the wheel well there is a tank (2) with washer fluid. The tank contains a water pump (1).


Removal the windshield wiper arms


Open the hood.

The wiper arm shaft is covered with a black protective cap. Use a screwdriver to press the protective cap of the wiper arm shaft. On the rear wiper, use your thumb to press the protective cap and simultaneously fold it up.

Unscrew the hex nut located underneath on the wiper shaft and remove the washer.

Use jerks to remove the lever from the wiper blade teeth.

If this is not possible, place two screwdrivers wrapped in rags under the lever and push it away from the roller.

When installing, screw the windshield wiper arms so that the left wiper blade axis is approximately 30 mm from the top edge of the rubber glass gasket, and the right wiper blade axis is approximately 60 mm.

Screw on the rear window wiper arm with the blade in the vertical position.

Screw the rear wiper arm parallel to the screen printing.


This article is available at russian, bulgarian, belarusian, ukrainian, serbian, croatian, romanian, polish, slovak, hungarian
Checking the article: Shapovalov Yaroslav

Share information:

Previous articles
Opel Vectra B: Equipment and devices
Next articles

Checking windshield wipers and washers
Heated rear window
Cigarette lighter
Relays and control units
Checking switches
Ignition switch
Windscreen wiper motor
Help with malfunctions
Water pump
Rear windshield wiper motor
Headlight washer system
Radio receiver


See similar ones from other Opel car manuals:
▶ Turning on the glass and headlight washing device Opel Corsa C (2000-2006, petrol)
▶ Gearbox Oil — Draining and Filling Opel Astra F (1991-1998, petrol)
▶ Filling tanks Opel Insignia A (2008-2017)
▶ Replacing the water pump Opel Kadett E (1984-1995)
▶ Draining water from the fuel filter — every 5000 km Opel Omega A (1986-1993)
Link to this page in different formats

Visitor comments


No comments yet


How much will 35 + 32 =


Vectra C (2002-2008) 
  • General information
  • User manual
  • Vehicle device
  • Maintenance
  • Troubleshooting
  • Power unit
  • Engine repair
  • Cooling system
  • Power and control system
  • Engine electrics
  • Transmission
  • Clutch
  • Car gearbox
  • Drive shafts
  • Chassis
  • Car suspension
  • Steering
  • Brake system
  • Body
  • Exterior
  • Interior
  • Doors, locks and windows
  • Heating and ventilation
  • Electrical equipment
  • Equipment and devices
  • Headlights and lighting
  • Electrical circuits
Vectra B (1995-2002) 
  • General information
  • User manual
  • Weekly checks
  • Maintenance (gasoline)
  • Maintenance (diesel)
  • Troubleshooting
  • Power unit
  • SOHC gasoline engine
  • DOHC petrol engine
  • Diesel engine 1.7 liter
  • Diesel engine 2.0 liters
  • Engine repair
  • Cooling system
  • Fuel system (gasoline)
  • Fuel system (diesel)
  • Charging system
  • Launch system
  • Ignition and preheat
  • Transmission
  • Clutch
  • Mechanical gearbox
  • Automatic gearbox
  • Drive shafts
  • Chassis
  • Brake system
  • Wheel suspension
  • Steering
  • Body
  • Exterior
  • Interior
  • Doors and windows
  • Heating and ventilation
  • Electrical equipment
  • Equipment and devices
  • Electrical circuits
Vectra B (1995-2002, petrol) 
  • General information
  • Maintenance
  • Help with malfunctions
  • Power unit
  • Engine repair
  • Exhaust system
  • Cooling system
  • Fuel system
  • Multec injection system
  • Four point injection
  • Transmission
  • Clutch
  • Gearbox and drive
  • Chassis
  • Wheel suspension
  • Steering
  • Brake system
  • Wheels and tires
  • Body
  • Exterior
  • Interior
  • Electrical equipment
  • Fuses and electronics
  • Power devices
  • Ignition system
  • Lighting and signaling
  • Equipment and devices
  • Heating and ventilation
  • Electrical circuits
Vectra A (1988-1995) 
  • Power unit
  • Engine repair
  • Ignition system
  • Lubrication system
  • Cooling system
  • Injection system
  • Fuel system (carburetor)
  • Fuel system (diesel)
  • Exhaust system
  • Transmission
  • Clutch
  • Car gearbox
  • Chassis
  • Front suspension
  • Rear suspension
  • Steering
  • Brake system
  • Wheels and tires
  • Body
  • Exterior
  • Interior
  • Electrical equipment
  • Electrical circuits
Vectra A (1988-1995, petrol) 
  • General information
  • User manual
  • Maintenance
  • Power unit
  • SOHC engine
  • DOHC engine
  • Cooling and ventilation
  • Fuel system (carburetor)
  • Fuel system (injector)
  • Exhaust converter
  • Transmission
  • Clutch
  • Mechanical gearbox
  • Automatic gearbox
  • Drive shafts
  • Chassis
  • Brake system
  • Car suspension
  • Steering
  • Body
  • Body elements
  • Electrical equipment
  • Power devices
  • Equipment and devices
  • Electrical circuits
OpelBook.ru © 2017–2026 · Mobile version · · Sitemap: EN BG BY UA RS HR RO PL SK HU · Feedback · Site search
Astra F, petrol · Astra G, petrol · Astra G · Astra H · Astra J, petrol · Corsa B · Corsa C, petrol · Corsa C · Insignia A · Kadett D · Kadett E · Omega A · Omega B · Omega B2 · Vectra A, petrol · Vectra A · Vectra B, petrol · Vectra B · Vectra C · Zafira A, petrol · Frontera A, petrol · Frontera B · Ascona C · Vivaro A ·
We want your visit to be comfortable 🤝! We use cookies 🍪 to make that happen.