
OpelBook.ru
Cars AvtoVAZ Cars Mitsubishi Cars BMW Cars Mercedes Cars Nissan Cars Toyota Cars Chevrolet
English Русский
Български
Беларускі
Український
Српски
Hrvatski
Română
Polski
Slovenský
Magyar
 |  Sitemap  |  Contacts  |    


Main Astra Corsa Insignia Kadett Omega Vectra Zafira Others Articles
Omega A (1986-1993) Omega B (1993-1999) Omega B2 (1999-2003)
  • Main
  • Omega
  • Omega B
  • Power unit
  • Diesel engine 2.5 l
  • Viscous coupling fan / fan clutch

Viscous coupling fan / fan clutch (Opel Omega B)

            0

Contents: Removal ⬇ Installation ⬇
The fan clutch should be replaced if the hub is rusty inside. The fan either stops or rotates very heavily when the engine is stopped. Replace the clutch also if there is axial or radial play. Rotate the fan back and forth to check for play; there should be no noticeable play. There should also be no oil coming out of the hub.

Removal


1. Remove the lower engine compartment shield.
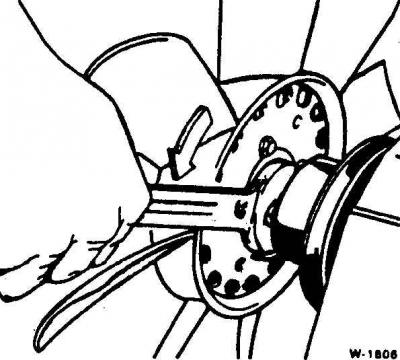
1. Remove the lower engine compartment shield.


2. Unscrew the fan using a 32mm wrench from the coolant pump hub.

Warning! The nut has a left-hand thread, so you need to turn it to the right (clockwise).


Text copied from this portal [OPELBOOK.ru]
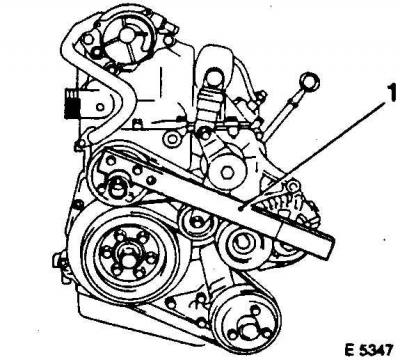
Warning! The nut has a left-hand thread, so you need to turn it to the right (clockwise).


3. When unscrewing the nut, press the V-belt of the pump, thus hooking the hub so that it does not turn. OPEL workshops use a special tool KM-821 (1), which presses the V-belt to the bolt head; the device can also be made independently from tin.


4. After loosening the nut, you can continue to unscrew it by rotating the fan impeller. Make sure that the fan impeller does not fall down.

5. Remove the fan downwards.

Warning! Do not place the fan with viscous coupling in a horizontal position, place it only vertically.


6. If necessary, disconnect the fan impeller and fan coupling, unscrew the 3 mounting bolts.

Installation


1. Install the viscous coupling into the fan and secure it with the mounting bolts with a force of 10 Nm.

Warning! To avoid damaging the coupling threads, do not overtighten the mounting bolts.


2. Screw the fan with the coupling installed to the pump hub with a force of 20 Nm, while holding the hub.

Warning! Do not tilt the nut. The nut has a left-hand thread, screw it in to the left.


3. Install the lower engine compartment shield.


This article is available at russian, bulgarian, belarusian, ukrainian, serbian, croatian, romanian, polish, slovak, hungarian
Checking the article: Fedorova Varvara

Share information:

Previous articles
Opel Omega B: Diesel engine 2.5 l
Next articles

Radiator — removal and installation
Cooling system of a 2.5 liter diesel engine
Oil pan and gasket
Multi-ribbed V-belt
Compression check
Camshaft — removal and installation
Cooling pump — removal and installation
Air blower pipe — removal and installation


See similar ones from other Opel car manuals:
▶ Viscous coupling and radiator fan for 3.2L engine (6VD1-W) Opel Frontera B (1998-2004)
▶ General information about the clutch Opel Astra F (1991-1998, petrol)
▶ Checking the clutch pedal adjustment Opel Corsa B (1993-2000)
▶ Brake and clutch fluids Opel Insignia A (2008-2017)
▶ Clutch Opel Kadett E (1984-1995)
Link to this page in different formats

Visitor comments


No comments yet


How much will 45 + 48 =


Omega B2 (1999-2003) 
  • General information
  • User manual
  • Maintenance
  • Troubleshooting
  • Power unit
  • Petrol 4-cylinder
  • Petrol 6-cylinder
  • Engine overhaul
  • Diesel engines 2.0 l
  • Diesel engines 2.5 l
  • Cooling and heating
  • Injection system (gasoline)
  • Fuel system (diesel)
  • Fuel system
  • Exhaust system
  • Ignition system
  • Transmission
  • Clutch
  • Mechanical gearbox
  • Automatic gearbox
  • Main gear and shafts
  • Chassis
  • Brake system
  • Car suspension
  • Steering
  • Body
  • Body elements
  • Electrical equipment
  • Equipment and devices
  • Electrical circuits
Omega B (1993-1999) 
  • General information
  • User manual
  • Tips for the car owner
  • Maintenance (gasoline)
  • Maintenance (diesel)
  • Power unit
  • Petrol engine SOHC 2.0 l
  • Petrol engine DOHC 2.0 l
  • Petrol engines 2.5 and 3.0 l
  • Repair of gasoline engines
  • Diesel engine 2.0 l
  • Diesel engine repair 2.0 l
  • Diesel engine 2.5 l
  • Cooling and heating
  • Power system (petrol)
  • Emission reduction
  • Fuel system (diesel 2.0 l)
  • Fuel system (diesel 2.5 l)
  • Launch system
  • Ignition system
  • Transmission
  • Clutch
  • Mechanical gearbox
  • Automatic gearbox
  • Drive shafts
  • Chassis
  • Brake system
  • Wheel suspension
  • Steering
  • Body
  • Exterior
  • Interior
  • Doors and windows
  • Electrical equipment
  • Equipment and devices
  • Wiring diagrams (early)
  • Wiring diagrams (late)
Omega A (1986-1993) 
  • General information
  • User manual
  • Maintenance
  • Changes and additions
  • Troubleshooting
  • Power unit
  • Gasoline engines
  • Diesel engines
  • Cooling system
  • Fuel system (gasoline)
  • Fuel system (diesel)
  • Ignition system
  • Transmission
  • Clutch
  • Mechanical gearbox
  • Automatic gearbox
  • Cardan shaft
  • Drive shafts
  • Chassis
  • Brake system
  • Car suspension
  • Steering
  • Body
  • Exterior
  • Interior
  • Electrical equipment
  • Power devices
  • Lighting and appliances
  • Electrical circuits
OpelBook.ru © 2017–2026 · Mobile version · · Sitemap: EN BG BY UA RS HR RO PL SK HU · Feedback · Site search
Astra F, petrol · Astra G, petrol · Astra G · Astra H · Astra J, petrol · Corsa B · Corsa C, petrol · Corsa C · Insignia A · Kadett D · Kadett E · Omega A · Omega B · Omega B2 · Vectra A, petrol · Vectra A · Vectra B, petrol · Vectra B · Vectra C · Zafira A, petrol · Frontera A, petrol · Frontera B · Ascona C · Vivaro A ·
We want your visit to be comfortable 🤝! We use cookies 🍪 to make that happen.