
OpelBook.ru
Cars AvtoVAZ Cars Mitsubishi Cars BMW Cars Mercedes Cars Nissan Cars Toyota Cars Chevrolet
English Русский
Български
Беларускі
Український
Српски
Hrvatski
Română
Polski
Slovenský
Magyar
 |  Sitemap  |  Contacts  |    


Main Astra Corsa Insignia Kadett Omega Vectra Zafira Others Articles
Corsa B (1993-2000) Corsa C (2000-2006, petrol) Corsa C (2000-2006)
  • Main
  • Corsa
  • Corsa C
  • Engines 1.4, 1.6 and 1.8 l
  • Injection system
  • Replacing the fuel tank filler tube

Replacing the fuel tank filler tube (Opel Corsa C)

            0

Contents: Removal ⬇ Installation ⬇

Removal


Removal


Open the hood.

Disconnect the battery.

Disconnect the ground clamp from the ground terminal.

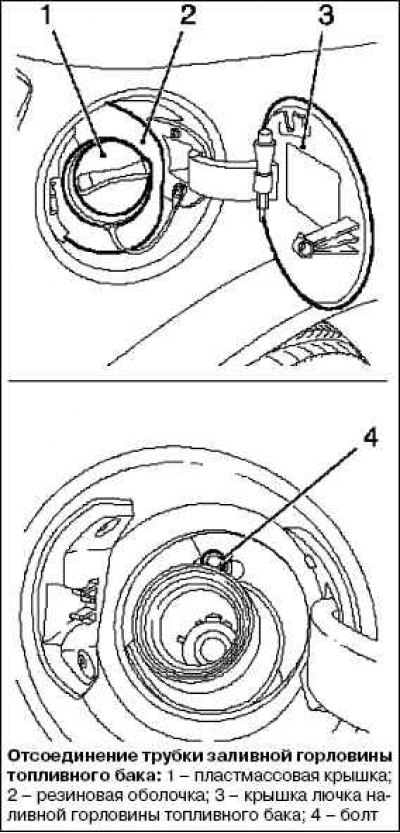
Disconnect the fuel tank filler pipe. To do this, open the fuel tank filler flap (3)

Remove the fuel tank filler cap.

Remove the rubber casing.

Loosen the bolt.

Attach the fuel tank filler cap.

Remove the right rear wheel.

Raise the car halfway.

Remove the right rear wheel.
Remove the right rear wheel.


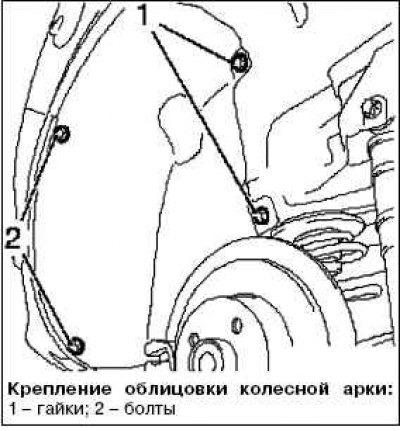
Remove the inner wheel arch lining by unscrewing 2 bolts and two nuts.

Raise the car halfway.

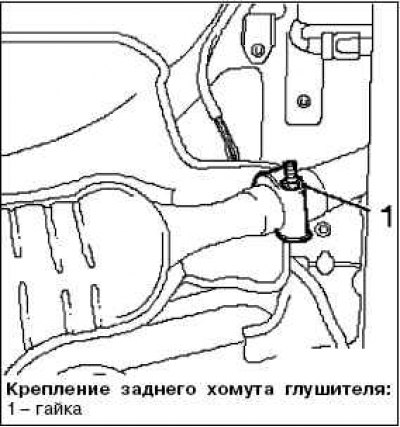
Loosen the rear muffler mounting clamp by unscrewing the mounting nut.
Loosen the rear muffler mounting clamp by unscrewing the mounting nut.


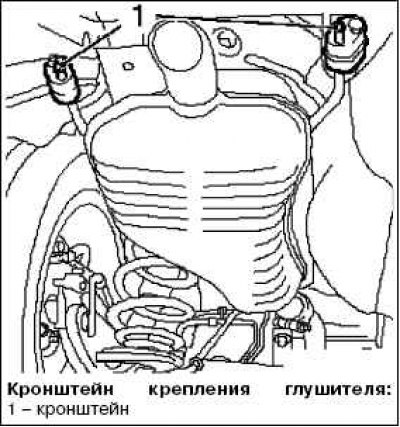
Remove the rear muffler from the bracket in 2 places.


Remove the rear muffler from the bracket in 2 places.


Disconnect the rear muffler from the center muffler.
Disconnect the rear muffler from the center muffler.


(Material copied from this portal: www.opelbook.ru)

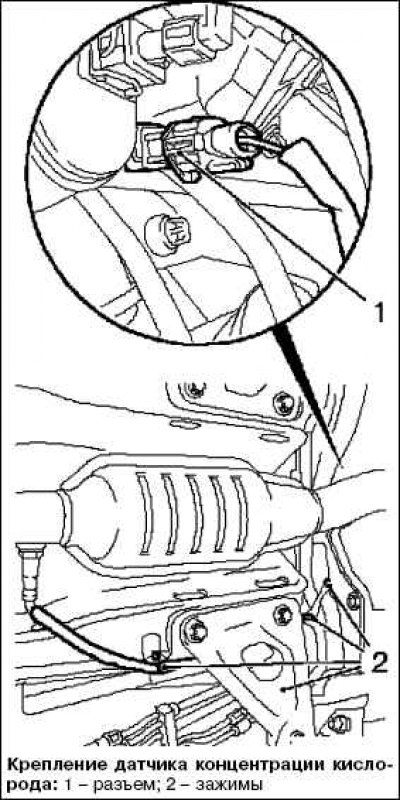
Disconnect the oxygen sensor wiring harness (catalytic converter control).

Disconnect the wiring harness connector and unscrew the 4 clamps.
Disconnect the wiring harness connector and unscrew the 4 clamps.


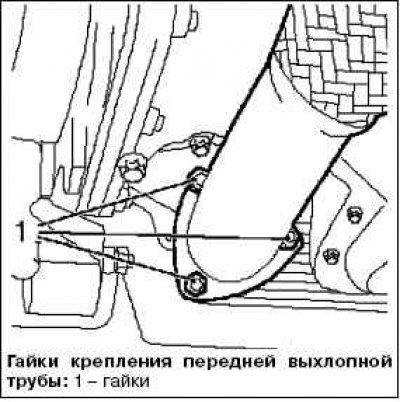
Disconnect the front exhaust pipe with the front muffler from the catalytic converter by unscrewing the 3 mounting nuts.


Remove the front exhaust pipe with the front muffler.

Remove from bracket in 4 places.
Remove from bracket in 4 places.


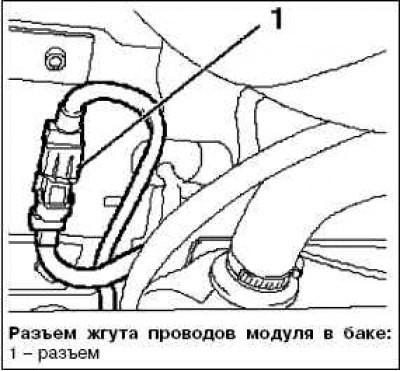
Disconnect the in-tank module wiring harness connector.

Disconnect 2 fuel lines.
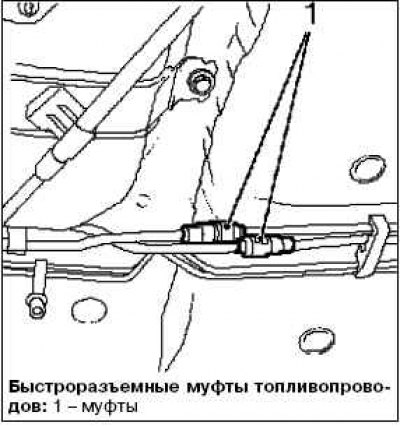
Disconnect 2 fuel lines.


Disconnect the 2 quick release couplings.

Close the ends of the fuel lines using special plugs.
Close the ends of the fuel lines using special plugs.


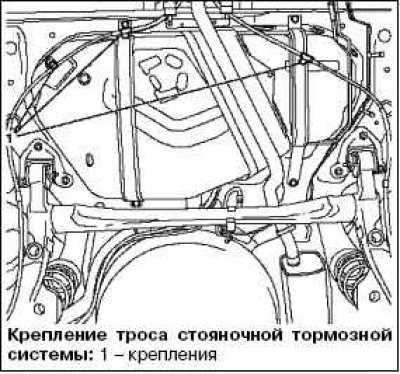
Remove the parking brake cable from the bracket in 3 places.


Remove the parking brake cable from the bracket in 3 places.


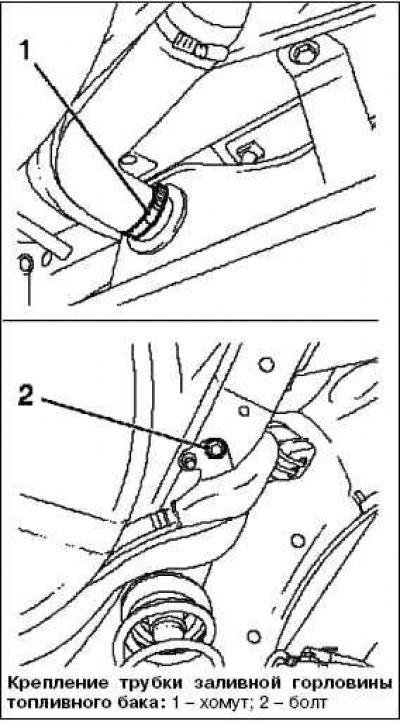
Disconnect the fuel tank filler neck tube. To do this, remove the clamp and unscrew the mounting bolt.
Disconnect the fuel tank filler neck tube. To do this, remove the clamp and unscrew the mounting…


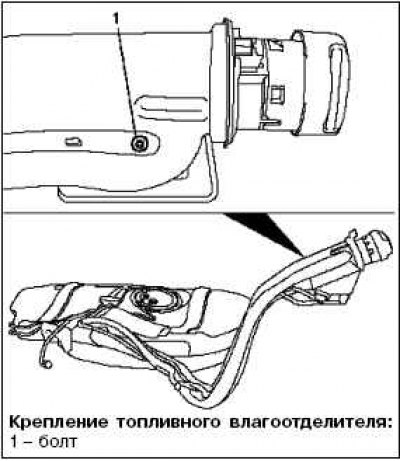
Disconnect the fuel water separator from the fuel tank filler neck tube by unscrewing the mounting bolt.

Remove the jack.

Remove 2 fuel tank mounting clamps, unscrew 4 bolts.
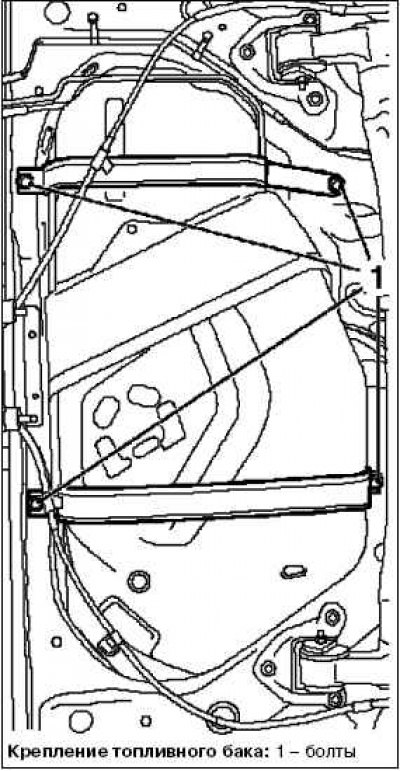
Remove 2 fuel tank mounting clamps, unscrew 4 bolts.


Remove the fuel tank with the fuel tank filler tube.


Note: The fuel tank filler tube must be routed over the rear axle.


Caution: Make sure that the fuel tank fittings are not damaged when disconnecting the hoses.


Leakage from damaged fittings may cause a fire.
Leakage from damaged fittings may cause a fire.


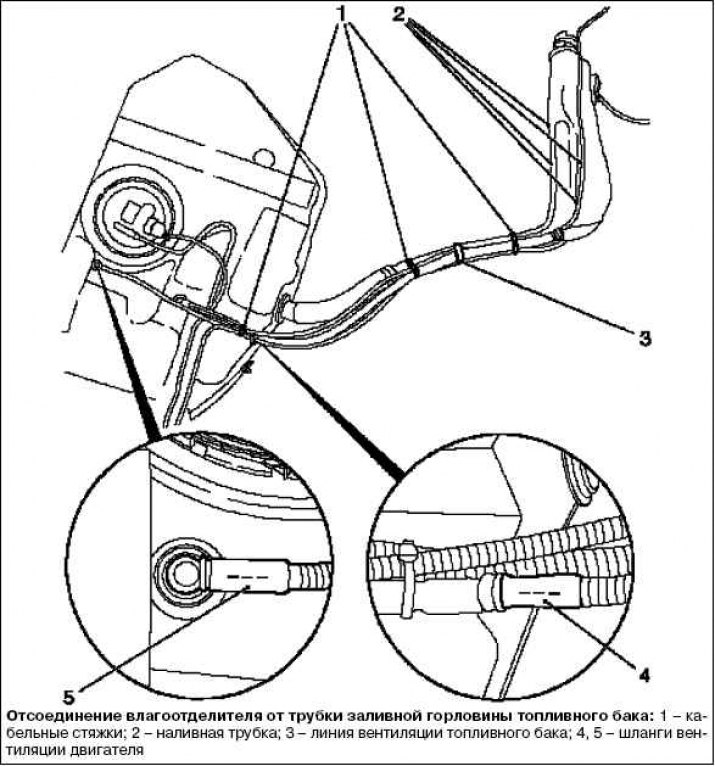
Disconnect the water separator from the fuel tank filler tube.

Disconnect 3 cable ties.

Disconnect 2 ventilation hoses (4) and (5)

Note: Cut along the dotted line with a sharp knife.


Remove the 2 ventilation hoses from the bracket and disconnect them from the filler pipe in 4 places.

Disconnect the fuel supply hose from the fuel tank filler tube.

Loosen the mounting clamp.

Installation


Connect the fuel supply hose to the fuel tank filler tube.

Tighten the clamp to a torque of 3.5 Nm.

Connect the vent tube to the fuel tank filler tube.

Connect the ventilation tube.

Attach the fuel water separator.

Connect 2 ventilation hoses.

Remove the 2 ventilation hoses from the bracket.

Fix to the filler pipe in 4 places.

Install 3 cable ties.

Install the fuel tank with the fuel tank filler tube.

Attach the 2 fuel tank mounting clamps.

Tighten the 4 mounting bolts to 20 Nm.

Raise the jack.

Attach the fuel water separator to the fuel tank filler tube and tighten the mounting bolt.


Attach the fuel tank filler tube, tighten the bolt and secure with a clamp.

Install the parking brake cable into the bracket.

Connect 2 fuel lines.

Connect 2 quick release couplings.

Connect the module wiring harness connector in the tank.

Install the front exhaust pipe with the front muffler.

Connect the front exhaust pipe with the front muffler to the catalytic converter, tighten to 20 N·m.

Install a new gasket.

Tighten the 3 new mounting nuts to 20 Nm.

Connect the oxygen sensor wiring harness connector (catalytic converter control).

Install the rear muffler.

Attach the rear muffler to the front muffler.

Secure the rear muffler and tighten the clamp to 18 Nm.

Lower the car halfway.

Install the rear right wheel arch inner lining.

Install the right rear wheel.

Lower the car halfway.

Tighten the right rear wheel.

Connect the fuel tank filler tube.

Remove the fuel tank filler cap.

Install the rubber shell.

Attach the fuel tank filler cap.

Close the fuel filler cap.

Connect the battery.

Connect the ground clamp to the ground terminal.

Program volatile memory.

Close the hood.


This article is available at russian, bulgarian, belarusian, ukrainian, serbian, croatian, romanian, polish, slovak, hungarian
Checking the article: Kornev Georgy

Share information:

Previous articles
Opel Corsa C: Injection system
Next articles

Fuel tank
Replacing the fuel level sensor — removal and installation
Replacing the fuel return damper housing
Replacing the fuel pressure regulator — removal and installation
Replacing the dosage module — removal and installation
Fuel pump module
Fuel vapor recovery system
Replacing the front ventilation tube
Removal and installation the activated carbon container
Removal and installation the mass air flow sensor
Exhaust system (Z14XEP, Z14XEL, Z16XEP)
Exhaust system (Z18XE)


See similar ones from other Opel car manuals:
▶ Replacing the fuel tank and its filler pipe Opel Astra J (2009-2015, petrol)
▶ Replacing the fuel filler flap Opel Insignia A (2008-2017)
▶ Fuel tank filler pipe — removal and installation Opel Vectra A (1988-1995, petrol)
▶ Fuel tank filler flap Opel Frontera B (1998-2004)
▶ Cleaning and replacing the fuel pump filter Opel Kadett D (1979-1984)
Link to this page in different formats

Visitor comments


No comments yet


How much will 46 + 41 =


Corsa C (2000-2006) 
  • General information
  • Introduction to guide
  • Troubleshooting
  • Vehicle device
  • User manual
  • Maintenance
  • Power unit
  • Engine repair
  • Cooling system
  • Power and exhaust system
  • Control system
  • Engine electrical equipment
  • Transmission
  • Clutch
  • Mechanical gearbox
  • Automatic gearbox
  • Drive shafts
  • Chassis
  • Brake system
  • Wheel suspension
  • Steering
  • Body
  • Exterior
  • Interior
  • Doors and windows
  • Heating and air conditioning
  • Electrical equipment
  • Equipment and devices
  • Lamps and lighting
  • Electrical circuits
Corsa C (2000-2006, petrol) 
  • User manual
  • Car access
  • Governing bodies
  • Seat control
  • Heating and air conditioning
  • Driving and maintenance
  • Engines 1.0 and 1.2 l
  • Engine repair
  • Cooling and lubrication system
  • Injection system
  • Engines 1.4, 1.6 and 1.8 l
  • Engine repair
  • Cooling and lubrication system
  • Injection system
  • Transmission
  • Clutch
  • Mechanical gearbox
  • Automatic gearbox
  • Drive shafts
  • Chassis
  • Wheels and tires
  • Wheel suspension
  • Steering
  • Brake system
  • Body
  • Exterior
  • Doors and windows
  • Electrical equipment
  • Equipment and devices
  • Lighting system
  • Electrical circuits
Corsa B (1993-2000) 
  • General information
  • Introduction to guide
  • User manual
  • Maintenance
  • Power unit
  • SOHC gasoline engines
  • DOHC gasoline engines
  • Diesel engines
  • Engine repair
  • Cooling system
  • Supply system
  • Injection system (gasoline)
  • Injection system (diesel)
  • Exhaust systems
  • Control system (gasoline)
  • Preheat system (diesel)
  • Charge and launch system
  • Transmission
  • Mechanical gearbox
  • Automatic gearbox
  • Clutch and drive shafts
  • Chassis
  • Brake system
  • Front suspension
  • Rear suspension
  • Steering
  • Body
  • Ventilation and heating
  • Exterior
  • Interior
  • Doors and windows
  • Electrical equipment
  • Equipment and devices
  • Lamps and lighting
  • Electrical circuits
OpelBook.ru © 2017–2026 · Mobile version · · Sitemap: EN BG BY UA RS HR RO PL SK HU · Feedback · Site search
Astra F, petrol · Astra G, petrol · Astra G · Astra H · Astra J, petrol · Corsa B · Corsa C, petrol · Corsa C · Insignia A · Kadett D · Kadett E · Omega A · Omega B · Omega B2 · Vectra A, petrol · Vectra A · Vectra B, petrol · Vectra B · Vectra C · Zafira A, petrol · Frontera A, petrol · Frontera B · Ascona C · Vivaro A ·
We want your visit to be comfortable 🤝! We use cookies 🍪 to make that happen.