
Attention: The jack included in the standard equipment of the car is intended only for short-term lifting of the car when changing a wheel! When carrying out any other repair or maintenance work, the vehicle must be raised using the hydraulic (or trolley) jack and be sure to install on special supports wound up under the bearing points of the bottom.
Attention: Never start the engine of a raised car - it is dangerous!
Park the car on a flat, level surface, if possible with a hard surface. Set the steering wheel to neutral position - the front wheels should be turned along the longitudinal axis of the car.
Firmly apply the parking brake Move the selector lever to the «R» (models with AT) /engage reverse/forward gear (models with manual transmission / Easytronic) and stop the engine.
If necessary, set an emergency stop sign and perform other actions provided for by traffic rules.
Remove all passengers from the vehicle and ensure that they do not interfere with traffic or be at risk of injury when changing a wheel.
Chock the wheel diagonally from the wheel to be replaced (see illustration 5).
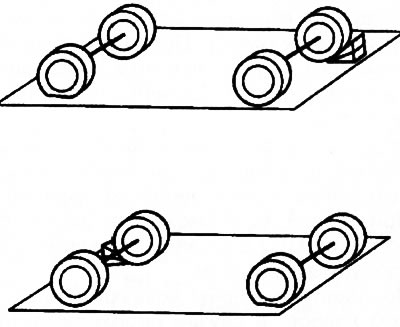
5. The wheel chock is installed under the wheel located diagonally relative to the jacked corner of the car
Attention: Do not perform procedures on slopes, ice and other slippery surfaces, and if you cannot completely remove the car from the roadway, wait for the arrival of traffic service specialists!
Prepare the necessary tool (jack, wheel wrench) and a spare wheel, - a description of the standard storage locations for the corresponding on-board tool and spare wheel is given in Chapter «Controls and methods of operation».
Note: Depending on the equipment, a compact design spare wheel or a repair kit may be supplied instead of a full-size spare wheel (see also Chapter 1, Section 5).
Attention: It is strictly forbidden to change several wheels at the same time!
Using the special hook included in the on-board tool kit or a screwdriver, remove the decorative / protective cap of the disc (if available) (see illustration 6). Note: On some models, the cap is attached to the rim with wheel bolts, which at this stage should only be loosened! On vehicles with alloy wheels, prying with a screwdriver (see illustration 7), remove the wheel bolt caps.
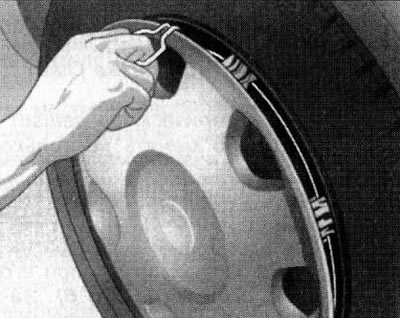
6. Dismantling the decorative cap
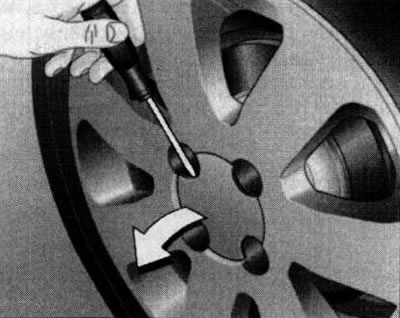
7. Extraction of caps of bolts of fastening of cast disks
Loosen the bolts of the wheel to be replaced by 1 + 2 turns with a wheelbrace.
On some models, the places for installing the jack are covered with decorative covers (see illustration 8), - release them by pulling out the covers.
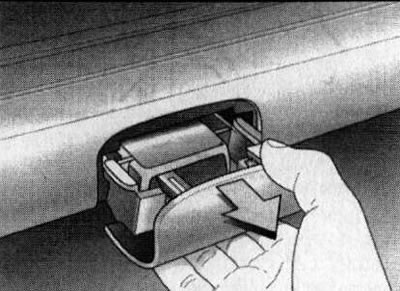
8. On models of the corresponding configuration, pull out the special decorative covers of the jacking places
When performing work, use only a regular jack. Get the head of the jack under the appropriate point under the threshold of the body - make sure that the jack is located strictly vertically (see illustration 9), and his heel rested on the ground with its entire surface. Try to install the jack on a hard surface, if necessary, put some kind of solid gasket under it with a sufficiently developed surface (for example, a piece of board at least 1 cm thick, which is useful to have in a car).
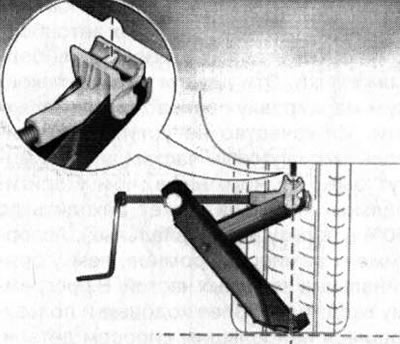
9. Correct installation of the jack
Attention: Remember that regardless of the presence of a slope, the jack must always occupy a strictly vertical position!
Rotate the jack collar until the distance from the ground to the threshold of the car is fully selected, make sure that the jack is in the correct position. Using the handle, hang out the damaged wheel.
Loosen the wheel bolts and replace the wheel. Before installing the spare wheel, clean the mating surfaces. Tighten the bolts alternately.
Lower the jack until the tire touches the ground and fully tighten the wheel bolts in a diagonal pattern. At the first opportunity, tighten the bolts to the service station with a special wrench with the required force
Check the air pressure in the spare tire, correct if necessary (see Chapter 1, Section 5).
Reinstall the alloy wheel cap and bolt caps (with appropriate equipment).
Note: With the appropriate design, the cap is put on before the screws are screwed in.
Do not start the engine until the jack is removed. Put the removed wheel and tool in their original places.
When using a jack, its arms must be set under the same reference points as when installing the jack (see illustration 10). Use suitable wooden or rubber pads to avoid damage to the underbody.
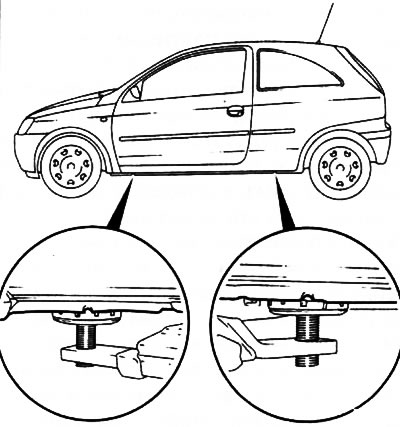
10. Dots (1) lift arm installation
After about 100 km of run, it is necessary to check the tightness of the wheel bolts.
Visitor comments