


Contents: Corsa Models ⬇ Meriva Models ⬇
Corsa Models
1. On AT equipped models, place the selector lever in the "D" position.
2. Pull out the front ashtray tray (and with the appropriate equipment and rear) from the mounting socket (see Section 17), use a plastic wedge if necessary.
3. On models with manual transmission, remove the gearshift lever boot (see Section 37).
4. Engage the parking brake lever, separate its boot from the center console and screw the boot upward.
5. Disconnect the parking brake cable from the lever (see Chapter 9).
6. Remove the front seat heating switch panel (or, if equipped accordingly, a coin holder) from the center console (see Chapter 12).
7. Remove the mounting screws (see accompanying illustration) and remove the center console through the gearshift and parking brake levers.
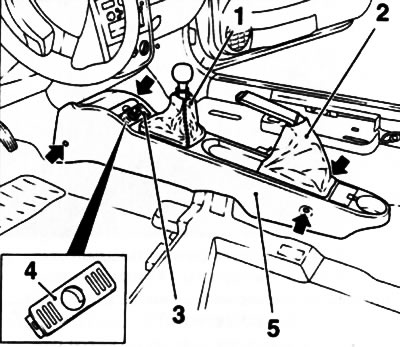
38.7. Screws (indicated by arrows) center console mounts (5) (corsa models): 1. Gear shift lever boot; transmission; 2. Parking brake lever boot; 3. Front seat heating switch panel (with appropriate equipment); 4. Coin holder (with appropriate equipment)
8. Installation is carried out in the reverse order of removal. Do not forget to check the parking brake adjustment (see Chapter 9).
Meriva Models
9. Remove the center console side trim panels from the driver and passenger footwells (see section 39).
Original source on the website OpelBook.ru
10. Remove the gearshift lever boot (see Section 37).
11. Separate the parking brake lever boot from the center console and screw the boot upward.
12. Remove the decorative panel above the storage compartment of the console section of the instrument panel and unscrew the 2 mounting screws (see accompanying illustration). Remove the glove box.
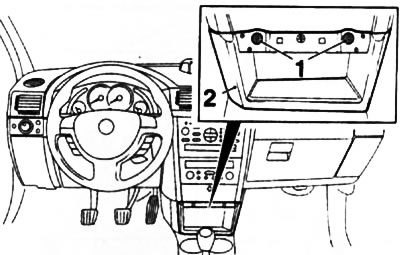
38.12. Screws (1) for fastening the glove box (2) of the console section of the instrument panel (meriva models)
13. If equipped, remove the rear seat infotainment control module located in the rear of the center console (twin Audio system). To do this, press the clamps (arrows A) through the parking brake lever shaft (see accompanying illustration) and pull the module up. Disconnect the module's wiring connector.
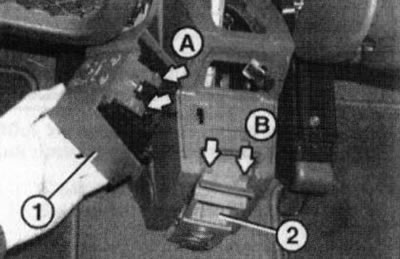
38.13. Removing the Twin Audio system control module (1) from the center console: 2. Rear ashtray mounting housing
14. Remove the rear ashtray from the center console. Press the rear ashtray mounting housing downwards with your hand and release it from the retainers (arrows B) (see illustration 38.13), pull the housing out of the center console and disconnect the cigarette lighter/power take-off socket wiring.
15. Remove the center console storage compartment cover (see accompanying illustration), unscrew the mounting screws and remove the console.
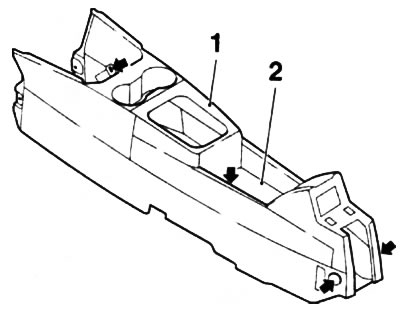
38.15. Screws (indicated by arrows) center console mounts (1): 2. Glove box
Note: You must first remove the decorative caps on the two rear screws.
16. Installation is carried out in the reverse order of removal.
Visitor comments