


2. Check the steering rod ends for play by moving the steering rods. If there is play, the rod ends must be replaced.
3. Remove the corresponding front wheel (see Introduction).
4. Measure the length of the free threaded part of the rod (see accompanying illustration), or count the number of free turns. Remember or write down the measurement result.
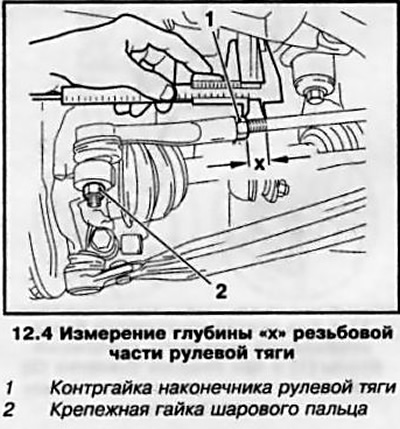
5. Slightly loosen the lock nut on the tie rod end and back it off a quarter turn, holding the end from turning - if necessary, first clean the threads with a wire brush and lubricate them with a special compound to corrode rust.
6. Loosen the nut securing the ball joint to the steering knuckle arm (see illustration 12.4).
7. Using a puller, release the ball joint pin from the steering knuckle (see accompanying illustration).
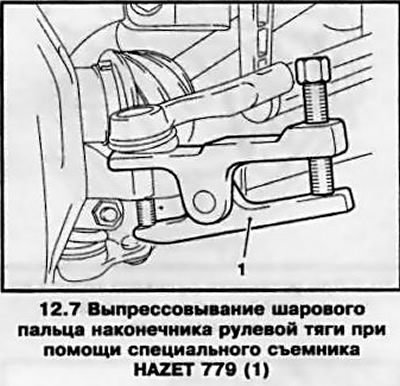
8. Unscrew the tip and remove it from the steering rod. Remember the number of turns for subsequent assembly.
[Material provided by this website: www.opelbook.ru]
9. When installing, screw the tip onto the steering rod by the number of turns counted during dismantling. At the same time, check whether the screwing depth size "x" that was recorded during removal has been preserved, otherwise the wheel alignment angles will be disturbed. Manually tighten the lock nut.
10. Insert the ball pin into the arm on the steering knuckle and tighten the new self-locking fastening nut to the required force in 3 steps - if the pin turns, press it into the conical hole in the arm.
11. Hold the end with an open-end wrench to prevent it from turning and tighten the lock nut to the required torque. Install the wheel, lower the vehicle to the ground and tighten the wheel bolts.
12. At the earliest opportunity, take the vehicle to a specialized service station to check and adjust the front wheel alignment angles.
Visitor comments