
OpelBook.ru
Cars AvtoVAZ Cars Mitsubishi Cars BMW Cars Mercedes Cars Nissan Cars Toyota Cars Chevrolet
English Русский
Български
Беларускі
Український
Српски
Hrvatski
Română
Polski
Slovenský
Magyar
 |  Sitemap  |  Contacts  |    


Main Astra Corsa Insignia Kadett Omega Vectra Zafira Others Articles
Astra F (1991-1998, petrol) Astra G (1998-2004, petrol) Astra G (1998-2004) Astra H (2004-2009) Astra J (2009-2015, petrol)
  • Main
  • Astra
  • Astra G
  • Power unit
  • Starting and charging system
  • Battery — check and charge

Battery — check and charge (Opel Astra G)

            0

Contents: General information and precautions ⬇ Maintenance free batteries ⬇ Charging a maintenance free battery ⬇ Charging a serviceable battery ⬇

General information and precautions


Attention! The engine electrical equipment consists of the battery charging system and the ignition system. Since the operation of these systems is related to the operation of the engine, they are described separately from the body electrical equipment.


The electrical system has an operating voltage of 12 volts.

Maintenance-free or low-maintenance rechargeable battery (hermetically sealed for life) recharged by a generator.

Precautions:When working with an electrical system, you must be especially careful not to damage the semiconductor elements (diodes and transistors) and avoid injury, it is necessary to observe the following rules when working with the electrical system:

Always remove rings, watches, etc. before working on an electrical system. Even after the battery is disconnected, the charge stored in any electrical component may be discharged if you touch the terminals of that component with a metal object. You may receive an electric shock or a nasty burn.

Observe the correct polarity when connecting the battery. Electrical components such as the generator, electronic engine control unit or any other devices containing semiconductor elements may be damaged if connected incorrectly.

When starting the engine using a second battery and jumper cables, connect the batteries plus to plus and minus to minus. The battery charger must be connected in the same way.


Never disconnect battery, alternator or any other wires or devices while the engine is running.

Do not allow the engine to rotate the generator armature when the generator is not connected.

Never test the generator by touching the generator output wire to the vehicle ground.

Do not use an ohmmeter with a mechanical current generator to test the continuity of circuits.

Always disconnect the negative battery cable before working on the electrical system.

Before using electric welding to repair a vehicle, disconnect the battery, alternator and other electrical components such as electronic control units to prevent damage.

The standard radio/stereo has a theft deterrent code system. If the power to the unit is cut off, the anti-theft system is activated. Even if the power is restored immediately, the radio/stereo will not function until the correct secret code is entered. Therefore, if you do not know the correct radio/stereo code, do not disconnect the negative battery cable or remove the radio/stereo from the vehicle. See Section "Radio/Stereo Player Coding System - Precautions" at the beginning of this guide.

1. If the vehicle has a low mileage, it is recommended to check the density of the electrolyte every 3 months and compare it with the table.
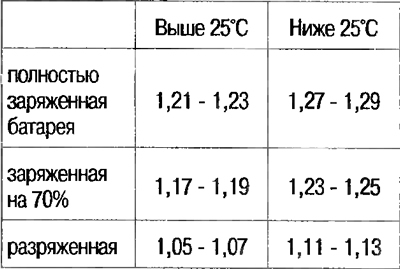
1. If the vehicle has a low mileage, it is recommended to check the density of the electrolyte…


2. If you suspect a battery malfunction, compare the density of the electrolyte in the cells, which should differ by no more than 0.04. Otherwise, the plates are damaged or there is an electrolyte leak.


3. If the density differs within the specified limits and the battery is discharged, it must be charged.

Maintenance free batteries


4. The battery condition is determined by a voltmeter or indicator.

5. The battery status is determined by the color of the built-in indicator (see photo), which depends on the type of battery. As a rule, the green color of the indicator corresponds to the normal state of the battery, black - to the need for charging, yellow or transparent - indicates that the battery is out of order and should be replaced.
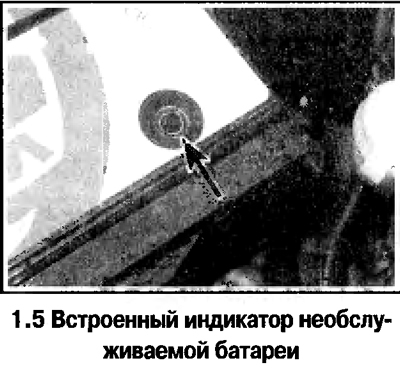
5. The battery status is determined by the color of the built-in indicator (see photo), which…


6. When checking the voltage with a voltmeter, at least 6 hours must pass after the last trip (it is also permissible to turn on the high beam headlights for 30 seconds before checking).

7. The battery is completely discharged if the voltage is below 12.2 V.

8. Remove the discharged battery and charge it.

Charging a maintenance free battery


9. Batteries of this type require a long time to charge (up to three days depending on the level of discharge).

10. A partially discharged battery can be charged with a stabilized source with a voltage of 13.9-14.9 V, usually within 3 hours to a voltage of 12.5 V.


11. A completely discharged battery (with voltage below 12.2 V) it is recommended to charge in a specialized workshop, since constant monitoring is required during the long-term charging process.

Charging a serviceable battery


12. The battery is charged with a current equal to 0.1 of the capacity until the density of the electrolyte stops changing for at least 4 hours.

13. The battery can also be charged with a low current of 1.5 A, leaving it overnight.

14. Forced charging of the battery is highly discouraged.

15. The temperature of the electrolyte during charging should not be higher than 37.8°C.


This article is available at russian, bulgarian, belarusian, ukrainian, serbian, croatian, romanian, polish, slovak, hungarian
Checking the article: Kornev Georgy

Share information:

Previous articles
Opel Astra G: Starting and charging system
Next articles

Technical data
Battery — Removal and Installation
Charging system — check
Generator Drive Belt — Removal, Tension Adjustment and Installation
Generator Drive Belt Tensioner — Removal and Installation
Generator — removal and installation
Generator — brush replacement


See similar ones from other Opel car manuals:
▶ Battery charge indicator light Opel Vectra B (1995-2002, petrol)
▶ Removal, condition check and installation of the camshaft… Opel Corsa B (1993-2000)
▶ Vehicle check Opel Insignia A (2008-2017)
▶ Rechargeable battery Opel Kadett E (1984-1995)
▶ Check coolant level — every 400 km Opel Omega A (1986-1993)
Link to this page in different formats

Visitor comments


No comments yet


How much will 42 + 22 =


Astra J (2009-2015, petrol) 
  • General information
  • Vehicle device
  • User manual
  • Faults en route
  • Maintenance
  • Power unit
  • Engine repair
  • Cooling and lubrication system
  • Engine power system
  • Exhaust system
  • Transmission
  • Clutch
  • Car gearbox
  • Drive shafts
  • Chassis
  • Front suspension
  • Rear suspension
  • Steering
  • Brake system
  • Wheels and tires
  • Body
  • Exterior
  • Interior
  • Doors and windows
  • Body Care
  • Heating and air conditioning
  • Security systems
  • Electrical equipment
  • Equipment and devices
  • Lighting and signaling
  • Power devices
  • Electrical circuits
Astra H (2004-2009) 
  • General information
  • Introduction to the guide
  • Troubleshooting
  • User manual
  • Maintenance
  • Power unit
  • Engine repair
  • Cooling and heating
  • Power and exhaust system
  • Ignition system
  • Launch and charge system
  • Transmission
  • Mechanical gearbox
  • Automatic gearbox
  • Drive shafts
  • Chassis
  • Brake system
  • Car suspension
  • Steering
  • Body
  • Interior
  • Exterior
  • Electrical equipment
  • Equipment and devices
  • Electrical circuits
Astra G (1998-2004) 
  • General information
  • Introduction to manual
  • User manual
  • Maintenance
  • Power unit
  • SOHC gasoline engines
  • DOHC gasoline engines
  • Diesel engines 1.7 and 2.0
  • Engine repair
  • Cooling system
  • Supply system
  • Injection system (gasoline)
  • Injection system (diesel)
  • Exhaust system
  • Charge and launch system
  • Ignition system (gasoline)
  • Preheat system (diesel)
  • Transmission
  • Manual gearbox
  • Automatic gearbox
  • Clutch
  • Drive shafts
  • Chassis
  • Brake system
  • Wheel suspension
  • Steering
  • Body
  • Exterior
  • Interior
  • Doors and windows
  • Ventilation and heating
  • Electrical equipment
  • Equipment and devices
  • Electrical circuits
Astra G (1998-2004, petrol) 
  • General information
  • User manual
  • Car care
  • Maintenance
  • Power unit
  • Single shaft engines
  • Twin shaft engines
  • Engine repair
  • Cooling and heating
  • Fuel and exhaust systems
  • Starting and charging system
  • Ignition system
  • Transmission
  • Clutch
  • Mechanical gearbox
  • Automatic gearbox
  • Drive shafts
  • Chassis
  • Brake system
  • Car suspension
  • Steering
  • Body
  • Interior
  • Exterior
  • Electrical equipment
  • Equipment and devices
  • Wiring diagrams Opel Astra
  • Wiring diagrams Opel Zafira
Astra F (1991-1998, petrol) 
  • General information
  • Maintenance
  • Power unit
  • Engine in car
  • Engine removed
  • Cooling system
  • Heating and ventilation
  • Fuel supply (carburetor)
  • Fuel supply (injector)
  • Emission control
  • Ignition system
  • Transmission
  • Clutch
  • Mechanical gearbox
  • Automatic gearbox
  • Drive shafts
  • Chassis
  • Brake system
  • Car suspension
  • Steering
  • Body
  • Exterior
  • Interior
  • Electrical equipment
  • Equipment and devices
  • Electrical circuits
OpelBook.ru © 2017–2026 · Mobile version · · Sitemap: EN BG BY UA RS HR RO PL SK HU · Feedback · Site search
Astra F, petrol · Astra G, petrol · Astra G · Astra H · Astra J, petrol · Corsa B · Corsa C, petrol · Corsa C · Insignia A · Kadett D · Kadett E · Omega A · Omega B · Omega B2 · Vectra A, petrol · Vectra A · Vectra B, petrol · Vectra B · Vectra C · Zafira A, petrol · Frontera A, petrol · Frontera B · Ascona C · Vivaro A ·
We want your visit to be comfortable 🤝! We use cookies 🍪 to make that happen.